Category: Cake

This is the Cake

September 19, 2010

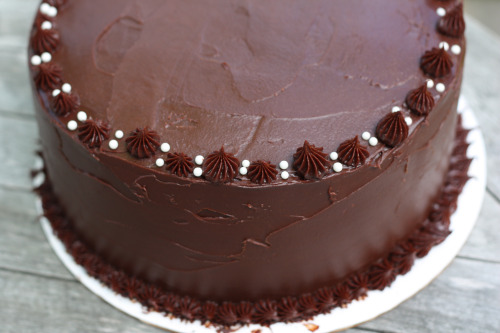
This is the cake that first made me afraid to make layer cakes.  This is the cake that showed me, in my early baking days, that something can turn out ugly and still taste delicious.  This is the cake that taught me the meaning and importance of a crumb coat.  This is the cake where I learned you can alter directions in a recipe and not get struck by lightning.

This is also the chocolate cake that has been written about by approximately 1 million food bloggers.  It is the cake that, at current count, has 1390 reviews and a four fork rating on Epicurious.

This is the cake I decided to make when our friend Tim invited us to his birthday party and requested a chocolate cake, the richer the better.  It was not an easy decision.  Between my cookbooks and notebooks with magazine cut-outs, I probably have a hundred chocolate cake recipes.  I have my favorites.  There are a few that I made long ago and want to try again (Mocha Ricotta Torte).  There are some that I have never made because they scare me a bit (Chocolate Viennese Cake).  But all of those cakes involved something fancy and not-chocolate component.  The message I got from Tim was that he wanted pure chocolate.

Normally in that case, I would make some kind of flourless chocolate torte.  If just he and his partner were coming for dinner, I would have made this amazing cake called La Bete Noire (black beast).  It is about as rich as they come.  But this was a larger party and called for a larger cake, something with icing and layers, and could be used as a vehicle for candles and a round of “Happy Birthday” (except I forgot the candles).  I looked around a little, knowing all the while I would come back to this cake.

I did hesitate a bit.  The original recipe tells you to make two 10-inch cakes.  If you have successfully made this cake following those directions, can you tell me how you maneuvered said cakes into place?  They are super moist and quite crumbly and I found trying to get them off cooling racks and onto cardboard rounds and stacking them one on top of the other resulted in broken cakes (hence the ugly but delicious).  Somewhere along the way in my baking career, I decided to bake the cakes in three 9-inch pans rather than the 10’s and that works a lot better (hence the learning to alter directions).  It also results in a taller more impressive looking cake.

Now.  After all that, all the times I have made it and tried to love it (the header in the recipe says the cake made the Gourmet editors swoon for pete’s sake), I am done with this cake.  There are cake people and there are frosting people and there, of course, are both.  I am a cake person.  I can take or leave frosting.  If the cake part is nothing special, I don’t care how beautiful the finished product is or how many pounds of chocolate there are in the frosting.  This cake part of this cake is not for me.  It is very moist but it is also too airy for my taste – too many crumbs (hence the necessity for a crumb coat).  I like something denser.  This cake has no butter in it – the fat comes from oil and buttermilk and I guess that just doesn’t do it for me.

But.  It’s a classic.  It is an easy cake.  It can be made in advance.  And it looks pretty darn good too, don’t you think?  The birthday boy was happy and that is the most important thing after all.

One Year Ago: Nutella Pound Cake (the most searched for recipe on my site)
Two Years Ago: Rosemary Aioli

Double Chocolate Layer Cake
Adapted from Gourmet
Serves about 16

When it is time to frost the cake, I find it is best to do the crumb coat while the frosting is a bit runnier than you want.  In the time that the crumb coat sets in the refrigerator, the rest of the frosting will come to the right consistency.

For Cake Layers
3 oz. fine-quality semisweet chocolate
1½ cups hot brewed coffee
3 cups sugar
2½ cups flour
1½ cups unsweetened cocoa (not Dutch process)
2 tsp. baking soda
¾ tsp. baking powder
1¼ tsp. salt
3 large eggs
¾ cup vegetable oil
1½ cups well-shaken buttermilk
1 tsp. vanilla

For Ganache Frosting
1 pound fine-quality semisweet chocolate
1 cup heavy cream
2 tbsp. sugar
2 tbsp. light corn syrup
½ stick (¼ cup) unsalted butter

Make Cake Layers
Preheat oven to 300ºF.  Grease three 9-inch cake pans.  Line bottoms with parchment paper rounds.

Finely chop chocolate and combine in a bowl with the hot coffee.  Let mixture stand, stirring occasionally, until chocolate is melted and mixture is smooth.

Into a large bowl, sift together sugar, flour, cocoa powder, baking soda, baking powder, and salt.  In another large bowl, with an electric mixer, beat eggs until thickened slightly and lemon colored (about 3 minutes with a standing mixer and 5 minutes by hand).  Slowly add oil, buttermilk, vanilla, and melted chocolate mixture to eggs, beating to combine well.  Add sugar mixture and beat on medium speed until just combined well.  Divide batter between pans and bake in middle of oven until a tester inserted in center comes out clean, about 45 minutes.

Cool layers completely in pans on a rack.  Run a thin knife around edges of pans and invert layers onto racks.  Carefully remove the parchment paper and cool layers completely.  (Can be made one day ahead.  Wrap well in plastic wrap and leave at room temperature.)

Make Frosting
Finely chop chocolate.  In a 2 quart saucepan, bring cream, sugar, and corn syrup to a boil over moderately low heat, whisking until sugar is dissolved.  Remove pan from heat and add chocolate, whisking until chocolate is melted. Cut butter into pieces and add to frosting, whisking until smooth.

Transfer frosting to a bowl and cool, stirring occasionally, until spreadable (depending on chocolate used, it may be necessary to chill frosting to spreadable consistency.)  Spread about ½-cup of frosting between cake layers.  Apply a very thin layer of frosting to top and sides of cake.  Refrigerate for 30 minutes.  Spread rest of frosting over cake.  (Cake keeps, covered and chilled, 3 days.  Bring to room temperature before serving.)


Vanilla Cake with Strawberry Cream Frosting

August 31, 2010

Friends, I am coming off a most exciting, fun, and food filled weekend.  I was lucky enough to participate in the IFBC (International Food Blogger’s Conference) here in Seattle.  I found some of the content helpful, some of it inspiring, some of it not relevant to what I do, and some of it simply boring.  Pretty standard for a conference, right?  For me, the real value and the tremendous fun came in hanging out with some really wonderful people eating, drinking, laughing, and talking with one another.  In addition to hanging out with old friends, I got to make some new ones  including Megan from A Sweet Spoonful and Sarah from Lettuce Eat Kale.  I am excited to know two more lovely women in the Bay area!  And I finally finally got to meet Peabody.

I kicked Randy and the boys out strongly suggested Randy take the boys up to Lopez so that I could invite some women to stay with me and he graciously accepted my suggestion.  That freed up some beds in our house so that Cheryl, Tracy, Denise, Joy, and Kristina could stay at Hotel Dana Treat.  I was so thrilled to be able to not only share our house with them, but also meals at some of the best restaurants Seattle has to offer.  We had sandwiches and incredible views at Matt’s in the Market, perfectly proportioned toppings on perfectly charred pizza crusts at Delancey, and an unbelievable, no-holds-barred tasting menu at the new hot spot Staple and Fancy.

I baked some treats for my fellow food bloggers (including these cookies) – of course I did – but alas, this strawberry cake was not for them.  I actually baked this cake to bring to a Sunday night dinner with friends.  Normally, I make something much more simple for a casual dinner – especially on a Sunday.  But John and Lauren’s son Jaden is a dessert lover of the highest order and I feel it is my duty to keep sophisticating his dessert palate.  Also, Randy and I had just celebrated our 8th anniversary and Randy loves strawberries.  I don’t think I gave strawberries their due this summer so I made this cake for him too.

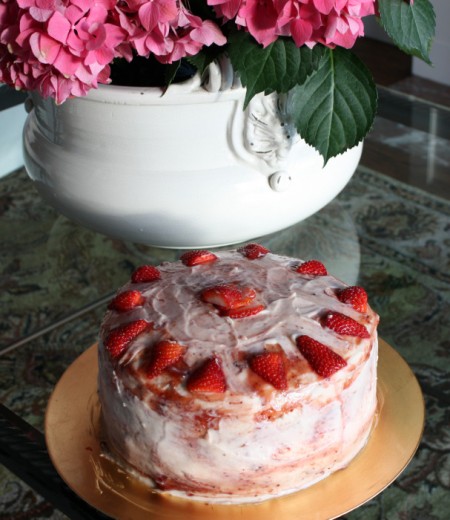
As I mention on a semi-regular basis, layer cakes and I are not the best of friends.  In general, they would not be invited to my birthday party (as my 3 year old is fond of saying).  I would make an exception for this cake because it was very well-behaved.  It is still a layer cake, meaning that the cakes need to be baked, split, and filled.  Frosting needs to be made and the whole thing needs to be assembled without looking like the leaning tower of Pisa.  But the filling is nothing more than jam and fresh strawberries and the frosting is made from cream cheese and butter (no multi-step buttercream here), and really the whole thing was just a joy to make.  And to eat.

One Year Ago: Mixed Berry Spoon Cake

Vanilla Cake with Strawberry Cream Frosting
Bon Appétit
12 servings

Whenever I make a cake like this one, I always make the cake part days ahead and freeze them once they are cool.  I allow them to thaw out overnight before proceeding with the recipe.

Frosting
2 8-ounce packages cream cheese, room temperature
1 cup (2 sticks) unsalted butter, room temperature
4 cups powdered sugar
½ cup seedless strawberry jam
¾ cup heavy whipping cream

Cake
3 cups cake flour
¾ tsp. salt
½ tsp. baking powder
½ tsp. baking soda
3 cups sugar
1 cup (2 sticks) unsalted butter, room temperature
7 large eggs
2 tbsp. vanilla extract
1 cup sour cream
6 tbsp. plus 1/3 cup seedless strawberry jam
2 pounds strawberries, hulled, sliced, divided

Frosting
Using electric mixer, beat cream cheese and butter in large bowl until smooth, stopping to scrape down sides of bowl.  Beat in sugar, then jam.  Beat cream in medium bowl until peaks for.  Fold whipped cream into frosting.  Cover; chill until firm enough to spread, about 2 hours.

Cake
Preheat oven to 325ºF.  Butter and flour two 9-inch cake pans with 2-inch high sides.  Sift flour, salt, baking powder, and baking soda into medium bowl.  Using electric mixer, beat sugar and butter in large bowl until fluffy.  Add eggs 1 at a time beating to blend after each addition.  Beat in vanilla.  Add sour cream; beat 30 seconds.  Add flour mixture in 3 additions, beating to blend after each addition.  Divide batter between prepared pans.

Bake cakes until tester inserted into center comes out clean, about 50 minutes.  Cool in pans on rack 10 minutes.  Run small sharp knife around pan sides, then turn out cakes onto racks and cool completely.

Using large serrated knife, cut each cake horizontally in half.  Place 1 cake half, cut side up, on cake plate.  Spread 2 tablespoons strawberry jam, then ¾ cup frosting.  Top with ¾ cup sliced berries, arranging in a single layer.  Repeat 2 more times with cake layer, jam, frosting, and berries.  Top with remaining cake layer, cut side down.  Spread 2 cups frosting over top and sides of cake in thin layer to coat completely.  Spread remaining frosting over top and sides of cake.  Stir remaining 1/3 cup jam to loosen.  Spoon teaspoonfuls onto top and sides of cake, then use back of spoon to swirl jam decoratively into frosting.

(Do ahead:  Can be made 8 hours ahead.  Cover with cake dome and refrigerate.)  Serve cake slices with remaining sliced strawberries alongside.


Incredible Honey

August 9, 2010

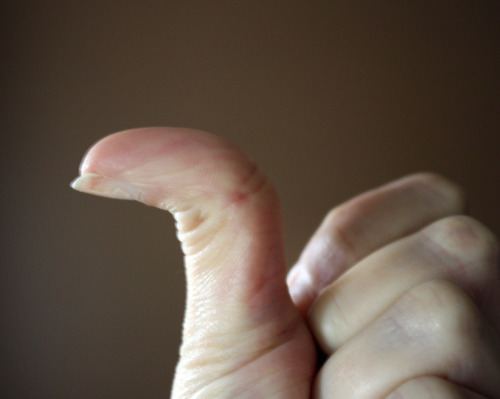
After writing this blog for over two years, I’m surprised by how many things you all don’t know about me.  Of course there are plenty of things you don’t know about me the person – Dana.  As opposed to me the cook – Dana Treat.  For example, even if you have met me, you probably don’t know that I have a hitchhiker’s thumb on my left hand but not on my right.  Like my thumb bends all the way back.  I kill at thumb wrestling.

So maybe it is not surprising that I haven’t shared more fascinating things like hitchhiker’s thumbs on my food blog.  But it is a little surprising that I still have some culinary things I haven’t shared.  Like the fact that I love honey.  Did you know that?  I love honey.  It is one of my very favorite things in the whole world.  I use it in marinades and in salad dressings and I stir it into Greek yogurt for breakfast.  I have been known to sneak spoonfuls of it when I am craving something sweet.

Living in a city where there are loads of farmers’ markets, it is easy for me to buy good honey.  Over the years, I have tasted some wonderful honey from Washington bees.  So when the good people at Mohawk Valley Trading Company offered to send some of theirs to try, I hesitated.  But the truth is, I was low on honey and the stuff isn’t cheap so I so I replied yes to their offer.

Not a week later, I got a box with four different jars of the most beautiful tawny-colored honey.  Not only is it beautiful, the flavor is so different than any honey I have tasted.  It is thicker, richer and more floral than anything I have ever used.  It seems a shame to put it in things where the amazing flavor gets masked by other ingredients.  I wanted to make something that would take advantage of the unique flavor and texture of this special honey.  (And yes, honey can have texture.  You know how you put a spoon in a jar and the honey almost immediately runs off?  This stuff really coats your spoon.  You have to coax it off.)

These mini bundt cakes were one of the first things I noticed in the first Ottolenghi cookbook.  I had seen a display of the adorable cakes in the window of the restaurant while in London in June.  Is there anything more tempting than a little cake sized perfectly for one?  For some reason I would totally buy one of these but not a slice of a large cake.  Anyway.  In the recipe, Ottolenghi mentions that the pans are not easy to find in England but we Americans can find them more easily.  (See?  Americans don’t like everything super-sized.)  I found mine in a local kitchen shop and I would imagine they can be tracked down online.

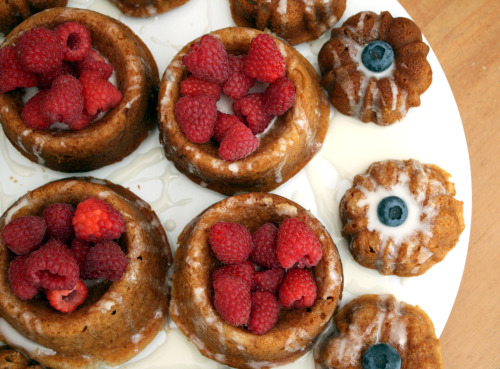
I was a little stumped as to how best to make these.  I needed about 20 of them and there are only 12 cakes in the molds.  I didn’t want to bake a whole batch, allow the molds to cool, and then bake another batch.  I have another larger mini-bundt pan mold so I doubled the recipe and just hoped for the best.  I ended up getting all my mini-bundts, a whole tray of mini-muffin size cakes and a small loaf cake.  The bundts got eaten at the party, the boys snacked on my mini-muffins, and the loaf cake is in the freezer.

I don’t know if I have ever written a paragraph quite as boring as that one.  What I am trying to tell you is that if you make the recipe as written below, I have no idea of how many cakes you will end up with.  Just get out all your fun sized pans and go for it.  Whatever you end up with will be the most delicately flavored but substantially textured cake.  If you leave it plain, it is perfect for an afternoon tea or even for breakfast.  Or you can dress it up with a drizzle of glaze and some lovely berries and call it dessert.

And speaking of dessert, my blog duty at Amazon Fresh has started back up again.  This week I posted a recipe for a very delicious and very easy cheesecake ice cream.  You can read it here.

Honey and Lavender previously on Dana Treat: Lavender-Honey Ice Cream
One Year Ago: Cheese Balls Three Ways
Two Years Ago: Olive and Jarlsberg Sandwich

Lavender and Honey Tea Cakes
Adapted from Ottolenghi, The Cookbook
Makes ??

8 ounces unsalted butter, room temperature
4 ounces sugar
4 ounces best quality honey
3 large eggs
8 2/3 ounces flour
1 tsp. baking powder
½ tsp. baking soda
½ tsp. salt
½ tsp. ground cinnamon
½ tsp. dried lavender, chopped
½ cup sour cream

Glaze
1 tbsp. fresh lemon juice
2 tsp. honey
3½ oz. powdered sugar

Berries for garnish, optional

Preheat the oven to 340ºF.  Grease your pans with butter.

Cream the butter, sugar, and honey together until pale and fluffy, preferably using an electric mixer.  Break the eggs into a cup, beat them lightly with a fork and gradually add to the creamed mixture, beating well until each little addition has been fully incorporated.  Sift together the flour, baking powder, baking soda, salt and cinnamon, then stir in the dried lavender.  Gently fold the flour mixture into the creamed mix in 3 additions, alternating with the sour cream.

Carefully fill your molds or pans.  If you are using molds, only the fill them to within a ½-inch of the top.  Place in the oven and bake for about 25-30 minutes, depending on what size pan or molds you are using.  You will want a skewerer inserted into the center of the cake to come out clean.  Remove them from the oven and leave them for 10 minutes, then turn out onto a rack to cool completely.

To make the glaze, mix the lemon juice and honey together in a small bowl, then whisk in enough powdered sugar to make a thick pourable glaze.  Use a pastry brush or a spoon to coat the top of the cakes, allowing the icing to drip down the sides.  Garnish with berries, if desired.

(DT: Even though I was careful about not overfilling my pans, I still got a rounded bottom on my small cakes.  I just sliced off a thin bit so they would stand up straight.)


There It Stayed

July 14, 2010

On July 5th, I went to a workshop with the incredibly lovely and talented Aran of Cannelle et Vanille.  Have you seen this woman’s photos?  I mean, come on.  She is in a league unto herself (along with Helène of course).  The workshop was less about photography and more about food styling.  While Aran is a terrific food photographer, her real passion lies in how the food looks in the photo.  She has an amazing eye and a clear picture in her mind of how she wants things arranged just so.  She has amassed a collection of linens, plates, silver and other props to make her already beautiful food look spectacular.

I learned a lot from our few hours together.  Here were the two big takeaways for me specifically.  I am not, nor will I ever be, a food stylist.  I make food that I want to eat and then take pictures of it, usually moments before I eat it.  Yes there are things I could do to make it look better, but usually I have impatient dinner guests who are waiting to dig in while I get my shot.  Even if that was not the case, I don’t have the artistic eye that some of those incredibly talented people do.  And (big takeaway #2) I really need to learn how to use my camera.  Aran made some reference to her old photos and how she (shudder) had her camera on auto-everything.  I have my camera on auto-everything.  I know the terms aperture, shutter speed, and depth of field, but I don’t exactly know what they mean.  Someone in the workshop suggested a book for me and I ordered it as soon as I got home.

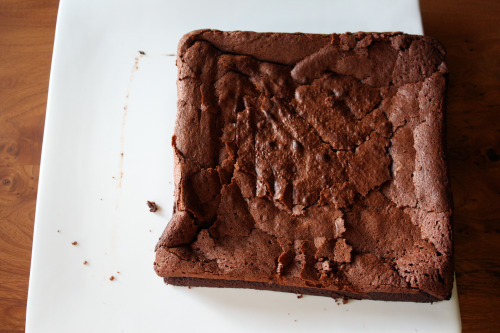
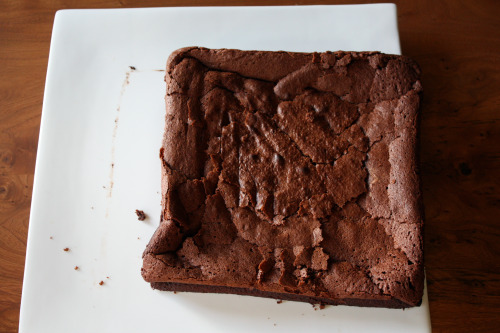
Aran gave us some general pointers and then demonstrated them with example after example of her gorgeous photos.  One of her “rules” that stood out is to make the food look organic.  “Like it just fell there.”  I believe those were the exact words and I know there were quotation marks around them.  I’m pretty sure the above photo was not what she meant.

Yes, this cake did more or less just fall there.  I turned it out of its pan onto my lovely white square platter and it did a bit of a skid.  Then it decided it was too fragile to be moved into the center of the platter without shattering into a million cake pieces.  So there it stayed.

So let’s talk about this cake.  If I say “flourless chocolate cake”, do you think one of those gooey centered things that are just about everywhere on restaurant menus?  When those things are good, they are pretty awesome.  Not so good and not so much.  This cake is actually not much like that at all.  It is indeed flourless but there is nothing gooey about it.  It’s just light but not too airy and tastes purely of chocolate.  While I like my chocolate a bit denser, I really liked this as an option – especially after a particularly heavy meal.  Lebovitz says this tastes best the day it is made but I froze half of it, thawed it wrapped at room temperature, and it suffered no loss of texture or taste.

One Year Ago: Roasted Tomato and Olive Galette with Fontina
Two Years Ago: Orzo with Broccoli, Feta, and Olives

Chocolate Pavé
Ready for Dessert
Makes one 9-inch square cake

In the original recipe, Lebovitz says to decorate the cake by sifting powdered sugar over it and then drizzling melted chocolate over that.  Yum.  But I knew I was going to try the freezing thing and powdered sugar starts to melt into cakes and look slimy after an hour or so.  Trust me. So I skipped that step.

Cocoa powder, for preparing the pan
1 cup salted or unsalted butter, cut into pieces
4 oz. bittersweet or semisweet chocolate, chopped
4 oz. unsweetened chocolate, chopped
6 large eggs, separated, at room temperature
½ cup plus ½ cup granulated sugar
Pinch of salt

Preheat the oven to 350ºF.  Butter the bottom and sides of a 9-inch square cake pan, dust it with a bit of cocoa powder, then tap out any excess.  Line the bottom of the pan with parchment paper.

In a large heatproof bowl, combine the butter and both chocolates.  Set the bowl over a pan of simmering water, stirring occasionally until the mixture is melted and smooth.  Remove the bowl from the heat.

In a stand mixer fitted with the whip attachment, whisk together the egg yolks and ½ cup of granulated sugar on high speed until the mixture leaves a defined ribbon on the surface when you lift the beater, about 5 minutes.  Fold in the melted chocolate mixture until fully incorporated.

In a clean, dry bowl and with a clean whip attachment, whisk the egg whites and salt on low speed until they form soft, wet peaks.  Gradually beat in the remaining ½ cup granulated sugar and continue whisking at high speed until the whites hold stiff peaks.  Fold the egg whites into the chocolate mixture just until there are no visible streaks of egg whites.  Don’t overfold.

Scrape the batter into the prepared pan and gently smooth the top.  Bake until just barely set in the center (it should still feel jiggly), about 35 minutes.  The cake will rise as it bakes and form a slightly crackly top.  Let cool about 15 minutes.

Run a knife around the sides of the cake to help loosen it from the pan.  Invert the cake onto a plate, peel off the parchment paper, and re-invert it onto a large platter or cutting board.  Let cool completely.

(DT: I served this with the Caramel Ice Cream from The Perfect Scoop.  I don’t think I need to tell you that it was the perfect combination.)


Holly B’s Rhubarb Bette

May 29, 2010

Recently, I taught a cooking class to a fun and engaging group of women.  I decided to focus on spring produce since it is finally showing its face in our wet climate.  Normally I don’t tackle desserts in my classes (simply because of time), but I thought it made sense to make something with rhubarb.  I had planned to make this cake but in flipping through that much-beloved book, I found something even easier.

There are people who love rhubarb.  My husband is one of them.  Me – I don’t really get it.  It’s sour.  Why do I want a dessert that has something sour in it?  But, after making this dessert twice in a week, it’s kind of growing on me.

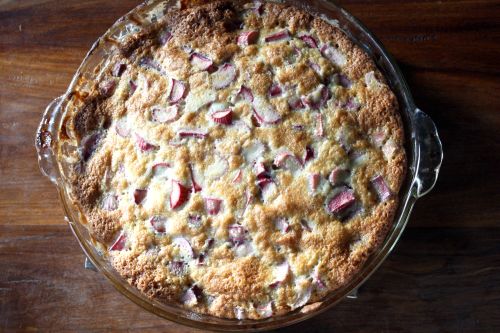
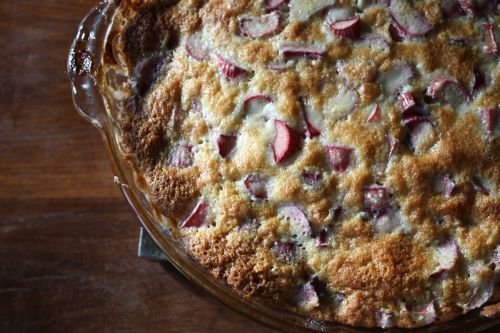
This recipe is so simple and it tastes so good, especially if you are in the rhubarb-loving camp.  Even if you think you can’t bake, you can make this.

One Year Ago:  Rosemary Raisin Pecan Crisps (I’ve made these countless times since)
Two Years Ago:  Roasted Potatoes with Onions and Wilted Greens (and the story of how I went veg)

Rhubarb Bette

With Love & Butter
8 servings

Approximately 5 cups sliced rhubarb (1/2-inch thick slices)
¾ cup plus 1/3 cup sugar
2 tbsp. mild tasting oil
1 egg
1 cup flour
½ tsp. baking powder
¼ tsp. salt
1/3 cup milk
½ tsp. vanilla extract

Preheat oven to 375 degrees.  Adjust the rack to the center position.  Butter a 9-inch glass pie plate.

Tumble the sliced rhubarb into the pie pan.  The rhubarb should come to within ½-inch of the rim.  Sprinkle the ¾ cup sugar on top and set aside.

In a big bowl, mix the remaining 1/3 cup sugar with the oil and egg.  Add the flour,  baking powder, salt, milk, and vanilla and combine into a smooth batter.  Now dumb the rhubarb from the pie dish into the batter.  Stir gently to incorporate the rhubarb, then pour the whole works back into the buttery-sugary pie dish.  Spread evenly in the dish, but leave the surface lumpy and interesting-looking.  Sprinkle with a little more sugar and bake 40 to 50 minutes, until caramel-colored on top and bottom.  Serve warm, in bowls, with vanilla ice cream or sweetened whipped cream.


« Older Posts Newer Posts »