Archive for February, 2010

Moving Into Stillness and Making Choices (or Not)

February 28, 2010

IMG_4850

About a year ago, my amazing friend Jen told me her vision for quarterly day-long yoga retreats at her studio.  She wanted to theme each one around the season and asked me if I would participate and also cook lunch for the yogis.  Jen is one of my very closest friends and one of my favorite people in the world, so even if I hadn’t thought it was a good idea, I would have said yes.  But I thought it was a terrific idea and the first retreat happened the Saturday before Mother’s Day last year.  We did one in July, one in October and now, one in February.

Yesterday was the winter one – she called it Moving Into Stillness.  Jen emphasized the need for us to embrace winter and find beauty in it, instead of waiting for it hurry past.  She mentioned the importance of home at this difficult time of year and welcomed us into hers.

Parents of small children – I know you can understand when I say having a day away is one of life’s greatest treasures.  Even just being by myself in the car is precious.  Then throw in a ferry ride, a challenging and invigorating morning of yoga, a lunch prepared by me, time to just hang with incredible women, and then another yoga class, another ferry ride, and more time in the car by myself.  Nirvana or what?

IMG_4851

Now that I have done four of these, I have a rhythm down.  I get to Jen’s house early and unload my car.  Everything cold goes in the refrigerator and everything else goes on the counter in groups of how it will be served.  The menus I plan need to be as simple as possible in terms of last minute prep because I only have about 45 minutes to get it all out and that includes a shower (Jen teaches hot yoga).  Then, I go down to the studio to secure my mat space and Jen and I get a few moments of talking time before she and I are both “on”.

If you are lucky, you have had a wonderful teacher in your life.  Maybe you have had several.  I had a tremendous 3rd grade teacher, a 9th grade English teacher who taught me how to write, math teachers all through high school who sat with me patiently and explained things over and over, and a physics professor in college who gave me a “B” even though I was doing “C” work because I tried hard.  And now, Jen.  I have taken and taught a lot of yoga classes in my life.  I have never had a teacher like her.  She manages to make the class extremely challenging and extremely approachable.  She gives very clear and yet minimal instructions on the poses and talks more about real life.  Honoring yourself.  One of my favorite things she says is, “Try easy.  We are always told to try harder.  Try easy.”  She speaks in English, not yoga speak and she is very real.

IMG_4854

After a morning of intense self-focus using poses and breath, it always feels a bit weird to change into frantic trying-to-get-the-food-out mode.  But I know everyone is hungry (including me) so I do my best to hurry.  I worry the entire time that I don’t have enough food.  If I made enough to feed 100 (we were 21 this time), I would still worry.

IMG_4828

One thing I never have to worry about is dessert.  Things can be made in advance and people are so appreciative of a home-baked treat.  Especially after sweating their guts out in a challenging class.  This time I made Honey Nut Bars (recipe coming soon) and these cookies.

Sometimes making choices is great and sometimes it is nice to have a choice made for you.  This cookie makes a choice for you.  Rather than having to decide between a cookie and a brownie, this recipe just combines them for you.  Yes, those chunks are brownies.  There are lots of nice things about this recipe, one of them being that you only use half the pan of brownies in the cookies.  The other half can either be served just as brownies, or you can freeze them for next time.

IMG_4835_picnik

One Year Ago:  Oatmeal Chocolate Chunk Cookies

Brownie-Chunk Cookies
Adapted from Bon Appétit
Makes approximately 30 cookies

Take note that you will need to refrigerate the brownies overnight before using them in the cookies.

2½ cups flour
1 tsp. baking soda
¼ tsp. salt
1 cup (2 sticks) unsalted butter, room temperature
1 cup (packed) golden brown sugar
½ cup sugar
2 large eggs
1 tsp. vanilla extract
1 cup walnuts, coarsely chopped
½ recipe (½ sheet) chilled Old Fashioned Brownies (recipe follows), cut into ½-inch pieces

Preheat oven to 350°F.  Whisk first 3 ingredients in medium bowl.  Beat butter and both sugars in large bowl until smooth.  Beat in eggs and vanilla.  Sir in dry ingredients, then walnuts.  Gently fold in brownies cubes (brownies may crumble).

Fill a small bowl with water.  Dip ice cream scoop in water, scoop batter; drop onto cookie sheets, spacing about 2 inches apart and dipping scoop as needed.  Using moist fingertips, flatten mounds to 1-inch thickness.

Bake cookies, 1 sheet at a time, until just golden – 15 to 18 minutes.  Remove cookies to cooling rack.

Old-Fashioned Brownies
Makes one 13×9 – inch brownie sheet

5 ounces unsweetened chocolate, chopped
½ cup (1 stick) unsalted butter, diced
2 cups sugar
2 tsp. vanilla extract
4 large eggs
¼ tsp. salt
1 cup flour

Preheat oven to 350°F.  Line 13x9x2 – inch metal baking pan with foil, leaving overhang.  Stir chocolate and butter in heavy large saucepan over low heat until melted and smooth.  Cool 15 minutes.

Whisk sugar and vanilla into chocolate mixture, then whisk in eggs and salt; stir in flour.  Spread batter in prepared pan.

Bake brownies until tester inserted in center comes out with moist crumbs attached, about 20 minutes.  Cool in pan.  Cover and chill overnight.

Using foil as aid, lift brownie sheet from pan and cut in half to use in cookies.  Serve other half (cut into squares) or wrap well in foil and freeze for up to one month.


Discovering a New Taste

February 25, 2010

IMG_4818_picnik

Randy and I moved to London in the summer of 2003.  If you are European, you probably remember that summer because it was the one with the unbelievable heat wave.  Temperatures soared in normally very mild (read: cold) London and got so high in France that hundreds of people died.  For over a week, temperatures in jolly old England were close to 100 degrees (that would be 33 Celcius) and we were all miserable.

When we get high temps in Seattle each summer (for three or four days), people go crazy because no one has air conditioning.  But, to be fair, all the shopping malls, movie theatres, museums, and many restaurants do.  There are places where you can go to be cool.  And, of course, Seattle is surrounded by water.  There are many places to just go, well, jump in a lake (or the Sound).

London?  Not so much.  First of all, no one in their right mind would jump in the Thames.  And, at least when we were there, every place we thought would be cool was not.  And believe me when I tell you that we tried a variety of options.  On the fifth or sixth day of the heat wave, we decided to head out of the city to try and find some cool.  I’m not sure why we thought taking the Tube was a good idea but there we were, with my brother Michael in tow, heading to Hampton Court, trying not to move a muscle, trying not to stick to the seat.

We went to a movie and sweated.  We ate lunch and sweated.  We sweated even more on the way home.  Just blinking my eyes made me hot.  I remember a lot about that day – I even remember the movie we saw (Pirates of the Caribbean – come on, we were desperate.)  For people who love to eat, many memories are associated with food.  That day sticks out so clearly for me because it was the first time I tasted Haloumi.

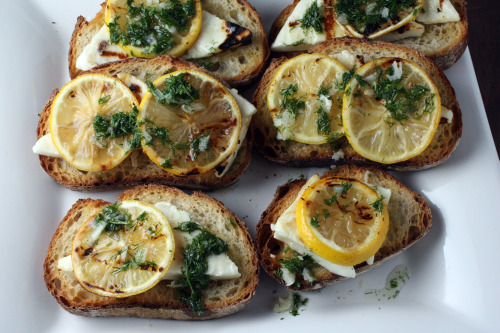
Ha-what? you may ask.  Haloumi is a cheese originating from Cyprus that is, in my experience, totally unique.  It is extremely dense and holds its shape when you cook it.  Raw, it’s a bit intense.  Squeaky is not usually an adjective I like to use in describing a cheese I am eating.  Cooked, it mellows a bit – softens, gets less squeaky.  It is quite salty, but for savory loving people like me, that is a compliment.  That hot hot day, the cheese was in a salad and it really blew my mind.  It is such a treat to be a food person and to eat something completely new and different.  Since then, I have tried numerous recipes using it and this is my favorite.

For this appetizer, you grill both the haloumi and lemon slices.  The taste combination with the dill-intense dressing is so unique that everyone I have ever served it to goes crazy for it.  If you have a non-stick grill pan, that is a great thing to use for the cheese.  I gave that pan away and used the grill on my stove and made a mess.  Totally worth it though.

UPDATE: I’ve had a few questions about whether or not you eat the lemon rind.  You do!  The lemon is sliced very thinly and being tossed in the marinade and then grilled, it becomes very soft.  Its intense citrus flavor is most welcome against the saltiness of the cheese.

IMG_4815

One Year Ago: Dinner Spanikopita

Grilled Haloumi Cheese and Lemon

Adapted from Gourmet
Serves 4-6

Haloumi can be a bit hard to find, but they always have it at my Whole Foods.  I would recommend using a nice dense bread (like a pain de campagne) and cut multiple slices – I’ve done as many as 8 depending on the size of the bread.

2 lemons
½ pound Haloumi cheese
1 large garlic clove
¼ tsp. salt
¼ tsp. sugar
¼ cup plus 2 tbsp. olive oil
4-8 (¾-inch thick) slices country bread
2 tbsp. finely chopped dill

Prepare a gas grill (or a grill pan) over moderately high heat.

Cut 8 thin slices from the lemons, then squeeze enough juice from remainder to measure 2 tablespoons and put it in a bowl.

Halve cheese diagonally, then cut each triangle, cut side down, into 1/3-inch thick slices.

Mince garlic and mash to a paste with a pinch of salt using the side of a large heavy knife, then add to lemon juice.  Whisk in salt and s sugar until dissolved, then add ¼ cup oil, whisking until combined.  Separately toss lemon slices ad cheese each with ½ tablespoon dressing.  Brush both sides of bread with remaining 2 tablespoons of oil.

Grill bread, cheese, and lemon slices on grill rack (or in pan), covered, turning once (use a metal spatula to scrape under cheese) until bread is toasted (2 to 3 minutes), grill marks appear on cheese (3 to 4 minutes total), and lemons begin to wilt (4 to 6 minutes total).

Whisk dill into remaining dressing.  Divide cheese and lemon slices between bread and drizzle with dressing.  Serve immediately.


Cucumber Raita

February 23, 2010

IMG_4771

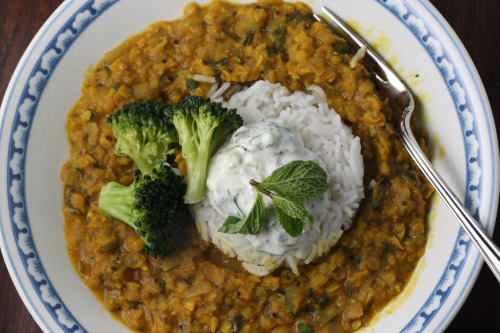
Whenever I make Indian food, or food that isn’t specifically Indian but that features those intoxicating spices, I make a raita to serve with it.  It is such a quick and easy thing to throw together and it complements the food so well.  The dhal I made the other night is, as I mentioned, very highly spiced so a nice cooling and and tangy raita goes perfectly with it.

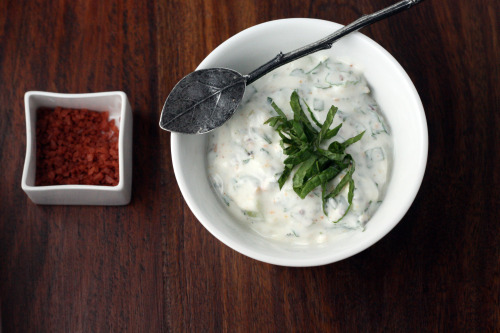
My standard additions to the plain yogurt are cucumber, lime juice, and salt; but the other day I had some of this on hand.

IMG_4801_picnik

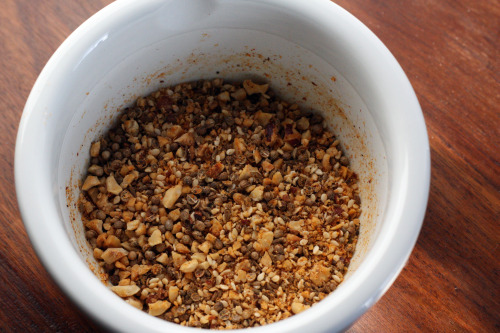
It’s called dukkah and it is a spice mixture that originated in Egypt.  I ground some for a dish that never made it to the table so, rather than waste it, I figured I’d just spice up my raita.  Although I mixed cultures and cuisines, the result was fantastic.  The dukkah stars coriander seed and cumin seed (among other wonderful things) and both of those spices are common in Indian cooking.  So I wasn’t that far off the mark.  It can be used, among other things, to garnish a bowl of your best olive oil for pita dipping, and it can also be used to coat soft boiled eggs that sit on greens which sit on toast (the original reason I made it).

IMG_4773_picnik

But don’t feel like you need to make dukkah to in order to enjoy the raita.  It is wonderful without the spices as well.  Oh, and those cute little boxes?  They are filled with a variety of sea salt courtesy of my good gift giver of a husband.

IMG_4768

One Year Ago: Palmiers

Cucumber Raita

Dana Treat Original
Makes about 1½ cups

Feel free to use full-fat yogurt here, or even Greek yogurt.  Just please don’t use that nasty non-fat stuff. If you are adding dukkah, use about 2 tablespoons.  If you are a cilantro hater, substitute the same amount of fresh mint.

1 cup plain low fat yogurt
½ English cucumber, peeled, seeded and diced
Juice of 1 small lime (or to taste)
Pinch of salt
2 tbsp. chopped cilantro

Mix all ingredients together in a medium bowl.  Taste for balance of flavor.  Cover and refrigerate until ready to use.

(Can be made one day ahead.  Be sure to give it a good stir before using.)

Dukkah
The Modern Vegetarian

1/3 cup hazelnuts, skinned
¼ cup sesame seeds
5 tsp. coriander seeds
4 tsp. cumin seeds
2 tsp. sea salt
½ tsp. black pepper
½ tsp. paprika
Large pinch of cayenne pepper

Heat the oven to 350° F.  Roast the hazelnuts and sesame seeds separately until golden.  Then, roast the coriander and cumin seeds until fragrant, about 2 minutes.

Transfer to a food processor or large mortar and pestle, add the remaining dukkah ingredients, and blend until a coarse mix is formed.  (Don’t overdo it; otherwise you will end up with a greasy mess.)  Store the dukkah in an airtight container until required.


A Love Affair with Red Lentils

February 21, 2010

IMG_4782_picnik

Variety is a big part of my diet.  In the three years I worked as a personal chef, I only repeated recipes a handful of times, and those were requests.  I figure I love food and love to eat and I want to make as many different things as I can in my lifetime.  Of course, I have my go-to meals but I really do try and have variety in our food lives.

And then there are the things that I could eat every single day and be totally happy.  Good french fries with ketchup.  Noodle soups like this one, noodle dishes like this one (yes, I have a thing for Asian noodles) could fulfill me until the end of my days.  And any kind of red lentil dish is on that list too.

If you have never cooked with red lentils, you are in for a treat.  They are among the fastest cooking of beans and they change utterly and completely from raw to cooked.  Raw they are bright orange (in spite of their name) and look like flat pebbles.  Cooked they become a mellow yellow and they lose their shape.  Depending on how much liquid is in your dish, they can loosely resemble other lentils, or they can disappear completely.  They, like other lentils, are high in protein and fiber, yet low in calories and fat.  They require no pre-soaking time.

On Thursday, I crossed the Sound and did a cooking lesson for a group of extraordinary women.  We have been talking about doing a class for months and I gave serious thought to what I wanted to cook.  In the end, I decided to make a full meal and it took me about one second to decide to feature a red lentil dhal.

Because I love red lentils and I love this family of spices, I have made various incarnations of this dish many times over the years.  Of all the ones I have made, this is my favorite.  It is very highly spiced – not hot, just spicy.  One of the beauties of this dish is its adaptability.  You could add all manner of vegetables (carrots, potatoes, zucchini, spinach come to mind).  Or you could add more liquid, allow it to simmer away and turn it into a soup.

IMG_4787_picnik

Red Lentils Previously on Dana Treat: Curried Red Lentil Stew with Vegetables
One Year Ago: Double Baked Chocolate Cake

Red Lentil Dhal
Inspired by The Modern Vegetarian
Serves 4-6

This list of ingredients is long but much of it is spices.  The stew actually comes together quite quickly.

Vegetable oil or grapeseed oil
2 tsp. cumin seeds
2 tsp. black or yellow mustard seeds
1 medium onion, finely diced
1 ½ inches of fresh ginger, peeled and minced
2 garlic cloves, minced
1 jalapeno chile, seeded, finely chopped
1 ½ tsp. curry powder
2 tsp. ground cumin
1 tsp. tumeric
Pinch of chile powder
1 tbsp. tomato paste
2 cups red lentils
2 cinnamon sticks (or 1, if large)|
2 cups water
1 15-oz. can “lite” coconut milk
Sea salt
Juice of 1 lemon
A bunch of mint, chopped
A bunch of cilantro, chopped

Heat just enough oil to coat the bottom of a large pan and add the mustard and cumin seeds.  Be careful as they will begin to pop.  Immediately add the onion, adjust the heat to medium, and cook until softened – about five minutes.  Add the ginger, garlic, chile, curry powder, cumin, tumeric, and chile powder and fry for 3 minutes.  Add the tomato paste and fry for 1 minute.

Add the lentils and stir to coat with the oil and spices.  Add the cinnamon stick, water, and coconut milk.  Bring to a boil, then reduce the heat so the dhal is at a simmer.  Cover partially and cook, stirring occasionally so it doesn’t stick to the bottom, until the lentils have partially lost their shape and are soft – about 15 minutes.  Stir in more liquid as necessary for the consistency you want.

Remove from the heat, season with sea salt and add the lemon juice to taste.  At this point, you can allow the dhal to cool and then cover and refrigerate it overnight.  When reheating on the stove, you will need to add more liquid as it will thicken as it sits.

About 10 minutes before serving, add the herbs.  You will want them to cook down a bit but not so much that they lose their color.  Serve warm over basmati rice and with a raita if desired.


One of My Favorites

February 18, 2010

IMG_4586

Have you read the book Cooking for Mr. Latte?  It is by Amanda Hesser who used to be a food critic for the New York Times.  She has also written a cookbook and is working on an intriguing project called Food 52.  Cooking for Mr. Latte is the story of how she met her now husband (the author Tad Friend) and recipes for the food she cooked along the way.  Sound like a familiar premise?  I know, these food-memoirs-with-recipes seem to be everywhere these days.  I just talked about another one in my last post.  But Hesser’s book is from 2003 – before blogs made a big splash and everyone got a book deal.  It’s my favorite of the food memoirs I have read.

Because she was a food critic, her descriptions of food are expert.  You want to be sitting along side her eating.  And her recipes are terrific.  So much so that I keep this little book on my heavy rotation cookbook shelf.  I love the things I have made from this book.  And this is my favorite of the bunch.

Hesser is the first person who told me about Meyer lemons.  The way she talked about them made me go on a mission to seek them out.  These days they are easy to find in Seattle, but just a few years ago it took a lot more investigative work.  They have become one of those “shoulds” in the cooking world.  You know, you “should” eat seasonally, you “should” always use fresh herbs, you “should” make your own salad dressing, and you “should” always use Meyer lemons if you can find them.  Well, I agree with the first three in that list.  And now that I have used Meyer lemons many many times, I have to say that I’m not sure I agree with that last one.  I love lemons.  Meyer lemons are more orange-y tasting and I don’t love oranges.  So, I’m going against the grain and saying no, in general you “should” use whatever lemons you like.

Except in this recipe.  For me, the Meyer lemons work amazingly well here and regular lemons are too mild.  This is a very simple recipe.  Simple in that “simple is sometimes better” way.  I love making this for dinner when recent meals have been complicated or overly spiced or really rich.  It is such a clean dish but not too spare.  Not to be a food snob, but fresh pasta is practically a must here.  You will taste the pasta and you want that pasta to taste good.  (One of these days, I will make my own and when I do, I’m making this one to go with this dish.)

I should have garnished this dish differently for the photo.  I know it looks like white on white.  But trust me.  It is so delicious in that wonderful simple way.  And it takes next to no time to make.  I can’t wait for spring so I can add some blanched asparagus to this bowl.

IMG_4591

One Year Ago:  Tome Yum Soup with Tofu and Mushrooms

Paparadelle with Lemon, Herbs, and Ricotta Salata
Adapted from Cooking for Mr. Latte
Serves 4

I’ve used all different combinations of herbs in this dish – use what you have.  I would keep the amount roughly the same and definitely use the mint.

2 cups vegetable broth
1 clove garlic, peeled and lightly smashed with a  knife
Grated zest of 1 lemon (use a Meyer if possible)
Juice of 1 lemon (ditto)
Sea salt
1 pound paparadelle, broken (or cut) into 2-inch pieces
3 tbsp. chopped mint
2 tbsp. chopped marjoram
1 tbsp. chopped fennel fronds, or tarragon, or chervil
Olive oil
6 ounces ricotta salata, crumbled or shaved
Coarsely ground black pepper

1.  Fill a large pot with water and add enough salt so that you can taste it.  Bring to a boil.  Pour the vegetable broth into a small saucepan, drop in the garlic and bring to a boil.  Reduce by half.  Remove the garlic and shut off the heat.  Stir in the lemon zest and juice.  Season and taste.  It should be full flavored because this will be the sauce for the pasta.  Keep warm.

2.  When the water comes to a boil, add the pasta and cook until soft on the edges but still firm under the tooth.  After a few minutes, ladle out about 1 cup of the cooking liquid and reserve.  Drain the pasta, shake it lightly, then return it to the pot.  Put it over low heat and pour in the broth.  Sprinkle in the mint and other herbs and a little olive oil.  Add some of the reserved cooking liquid and more lemon juice if needed.  Season to taste with salt (keeping in mind that the cheese will add some salt).

3.  Spoon into bowls so that the pasta is lying in a bit of broth.  Scatter the ricotta salata over it, drizzle with a bit more olive oil (DT: I skipped the oil), and grind pepper over the top.


« Older Posts