Category: Seasonal

Five Years and a Strawberry Tart

May 10, 2013

Today marks five years since I started this blog. In some ways, I am surprised I started it at all. I don’t know what Myers Briggs personality type I am but I can be tentative, hesitant. Certainly far from the first to start or join anything. I wait in the wings until I feel safe and then maybe I join in. When I started writing here, I felt I was already really late to the party. The writers whose blogs I admired had already been at it for a year or two. Was it worth it to even start? Silly now to even think about how I felt then.

It is also a little surprising that I started given my, not fear, but deep discomfort around technology. The fact that I got a web site up and running, figured out how to upload photos, found a designer to help me with the aesthetics of it, all of this makes me realize that I was really motivated to write. And I’m so glad I bit the bullet. In the past five years, I have made some wonderful friends (some of whom have made the move to the Bay Area much more friendly), have been able to travel a bit to learn about companies and products, have pushed myself outside my comfort zone as a cook and as a writer.

Randy was out of town the first part of the week and I decided to invite some friends over for dinner. This is something I did often in Seattle and am just starting to do here in Oakland. I get the urge to cook but I don’t want to cook for just myself. So I have friends come sit around the table with me. I decided on this Strawberry Tart for dessert because strawberries are in full swing here and it seems a shame not to celebrate them. Every June, which is when strawberries start to make an appearance in the Seattle markets, I would bemoan my lack of a perfect strawberry dessert. When they are small and sweet and too soft to travel far, strawberries are a revelation. They have always been Randy’s favorite fruit but the first time he popped a real strawberry in his mouth, his eyes got wide and he was speechless. The taste is so clean and pure and sweet. My favorite berry is definitely the blueberry but very little can compare to the taste of the first of the season strawberry.

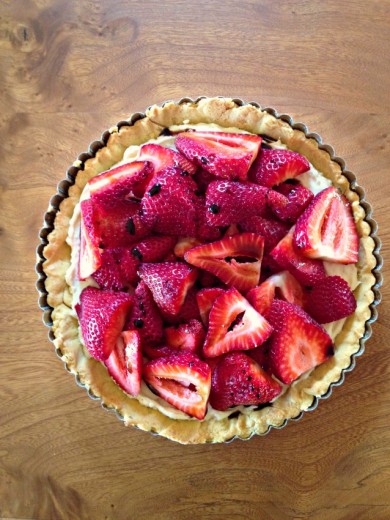
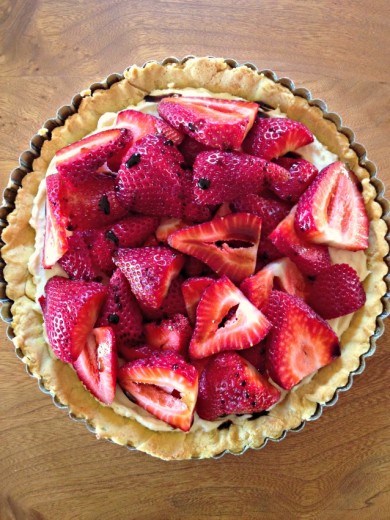
With a fruit this special, you want a dessert to honor it. Not crush it or overpower it, but celebrate it and make it even better than it already is. I have made many attempts over the years, but I have not found the right thing. So when I happened upon this Strawberry Tart in Dan Lepard’s Short & Sweet, I thought I might have found the one.  In that moment, I started mentally composing this post. I would give you the background (see above) of my search for the perfect dessert to celebrate the strawberry and then I would reveal that (ta-da!) I had found it. Except it didn’t go like that. The crust, which was described as easy to work with and not crumbly, was hard to work with and crumbly. The filling, which sounded smooth and slightly tangy, had little bits of clumped cornstarch in it. The boys ate through all my small and delicate strawberries so I was relegated to the large (but still local) grocery store kind. I was annoyed as I assembled the tart. But in the end, it looked pretty and tasted wonderful. The crust had a nice snap and just a subtle sweetness, the filling was smooth and slightly tangy, and you could not tell that there was any undissolved cornstarch. The berries left a little to be desired but I dressed them up with a drizzle of my most expensive balsamic vinegar, a gift from a friend.

In thinking about this tart and my expectations for it, I realized that it is really a metaphor for this blog. Expectations, sometimes realistic and sometimes not, set, dashed, and then redeemed.  I started this blog because I wanted to write about food but I would be lying if I said I wasn’t secretly hoping for big things.  What those big things were are hard to say.  A cookbook deal.  Lots of recognition.  Money.  I was a theatre major and there is still a very small (very small!) part of me waiting to be “discovered”.  I’m cringing as I’m typing this – it is embarrassing but it is the truth.  My first few months worth of posts are not written in my voice.  I was channeling other people.  My food, other people’s voices.  Then I slowly started to find my groove.  People started to read.  And I realized that I liked writing.  A lot.  I liked keeping a record of  the food I made and I liked writing about my family.  I like the interactions I have had with my readers.  I like to think of you as a relatively small but loyal group of friends.  I am proud of the work I have done here.  So no publishers have been knocking down my door begging me to write a book and no brands have been begging me to be their representative.  But I haven’t chased those things down either.

Anyway.  Five years is a long time to do anything.  I know the past year has not seen the usual number of food posts here and I hope you haven’t lost patience.  A lot of travel and a big move in 2012 put me off kilter.  I am grateful for this space.  I am extremely grateful to those of you who read, those of you who comment and email.  I got my first negative comment the other day.  It was short and not a big deal and I deleted it.  But it made me realize how fortunate I am.  Five years with only love coming from you.  Thanks to everyone.

Two Years Ago:  Stir-Fried Sesame Broccoli and Tofu with Rice Noodles
Three Years Ago:  Corn Salad Sandwich with Tomatillos and Jack Cheese
Four Years Ago:  Roasted Pepper and Goat Cheese Sandwiches, Moroccan Carrot and Hummus Sandwiches
Five Years Ago:  Meet Me
[/donotprint]
Strawberry Tart
Short & Sweet
Makes one 9-inch tart

½ recipe Sweet Shortcrust Pastry (recipe follows)
Flour for rolling
½ cup milk
2 tbsp. cornstarch
1 egg white
¼ cup super-fine sugar
1 tsp. vanilla extract
¾ cup crème fraîche
3 cups strawberries

Chill the pastry for 30 minutes, then roll it out and line a shallow 9-inch tart pan.  Line the pan with parchment paper and dried beans and blind bake at 325ºF for about 30 minutes until a really golden color all over, removing the parchment paper and beans halfway though.  Allow the shell to cool completely.

Whisk the milk with the cornstarch, egg white, sugar, and vanilla in a saucepan till smooth, then heat, whisking constantly, till boiling.  Remove from the heat, spoon into a bowl and cover with a plate to stop a thick skin from forming as it cools.  When cold, beat in the crème fraîche and spoon this into the pastry shell.  Hull the strawberries, slice them in half, and fan them over the top.  (DT:  I drizzled the berries with just a tiny bit of really good balsamic vinegar.  If you don’t have a good sweet one, take a cheaper version and cook it down, in a saucepan, until about half its original volume.  You want it syrupy and sweet.)

Sweet Shortcrust Pastry
Makes enough for two 9-inch tarts

2 cups all-purpose flour
½ cup confectioners’ sugar
Pinch of salt
10 tbsp unsalted butter, cold but pliable
2 egg yolks
1-3 tbsp. ice water

Spoon the flour, sugar, and salt into a bowl.  Break the butter into small pieces and rub this through the flour until it vanishes.  Stir the egg yolks with the water and mist this into the flour to form a very soft and smooth paste.  (DT: I needed an additional 2+ tablespoons of water to make this work.)  Pat it into a flat block, wrap well, and chill for at least 30 minutes before using as it needs time to firm up.

My First Buche de Noel

December 22, 2011

I’m going to keep this short and sweet because, chances are, if you are still looking for a dessert for your holiday table, you need it now and don’t have extra time to read a long post from me.  Am I right?

This is actually, technically, my second Bûche de Noël.  I made the first one, the exact same recipe, earlier this month for a party we hosted and I meant to take a photo of it then and post about it so you would have plenty of time to decide whether or not this was the dessert for you.  Alas, things don’t always happen as we plan.  And sometimes I write run-on sentences.  So I made it again for another party this past Saturday.  I meant to post about it on Sunday but then this bug hit our house and it seems to enjoy taking its time attacking us one by one.

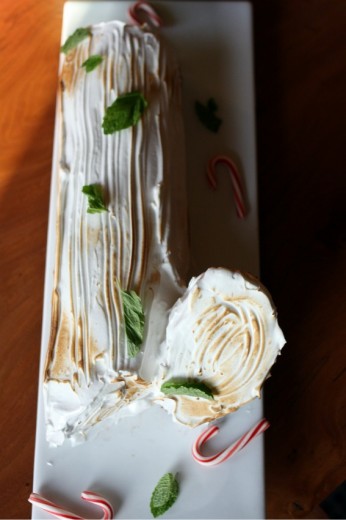
So here we are.  This is an easy cake – a very easy way to get lots of ooohs and aaaahs.  You will need a jelly roll pan and ideally a torch although the latter is not totally necessary.  If you have patience, you will be making chocolate leaves and if you don’t you will not.  (I chose not but I will include the how-to below).  Buy the best peppermint ice cream you can because that is the flavor that comes through most clearly.  The cake is very mild and the frosting is just sweet.  The chocolate sauce is divine though, of course.  Next year I will make a more involved Bûche, one with a chocolate ganache and homemade meringue mushrooms, and pistachio “moss”.  This was a good start though.

One Year Ago:  Holiday Biscotti with Pistachios and Cranberries
Two Years Ago:  Peanut Butter (or Caramel) Mini Candy Brownie Cups
Three Years Ago:  Ultimate Ginger Cookies (Ina calls them ultimate, I say not as my new favorites)

Frozen Chocolate-Peppermint Bûche de Noël
Bon Appétit
12 to 14 servings

Sauce
8 ounces bittersweet chocolate (do not exceed 61% cacao), chopped
¾ cup heavy cream

Chocolate leaves
3 ounces bittersweet chocolate (do not exceed 61% cacao), chopped
10 fresh camellia leaves or lemon leaves, wiped clean with a damp cloth

Cake
Nonstick vegetable spray
1 cup sugar, divided
¾ cup cake flour
¼ cup natural unsweetened cocoa powder
1 tsp. baking powder
¼ tsp. salt
4 large eggs, separated
2 tbsp. vegetable oil
2 tbsp. water
1 tsp. vanilla extract
1/8 tsp. cream of tartar
2 pints peppermint ice cream
1/3 cup coarsely crushed red-and-white peppermint candies or candy canes

Meringue and decorations
5 large egg whites
¼ tsp. cream of tartar
¾ cup sugar
½ tsp. vanilla extract
Fresh mint leaves
Small candy canes

Sauce
Place chocolate in medium microwave-safe bowl.  Bring cream to simmer in small saucepan.  Pour cream over chocolate.  Let stand 1 minutes, then whisk until melted and smooth.  (Can be made 1 week ahead.  Cool cover, and chill.  Rewarm, uncovered, in microwave in 15-second intervals and whisk before using.)

Chocolate leaves
Stir chocolate in small saucepan over low heat until melted and smooth.  Remove from heat.  Using pastry brush, brush chocolate on underside (veined side) of 1 leaf to coat completely (do not allow chocolate to drip over edge of leaf).  Place leaf, chocolate side up, on small foil-lined baking sheet.  Repeat with remaining leaves.  Chill, uncovered, until chocolate is cold and firm, at least 1 hour.  Working with 1 leaf at a time, carefully peel green leaf away from chocolate.  Return chocolate leaf to same sheet; discard green leaf.  (Can be made 3 days ahead.  Cover with plastic wrap and chill.)

Cake
Position rack in center of oven and preheat to 375ºF.  Line 15x10x1-inch baking sheet with parchment.  Coat paper with nonstick spray and dust with cocoa.

Sift ½ cup sugar, cake flour, ¼ cup coca, baking powder, and salt into small bowl.  Using electric mixer, beat egg yolks in large bowl until thick.  Beat in oil, 2 tablespoons water, and vanilla.  Gradually add dry ingredients, beating just until blended.  Using clean dry beaters, beat egg whites and cream of tartar in medium bowl until soft peaks form.  Gradually add remaining ½ cup sugar, beating until stiff but not dry.  Fold ¼ of whites into yolk mixture to lighten.  Fold in remaining whites in 2 additions.  Spread batter evenly in prepared pan.

Bake cake until puffed and tester inserted into center of cake comes out clean, about 12 minutes.  Cool cake in pan on rack 10 minutes.  Sift light layer of cocoa powder over large smooth kitchen towel (not terrycloth).  Cut around pan sides.  Turn cake out onto prepared towel, leaving 3-inch cloth border on 1 long side.  Peel off parchment.  Starting at 1 long side with cloth border and using cloth as aid, roll up cake in towel (towel will be rolled up inside).  Place cake, seam side down, on work surface; cool completely.

Microwave ice cream in 10-second intervals until barely softened.  Unroll cake on work surface but leave on cloth.  Dollop ice cream over cake by spoonfuls.  Gently spread ice cream in an even layer, leaving 1-inch plain border on long side opposite cloth border.  Sprinkle ice cream with crushed candy.  Using cloth as aide and starting at cloth order, roll up cake, enclosing ice cream in cake.  Place cake, seam side down, on long platter; cover with plastic wrap.  Freeze cake at least 8 hours or overnight.

Meringue
Using electric mixer, beat egg whites and cream of tartar in large bowl to soft peaks.  Gradually add sugar, beating until still but not dry.  Bean in vanilla.

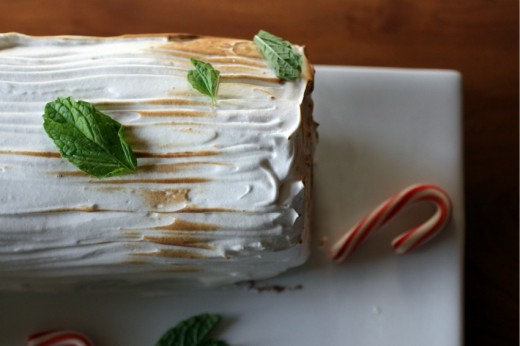
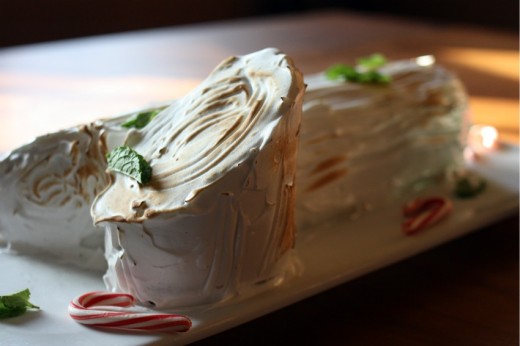
Cut off 1/8 of cake at angle at 1 end.  Press cut off part onto center of 1 side of log, cut side in.  Spread meringue all over top, sides and ends of cake.  Using fork, make long grooves in meringue down length of cake and in circles on ends to resemble tree bark.  Freeze cake until meringue is cold and firm, at least 3 hours.  Using torch, brown meringue in random spots.  Return cake to freezer.  (Can be made 2 days ahead.  Keep frozen.)  (DT:  I found I was not able to cover the cake because it stuck to the meringue so I just kept it in the freezer uncovered.)

Garnish cake with chocolate leaves, fresh mint, and small candy canes.  Cut cake crosswise into 1-inch wide slices.  Drizzle with warm chocolate sauce.


My Favorite Gingerbread Cookies

December 20, 2011

Before I tell you about these very most favorite of cookies and before I tell you about the post I just deleted, I am happy to tell you that my January, February, and March classes have been announced!  In January’s class, we will be taking some of the most basic foods – pizza, salad, chocolate chip cookies – and making them the very best that we can.  In February, we will be celebrating the winter bounty (yes, I said bounty) that our Pacific Northwest soil brings to us with dishes like shepherd’s pie and beets in a lovely horseradish sauce.  And in March, we will be learning more about Indian food.  Space is very limited, so please let me know soon if you would like a spot.  More information can be found here.

So yes, I deleted a post on purpose.  I was composing a list of the Things You Can Do To Greatly Improve the Flavor of Your Food and I realized, when it was almost done, that I sounded awfully bossy.  At this time of year, when you are likely feeling a little pressure, a little stressed, that you probably didn’t need bossy me telling you what you should and should not be buying and eating.  So we will save that list for another time.

But.  I do have to very gently suggest that you think about your spice rack for a moment.  How old is your cinnamon?  Your ginger?  Your cloves?  If the answer is more than a year or two old, or certainly if you can’t remember when you bought them, I would very gently suggest that you throw away those spices and start over.  Here is the advice I give to students in my classes:  Keep the jars, dump out the contents, and replace with fresh (bulk) spices bought from a reputable place.  In Seattle, you can get terrific spices from World Spice Merchants (also available online), Market Spice and Penzey’s (also available online).  The cost is so low and the payoff is so big.  I can’t tell you what a difference new and fresh spices make in your cooking and baking, especially in a cookie as special as this one.

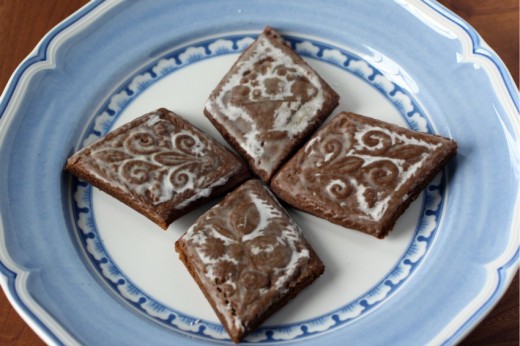
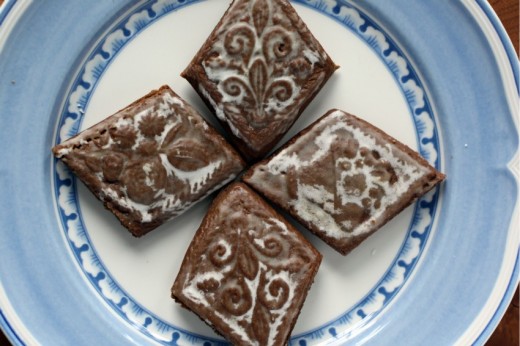
Every so often I post something here and marvel that I have never told you about it before.  How can this be my fourth Christmas season writing this blog and only the first time mentioning the best gingerbread cookie I have ever tasted?  Who knows.  Sometimes I just can’t make it all work.  Last year, when my baking list was a mile long and I had to be as efficient as possible, I left this cookie off the list.  For some reason, I got it in my head that they were too much work for a super busy season and off they went.  For shame.  They really aren’t any more work than anything else and they are the spiciest most perfectly textured gingerbread ever.  And they are pretty.

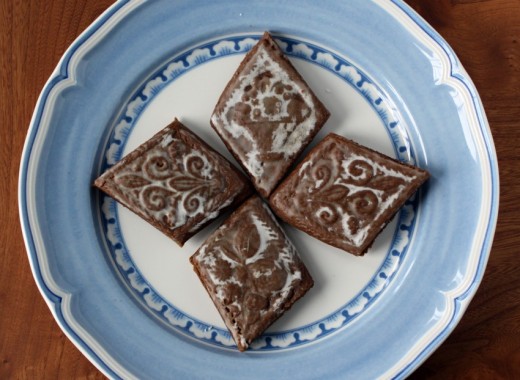
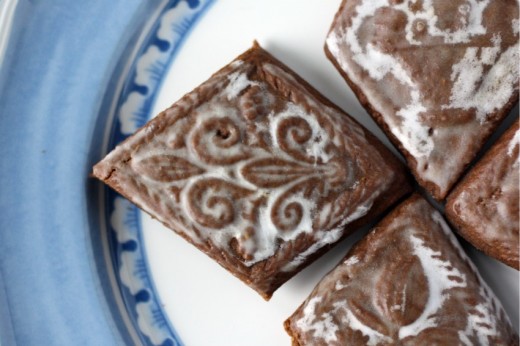
This is a recipe from Tartine.  To make the cookies look pretty, you will need a Springerle rolling pin or plaque.  The first year I made this cookie, I trekked down to the Pike Place Market to the original Sur la Table (did you know it started in Seattle?) with the intention to buy a pretty rolling pin.  I am totally one of those people who can’t seem to find time to fold the laundry but can somehow create time to go and purchase an item in an out of the way spot.  Amazon was not an option at that point or not one I knew about.  Anyway.  When I saw that the rolling pins were pricey, and really single use, I decided to go for more of a tile.  Now a quick search on Amazon (I don’t have an affiliate program with them – they just have the best online selection) will turn up all sorts of options.

Of course you can just roll out the dough and use your favorite cookie cutters and dispense with pretty.  We made a couple of gingerbread men with the scraps of the dough and I assure you that they taste no worse than the pretty diamonds you see above.

A few words of advice.  I’ve never made these with a textured rolling pin but if you own or buy a plaque like I have, I can tell you how best to work with this dough.  I roll out the refrigerated dough, press the mold very firmly into the dough, and then use a paring knife to cut around the mold.  Repeat until the dough is used up, re-roll scraps once.  I bake those large diamonds on a baking sheet and as soon as they are out of the oven, I use a larger knife to cut each big diamond into smaller ones.  You do this while the dough is still soft and it gives you a sharper edge then if you cut them separately before baking.  I would imagine that any mold you use will work well using this technique.  Some of my diamonds really held the imprint of the mold and others, not so much.  Don’t worry – they all taste the same.  I have made both the easy and the slightly less easy versions of the icing and I would stick with easy (powdered sugar and water and no candy thermometer).  Just be sure to sift your powdered sugar so you don’t get any lumps.

One Year Ago:  Cranberry Walnut Braid
Two Years Ago:  Smoked Tofu, Le Puy Lentil, and Spinach Salad
Three Years Ago:  Glazed Butter Cookies

Soft Glazed Gingerbread
Tartine
Makes 12 to 20 cookies depending on size of cutters

I’m keeping it simple by just copying the recipe as written in the book.  Feel free to use my tips above or not.  Also, I’m not including the more complicated icing because it’s truly not worth the effort.

Dough
3¾ cups all-purpose flour
1 tbsp. cocoa powder
4 tsp. ground ginger
1½ tsp. ground cloves
2 tsp. ground cinnamon
½ tsp. baking soda
1 tsp. salt
1¼ tsp. black pepper, freshly ground
1 cup (8 ounces) unsalted butter, at room temperature
¾ cup + 2 tbsp. granulated sugar
1 large egg
½ cup blackstrap or other dark molasses
2 tbsp. light corn syrup

Glaze
1 cup confectioners’ sugar
2 tbsp. water

To make the dough, stir together the flour, cocoa powder, ginger, cloves, cinnamon, baking soda, salt, and pepper in a mixing bowl.  Set aside.  Using a stand mixer fitted with the paddle attachment, beat the butter on medium-high speed until creamy.  Slowly add the granulated sugar and mix on medium speed until the mixture is completely smooth and soft.  Stop the mixer and scrape down the sides of the bowl with a rubber spatula as needed.  Add the egg and mix well.

Add the molasses and corn syrup and beat until incorporated.  Stop the mixer again and scrape down the sides of the bowl.  Add the flour mixture and beat on low speed until a dough forms that pulls away from the sides of the bowl and all the ingredients are well incorporated.  Remove the dough from the bowl,  flatten it on a large piece of plastic wrap into a rectangle about 1 inch thick, cover the dough with the plastic wrap, and refrigerate overnight.

Preheat the oven to 350ºF.  Line a baking sheet with parchment paper or a nonstick liner.

Unwrap the dough and place on a floured work surface.  If using a plaque with a design, roll our the dough 1/2-inch thick, lightly dust the op with flour, press your cookie molds over the dough, and then cut out the shapes with a small knife and place on the prepared baking sheet, spacing them about 1 inch apart.  Alternatively, using the mold as a guide, cut around it with a small knife, flip the mold over so the design is facing you, and place the dough over it, pressing it into the design.  Unmold the shapes onto the prepared baking sheet, leaving about 1 inch between them.

If using a patterned rolling pin, lightly dust the lined baking sheet with flour and transfer the dough to the pan.  Lightly dust the top of the dough with flour and roll it into a rectangle about 1/3 inch thick with a plain pin.  Then, using the patterned pin, roll over the dough with enough pressure to ensure a clear impression of the design.  Trim the sides with a small knife.  It is not necessary to cut into smaller sizes before baking.

Bake the cookies until lightly golden along the sides but still soft to the touch in the centers, 7 to 15 minutes.  the timing will depend on the size of the individual cookies, or if you have made a single large patterned piece that will be cut after baking.

While the cookies are baking, prepare the glaze.  In a small bowl, whisk together the confectioners’ sugar and water utnil smooth.

When the cookies are ready, remove from the oven and let cool on the pan on a wire rack for about 10 minutes.  Then, while the cookies are still warm, using even strokes, brush a light coat  of glaze on the top of each cookie, evenly coating it.  Let the cookies cool completely.  When the glaze dries, it should leave a shiny opaque finish.  If you have a used a patterned rolling pin to make a single large plaque, cut into the desired shapes with a small very sharp knife.  The cookies will keep in an airtight container in a cool place for about 2 weeks.


Sticky Toffee Pudding

December 15, 2011

Put away any pre-conceived notions you have about Sticky Toffee Pudding.  Unless your pre-conceived notions about Sticky Toffee Pudding is that you like it very much.  In that case, keep your pre-conceived notions and go take 1½ sticks of butter out of the fridge.

Look, when I check out a dessert menu, my eyes glaze over until I see chocolate.  I can appreciate a good apple tart and I like ice cream, and raspberries are awesome, but friends – dessert is chocolate.  Period.  But.  This time of year, something happens.  I never lose my chocolate affinity but my mind opens just a bit.  It would never occur to me that I would like a cake that has puréed dates in it and it may not occur to you either, which is why I am asking you to put aside those notions of yours.

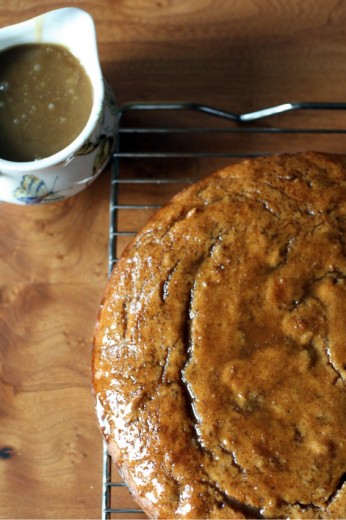
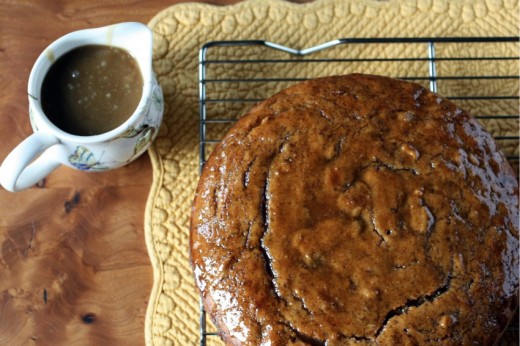
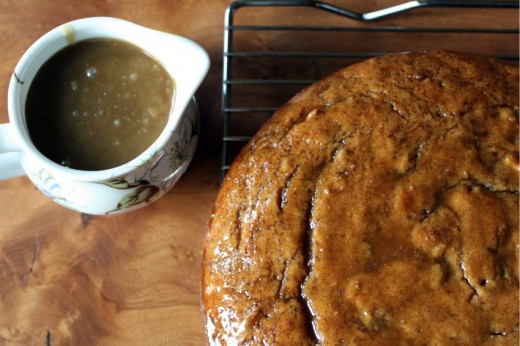
A couple of years ago, I took a holiday cooking class with Olaiya Land.  She is now one of the co-founders of The Pantry at Delancey and she is a very good cooking teacher indeed.  In that class, we made Sticky Toffee Pudding and I silently pooh-poohed it and decided to eat my dessert’s worth of calories in savory bread pudding instead.  Big mistake.  The cake, which really looks like nothing special, smelled like the very best of everything (butter, brown sugar, cinnamon) and, with a caramel-y toffee sauce poured over the entire cake and the same sauce served alongside it, I realized my short-sightedness.  It’s not chocolate.  But it’s easy, crowd pleasing, and can be made in advance and frozen.

One Year Ago:  Over the Top Mushroom Quiche
Two Years Ago:  Chocolate Gingerbread Bundt Cake
Three Years Ago:  Fennel and  Brie Risotto Wedges (yum!)

Sticky Toffee Pudding
Adapted from Olaiya Land
Makes one 8-inch cake

I make this cake in a round cake pan but you can certainly use a square.  And because I have two of them (actually I have four – don’t ask), I usually double the recipe and freeze one for later use.  Don’t glaze the cake you are going to freeze.  Olaiya serves this with whipped cream but I just like to pour on extra sauce.

For Pudding:
1 stick (½ cup) unsalted butter, softened, plus additional for the cake pan
8 ounces Medjool dates, pitted and roughly chopped
½ cup light rum
2 cups all-purpose flour
1½ tsp. baking powder
½ tsp. salt
½ tsp. ground cinnamon
¼ tsp. baking soda
1 cup packed dark brown sugar
2 large eggs, room temperature

For Sauce:
1 cup heavy cream
1 cup packed dark brown sugar
½ stick (¼ cup) butter, cut into small pieces
1/8 cup light rum

For pudding:
Preheat oven to 350ºF.  Butter an 8-inch square or 9-inch round cake pan and set aside.  Put dates, rum, and ½ cup water in a small saucepan.  Bring to a boil over medium-high heat, stirring occasionally.  Reduce heat to medium-low.  Cover and simmer until dates are very soft, about 5 minutes.  If the dates have not fallen apart, mask with a fork or potato masher to break up any large chunks.  (If you prefer to not even know the dates are there, you can blend the mixture with an immersion blender or put it in a stand mixer.)  Set aside to cool for 10-15 minutes.

In a medium bowl, whisk together the flour, baking powder, salt, cinnamon, and baking soda.  Set aside.

In the bowl of an electric mixer fitted with the paddle attachment, cream butter and brown sugar on medium-high speed until pale and fluffy, 2-3 minutes.  Add eggs, one at a time, mixing well after each addition and scraping down the ixer bowl as needed.

Reduce speed to low.  Add flour mixture in 3 additions, alternating with the date mixture.  Transfer batter to prepared pan and smooth top.  Bake for 25 minutes, then reduce the heat to 325ºF and bake until cake tester inserted into the center of the pudding comes out clean, 15-20 minutes more.  Let pudding cool in pan on a wire rack for 5 minutes.  Run a knife around the edges of the pan to loosen and invert onto a serving plate.

For sauce:
In a medium saucepan, bring cream, brown sugar, and butter to a boil over medium-high heat.  Boil for 3 minutes.  Stir in rum and cook for 2 minutes more (you should have about 1½ cups sauce).  Put a piece of parchment or waxed paper under the rack (this will catch the drips).  Pour half of the sauce, slowly, over the warm pudding, allowing it to drip down the sides.  Serve the other half of the sauce along side.

(Make ahead:  I made this cake, glazed, one day ahead and loosely covered it with foil.  I let the remaining sauce cool completely, covered and refrigerated it.  When we were ready to serve it, I reheated the sauce gently.)


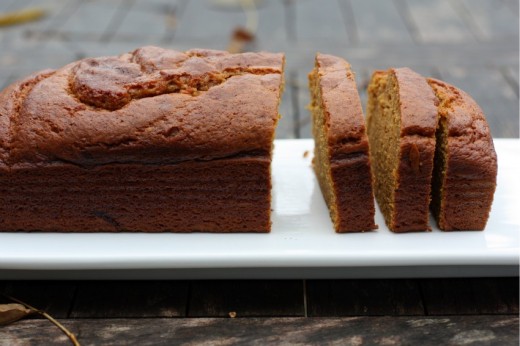
Perfect Pumpkin Bread

November 14, 2011

Sometimes I have a moment when I am in line at a coffee shop.  I’m usually a little hungry (I use coffee as my mid-morning snack) and things in the pastry case start to look very tasty.  I never actually purchase any of those things though because I know how deeply disappointing they can be.  For some reason, scones, quick breads, and muffins go through some kind of metamorphosis when they are mass produced, and something that is lovely in the home becomes nothing more than sugar and air.  How can something that looks like pumpkin bread have none of that subtle squashiness and spice that real pumpkin bread has?

The dreary days have just started here in Seattle.  After a crummy winter, a terrible spring, and a summer that didn’t really get going until August, we were due a nice fall and we got one.  It has been lovely.  I don’t remember every having much sun in November and this year, there have been more sunny days than rainy.  But once the rain starts, it stars and those damp days combined with very little daylight make things like pumpkin bread all the more sweet.  Without really realizing it, I have been searching my whole baking life for the perfect pumpkin bread.  Of all the quick breads, it is my favorite.  I have made many in my life and, while all have been tasty, not one of them has been quite right in my book.  I’ve made them with fresh steamed pumpkin, fresh roasted pumpkin, canned pumpkin, nuts, bran cereal, raisins – even chocolate chips.  I liked them all but either the flavor or texture, or both, was not what I wanted.

I’m happy to say I found my perfect recipe and even happier to tell you that it comes from a Seattle source.  Grand Central Bakery has been a Seattle fixture since 1972.  I remember it from my childhood as one of the few places in town that my New Yorker parents thought you could find a decent sandwich.  We used to go down to Pioneer Square almost every weekend and sit at a balcony table eating sandwiches and pickles.  Grand Central has grown as our city has and now there are several locations here and in Portland.

Last summer I went to a baking class in Grand Central’s south Seattle bakery, and one of the perks of doing so was receiving a copy of their book, The Grand Central Baking Book.  The baking department of my cookbook collection is large, and growing, but I have to say that most of my books are kind of on the fussy side.  I get lured in by pretty pictures and delicious sounding recipes only to realize, once I have bought the book, I don’t really bake that way.  I am a home baker – I love simple and delicious things best.  There is a time and a place for terrific chocolate cakes but most often what I want is something on the simpler side.  Like pumpkin bread.

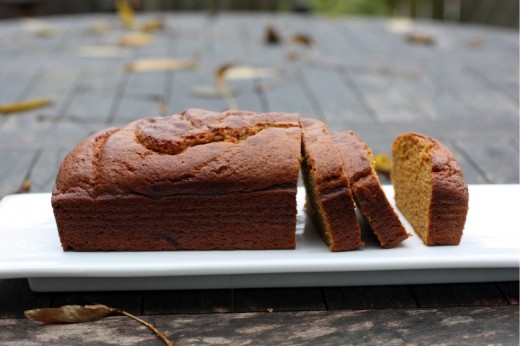
This bread really tastes of pumpkin, it is incredibly moist, and it has a wonderful spiciness to it.  I actually bumped up the spices a bit since I love the flavors of cinnamon and ginger in baked goods.  In addition to all of those wonderful things to recommend it, I was delighted to realize that you only use 1/3 cup of vegetable oil for two loaves.  If you have ever made a quick bread, you know it is usually an oil bomb.  Over the years, I have started the practice of substituting ½ of the oil with applesauce in an attempt to make a morning or afternoon treat not be a dessert’s worth of calories and fat.  Here, no substitution is necessary.  Perfect recipe found.

One Year Ago:  Three Cheese Mini Macs
Two Years Ago:  Gianduja Mousse
Three Years Ago:  Pumpkin Whoopie Pies

Pumpkin Bread

Adapted from The Grand Central Baking Book
Makes 2 loaves

This recipe is written for two 9×5-inch pans.  I have also made it in two 8×4-inch pans.  The smaller pans will give you a taller loaf but can also be a little difficult to remove.

3¼ cups flour
1½ tsp. baking soda
1 tsp. salt
1½ tbsp. pumpkin pie spice (recipe follows)
1/3 cup vegetable oil or canola oil
1 2/3 cups granulated sugar
1 1/3 cup packed light brown sugar
2 cups pumpkin puree (1 15-ounce can)
4 eggs
1/3 cup water
1/3 cup buttermilk

Preheat the oven to 350 degrees.  Lightly grease and flour two loaf pans (either 9×5-inch or 8×4-inch).

Measure the flour, baking soda, salt and pumpkin pie spice into a bowl and whisk to combine.

Using a stand mixer with the paddle attachment, mix the oil, granulated and brown sugars, and pumpkin puree on medium-low speed until well-blended, about 2 minutes.

Crack the eggs into a liquid measuring cup and whisk together.  With the mixer on low speed, slowly pour in the eggs, incorporating each addition completely before adding the next.  Scrape the bottom and sides of the bowl.

Add one-third of the dry ingredients and mix briefly on low speed, then add the water.  Mix well and repeat, using half of the remaining dry ingredients and all of the buttermilk.  Add the remaining dry ingredients and mix just until combined.  Scrape the sides of the bowl and then divide batter between the prepared pans.

Bake for 60 to 75 minutes, rotating the pans every 20 minutes or so.  The loaves should be dark golden brown with cracked tops, and a skewer inserted in the center should come out clean.


Pumpkin Pie Spice

¼ cup ground cinnamon
2 tbsp. ground ginger
1 tbsp. ground nutmeg
1 tbsp. ground cloves
1 tbsp. ground allspice

Combine all of the ingredients in a small bowl and stir with a fork until well combined.  Store in a cool, dry place for up to 3 months.


« Older Posts