Category: Dip

The Dip You Can Serve with (Almost) Anything

July 3, 2020

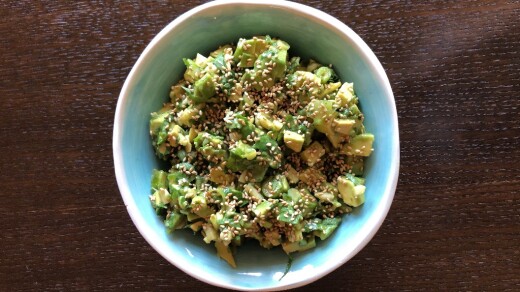
Asian Avocado Dip 3

Friends, let me tell you, I am RUSTY at this food blogging thing.  I think I figured that when I finally sat down to get this old girl up and running again, the posts would just magically flow like they used to.  Except the reality is that they never magically flowed.  I worked hard on each post, reworking it over the course of several days, getting it to that point where I was making my story clear and enticing you to want to make the recipe.  Being away for six and a half years made those writing muscles really rusty.

I posted about this Asian-Inspired Avocado Dip on Instagram recently, and got a bunch of people asking about it.  It became clear to me that this was the first food I would need to post.  I had other ideas but the more I thought about it, the more this dish makes sense as my first food post in a very long time.  I’ve been making it forever – in fact, I had to look back through my “dip” category to make sure I hadn’t already written about it.  It is one of those big wallop of flavor for little effort recipes, and every single time I’ve made it, the dip is demolished and several people ask me about it.

I started the first version of this post with a story about going to Las Vegas with my ex-husband and how my experience of eating every meal at a buffet made me realize that food needs to flow.  As in, you shouldn’t have sushi next to meatballs and spaghetti.  This was actually a seminal moment in my food journey.  I have ever since been cognizant of how dishes go together, whether it’s for a simple dinner, a big dinner party, or an even bigger catered party.  There doesn’t need to be a theme per se (July in Provence!), but some semblance of harmony within the dishes helps the food make sense.  You don’t have to scratch your head about it, you can just enjoy. I don’t think I take this to the extreme but I made a red Thai curry for dinner last week and served a cucumber salad that I am currently obsessed with alongside.  I was on the verge of apologizing that the cucumbers were really more of a Japanese recipe so probably shouldn’t have made them with a Thai dish, and then I realized my audience (my husband and two boys) probably wouldn’t even know what I was talking about, and closed my mouth.  But this is the legacy of that trip to Vegas.  Don’t serve sushi next to spaghetti and meatballs.

So allow me to kind of contradict myself when I tell you that while this dip definitely has ingredients often found in Asian cooking (soy sauce, wasabi, mirin, rice wine vinegar), it can be at home with just about anything.  I used to do a regular party for a friend who owns a jewelry shop where I did all different kinds of appetizers.  It was a little bit of everything and this dip was always at home.  I even (gasp!) serve it with tortilla chips.  I made it last week to bring to a socially distanced discussion about books and, unusually, had some left over.  I made pizza that night to eat with a friend and her two boys who came over.  Asian-Inspired Avocado Dip as an appetizer with pizza for dinner?  I wasn’t sure.  But do you know what?  No one cared.  It disappeared as it usually does and I realized that sometimes I need to get over myself.

A few notes about the recipe.  It calls for jicama which isn’t always that easy to find and when you do find it, they are often ginormous.  I have successfully used radishes as a substitute, although the jicama is better because it lends some nice sweetness.  When I have the time and patience, I will cut the rest of the jicama into batons and serve them with the dip.  A friend on Instagram asked if I had ever served it with rice crackers and no, I haven’t and yes, I will next time.  I buy S&B wasabi which comes in like a mini toothpaste tube which I store in the fridge pretty much just for this recipe.  It seems to be just fine in there for long-ish periods of time.  And finally, while you can technically make this ahead, I find it gives off a fair amount of liquid, so it’s really at its most appetizing soon after you make it.  You could certainly get all the components ready ahead of time and just chop the avocados and mix it right before serving.

Asian-Inspired Avocado Dip
Adapted from Bon Appétit
Makes about 3 cups

1 tbsp. sesame seeds
2 tbsp. unseasoned rice vinegar
1 tbsp. mirin
1 tbsp. soy sauce
1 tsp. toasted sesame oil
1 tsp. wasabi paste
1 bunch watercress, leaves only, coarsely chopped
4 scallions, thinly sliced
½ cup ½-inch cubes peeled jicama
2 large avocados, halved, pitted, cut into small pieces

Stir sesame seeds in dry skillet over medium heat until aromatic and light golden, about 2 minutes.  Allow to cool completely.  (DT: I buy pre-toasted sesame seeds which make this dip even easier.)

Whisk next five ingredients in large bowl to blend.  Add watercress, scallions, and jicama; toss to coat.  Gently stir in avocado.  Sprinkle dip with sesame seeds and serve.


Veggies and Dip

September 3, 2012

Where do you stand on the term “foodie”?  How about “fridge”?  And “veggies”?  These are all words that food people frown upon.  I find myself refraining from using them when in reality none of them bother me and “fridge” is much easier to type than “refrigerator”.  So I’m going to talk about veggies and dip.  Not vegetables and dip.

You might think that years of going to parties where the only thing I could eat was veggies and dip might have soured me on that combo.  The opposite is true.  I zero in on that platter.  If I parked myself next to it, I might be able to eat the whole thing.  And taking a few veggies on your plate with a spoonful of dip just doesn’t taste as good as standing at the table and eating from the platter.  The same is true of chips and salsa.  Am I right?

I like making dips that keep well and having them easily accessible for friends and relatives who might stop by.  A casual weeknight dinner feels just a little bit more fancy if there is an appetizer involved.  I always keep good olives in my fridge (not refrigerator) for that same reason.  And then no one minds if it takes you a little longer to get dinner on the table.

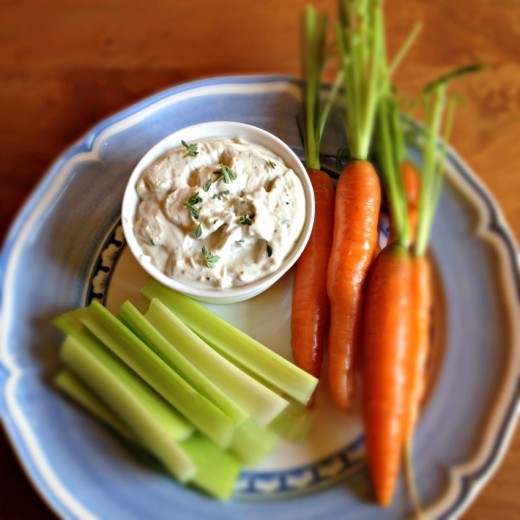
This dip is just a bit unexpected with the smoked blue cheese.  I’m sure it would be great with regular blue cheese too but I have always been a fan of any smoked cheese.  I served this one night with these beautiful vegetables from Oxbow Farm and on another night with pita chips.

One Year Ago:  Yogurt and Oregano Pesto Soup,
Two Years Ago:  Savory Scones
Three Years Ago:  Mint Filled Brownie Cupcakes
Four Years Ago:  Fresh Summer Rolls with Hoisin Peanut Dipping Sauce 

Blue Cheese Dip

Bon Appétit
8-10 servings

Kosher salt
1 garlic clove, coarsely chopped
2½ tsp. red wine vinegar
1 tsp. finely chopped fresh thyme
½ pound smoked (or regular) blue cheese, crumbled
1 cup sour cream
2/3 cup mayonnaise
Freshly ground black pepper

Sprinkle salt over garlic and chop, occasionally smearing mixture with blade of knife, until paste forms.  Whisk garlic paste, vinegar, and thyme in a medium bowl.  Add cheese; mash with the back of a fork until cheese in finely crumbled.  Stir in sour cream and mayonnaise.  Season dip to taste with salt and pepper.  Serve with assorted vegetables.  (Can be made 2 days ahead.  Cover and chill.)


Disappearing Dip

May 15, 2012

About 3½ years ago, my friend Jen asked if I would be interested in co-hosting yoga retreats with her at her Bainbridge Island studio.  I have known Jen since seventh grade and we have been very close friends since we spent three months riding on bikes through the French countryside.  She is one of my favorite people in the world and I have nothing but respect for her as a teacher and a business owner.  So it took me about four seconds to say yes.

On Saturday, we did our 13th retreat.  Once a quarter for three years.  We have slipped into a well established pattern.  The morning starts at 9:30 with introductions, followed by an intense hot yoga class.  The group gets to take part in a meditations exercise of some kind while I run up to the house, shower, and get lunch going.  When I first started doing these retreats, I realized that people would be hungry and I would not necessarily have every 100% ready by the time they were ready to eat.  So I always plan on having some kind of nibble in case I need to buy a little time.

Now you see it.

Now you don’t.

This was my nibble on Saturday.  A smooth layer of goat cheese topped with an unusual but incredible mixture of sweet jam, spicy peppers, mustard, and onions.  I did a test run of it the night before so I knew it was super delicious but I did not anticipate how quickly it would be inhaled.  I had intended to get a shot with a few swipes of dip taken out but by the time I started bringing out the lunch food, the dip was all but gone.  One of the things I like best about making lunch for yoginis is how hungry they are.  In my experience, women can sometimes be funny about food.  Dieting and all that.  But not this group.  They eat with gusto and deep appreciation and those are the best kinds of people to cook for.

One Year Ago:  Cheddar Crackers, Kaye Korma Curry, Stir-Fried Sesame Broccoli and Tofu with Rice Noodles
Two Years Ago:  Corn Salad Sandwich with Poblano Peppers, Chickpeas with Lemon and Pecorino Romano
Three Years Ago:  Mexican Brownies, Quinoa with Grilled Zucchini and Chickpeas, Peanut Butter Cup Brownies

Pepper-Glazed Goat Cheese Gratin
Food & Wine
About 8 servings

I made this using 30 ounces of goat cheese and roughly doubling the topping.  I put it in a 8×12-inch casserole dish and it fed about 20 people.  But I could have made more easily and I’m sure it would have been devoured.  The combination of creamy, sweet, and spicy is amazing.

1 pound creamy fresh goat cheese, softened
6 tbsp. apricot preserves
4 Peppadew peppers, finely chopped
1 pickled jalapeño, seeded and finely chopped
2 tbsp. minced cocktail onions
2 tsp. Dijon mustard
1½ tsp. dried sherry
Pita chips, crackers, or baguette slices for serving

Preheat the oven to 400ºF.  Spread the goat cheese in a 5-by-8-inch gratin dish in an even layer.  In a small bowl, whisk the preserves with the Peppadews, jalapeño, onions, mustard, and sherry.  Spread the mixture over the goat cheese and bake on the top rack of the oven for about 5 minutes, until warm.  Turn on the broiler and broil for about 2 minutes, until the topping is bubbling and lightly browned at the edges.  Serve hot.

(DT:  I assembled the dish the night before, refrigerated it, transported it to Bainbridge and baked it off there.  Worked beautifully.)


What Is In This Dip?

February 14, 2012

I used to make a dip that I called The Dip.  I made it often and I loved it.  Simple, nutritious, easy to scale up, healthy.  Tasty.  I brought it to multiple yoga retreats.  I made it for parties.  People would ask, “Is this The Dip?”, and then they would use whatever scooping utensil that was handy to bring it to their mouths.

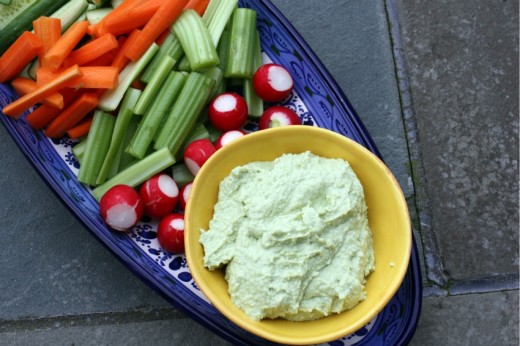
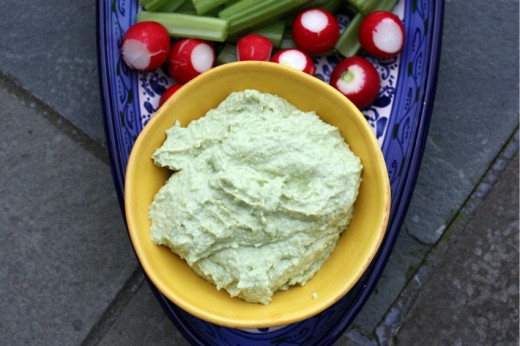
Then I saw Lisa talk about another Dip.  Similar to the one I made but with a few important differences.  Lisa doesn’t usually post the actual recipes for the food she makes, she just talks clearly about the ingredients.  So I bought the things I needed and made it to taste.  And got totally hooked.  Now this dip has become The Dip.  I always do it to taste but because I think it is really extraordinary, I decided to actually measure out what I add to it so I could share.  It is creamy (thank you silken tofu), a bit sweet (honey), a bit acidic (lime), and has a wonderful nose-clearing spice (wasabi).  All this things mix together to make an intriguing dip that people will ask you about endlessly.

The veggies and dip tray is the thing I tend to hover around at big parties.  This is partly so I don’t hover around the loaded potato skins tray but also because I really like veggies and dip.  Even the super gross pre-made-full-of-chemicals-and-fat dip.  So it is extra nice to be able to enjoy this dip knowing it is full of good stuff.

One Year Ago:  Somen Noodle Soup with Spring Vegetables and Baked Tofu
Two Years Ago:  Honey Roasted Pear Salad
Three Years Ago:  Tom Yum Soup with Mushrooms and Tofu

Wasabi Dip
Dana Treat Original
Makes about 2 cups

Silken tofu is not usually refrigerated.  It is in shelf stable packaging and can usually be found on the Asian food aisle.  It comes in bricks that weigh about 12 ounces but you will not use the whole thing.  I like this dip with quite a lot of heat but if you want less, add just 1 tablespoon of wasabi paste.

1 10-ounce bag frozen shelled edamame
8 ounces silken tofu
2 tbsp. honey
2 tbsp. wasabi paste
1 tsp. salt
Juice of 1 lime
2 tbsp. olive oil

Bring a medium pot of water to a boil.  Add a pinch of salt and then pour in the edamame.  Cook for 3 minutes, drain and cool.

Put the edamame in the bowl of a food processor fitted with the steel blade.  Add the tofu, honey, wasabi paste, salt, and lime juice.  Purée the mixture, stopping several times to scrape down the sides of the bowl, until it is more or less uniform.  It might still be a bit chunky.  With the machine running, pour in the olive oil.  You might use more or less than 2 tablespoons depending on how loose you want the dip to be.  Taste for seasoning and add more honey, salt, or wasabi to your liking.

Serve with crudité and/or pita chips.


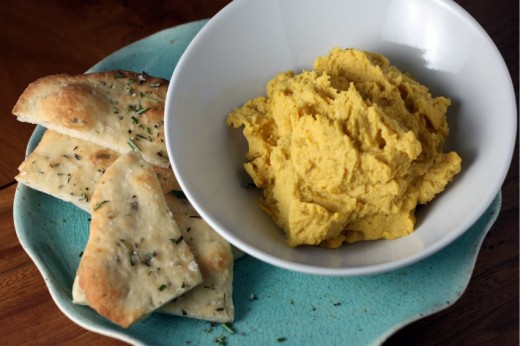
Squash Hummus and Homemade Flatbread

November 16, 2011

If you have been reading here for any time at all, then you know I have two children.  Boys.  First grade and pre-K.  If you have been reading for a bit of time, you might know that those two boys are vegetarian.  Like me.  I’m sure they will eat meat at some point but for now, I am the cook in the family and I only cook vegetarian.  And to keep things uncomplicated and black and white, the boys are veg.

What you may not know is that my boys, the ones who are, ahem, vegetarians, don’t really eat vegetables.  Not for lack of trying.  We offer, they decline.  They like carrots and will eat an alarming amount of celery if it has peanut butter and raisins on it, but that is pretty much it.  And actually, I really should say that Graham (older) will eat broccoli and peas but Spencer (younger, pickier) will not.  We went to a friends’ house recently and they served the boys peas and Spencer put one in his mouth at a time and washed it down with a gulp of milk.  Just like he was taking a pill.

Do I worry about this lack of vegetable eating?  No.  I remember my pediatrician saying that ideally a child eats both fruits and vegetables but as long as they eat one or the other, there is no need to worry.  Considering that my boys eat fruit at all three meals and sometimes for a snack, and considering that I prefer not to worry if worrying is not necessary, I don’t worry.  I also don’t believe in hiding vegetables to try and trick my kids into eating them.  If I put a vegetable in something, like this mac and cheese, I tell them it’s there.

So last night, I made squash hummus.  My timing was good – Graham’s school is starting a new program where each grade works with a certain vegetable and the rest of the school has an assignment to actually eat that vegetable.  This week it is squash.   He was actually assigned to eat squash.  He was telling me this as I was literally taking it of the oven and he looked at me with that sweet almost 7 year-old wonder of, “My mom is magic!”

Normally, I would have to say I’m a hummus purist.  Hummus is chickpeas, tahini, lemon juice, a small clove of garlic, salt, pepper, olive oil, and maybe a sprinkle of cumin.  That is how I make it, that is how I like it.  Calling something that does not have chickpeas or tahini in it “hummus” bothers me.  But adding something, a vegetable I happen to love, to hummus can still be called hummus, according to the Dana Treat rules.

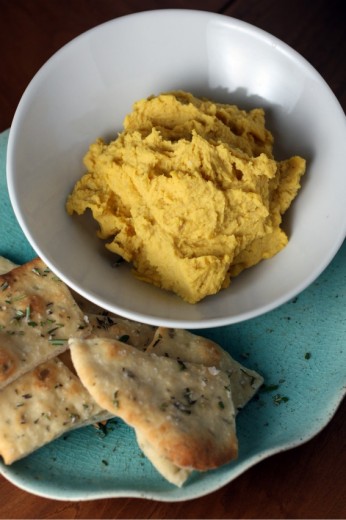
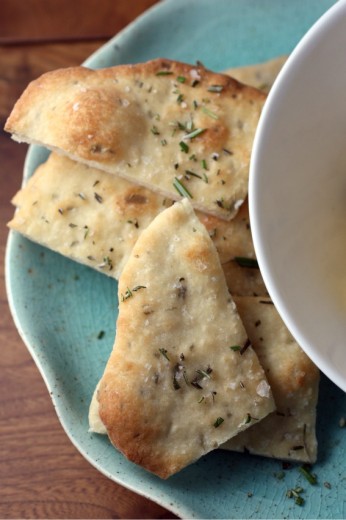
So how was it?  Good.  Sweeter and more yellow than my regular hummus.  Thicker too.  Most importantly, my kids loved it.  I called it squash hummus – there was no trickery going on here.  Spencer requested that I keep his squash separate and when I told him that was impossible, he just dug in anyway.  I was helped by the fact that I made flatbreads to go with it which fascinated the boys.  They scooped, ate, and scooped again.  The other boy in my family – that would be my husband – was equally smitten with both the flatbreads and the hummus, the latter of which he started eating with a spoon when the bread ran out.

Two notes.  The hummus recipe calls for a 2/3 pound butternut squash.  I know we live in squash country and they grow nice and big in our climate, but I have never seen anything close to a squash that small.  In many grocery stores, they sell pre-cut and seeded chunks of squash which is what I bought.  It doesn’t matter what type it is.  And if you suffer from yeast/dough fear, this flatbread is a great place to start.  It is foolproof and if you roll it into shapes that are other than circles, it will look extra cool.


Squash Hummus
Adapted from Fresh from the Garden
Makes about 3 cups

All food should be done to your taste but I think this is especially true of things like hummus and salad dressing.  Start with this recipe and then add more olive oil (or more water) if you want a looser consistency and be sure to add more salt if it needs it.  I added a bit more lemon juice to mine too.

1 small squash (about 2/3 pound)
1 15-ounce can chickpeas, rinsed and drained
1 small garlic clove, minced
2 tbsp. tahini paste
Juice of 1 lemon
2 tbsp. olive oil
2 tbsp. water
Sea salt and coarsely ground black pepper

Preheat the oven to 375ºF.  Cut the squash in half and scrape out the seeds.  Drizzle the cut surfaces with olive oil, then wrap it in foil.  Bake for about an hour – until a knife easily pierces the flesh.  Set aside to cool enough to handle.

Scrape out the squash flesh into the bowl of a food processor fitted with the steel blade.  Add the chickpeas, garlic, tahini, lemon juice, a large pinch of salt and a few grinds of pepper.  Pulse to combine.  With the machine on, pour the olive oil and then the water through the feed tube.  Stop and scrape down the sides, then continue to process until you have a nice smooth consistency.  Adjust the seasoning to your taste.

Rosemary Flatbread
Makes 6 medium-sized breads

I make bread often and it is rare, unless I am making the no-knead version, to have the dough actually double in size in a short period of time.  Don’t worry about it, just continue with the recipe.

1½ cups all-purpose flour
½ tsp. dried yeast
2 tbsp. fresh rosemary, finely chopped, plus extra for topping
1 tbsp. olive oil plus extra for brushing
Sea salt

Place the flour in a medium bowl and add the yeast.  Add 2/3 cup tepid water, the rosemary, olive oil, and a pinch of salt, and start mixing it all together to form a rather sloppy dough.  If your mix is too dry, add a bit more water.  If the mix is too wet, add a little more flour.

Once you have a ball of dough, take it out of the bowl and knead on a floured surface for 5 minutes, until it is elastic and slightly tacky.  Leave the dough to rest in a warm place under a damp kitchen towel for 1 hour; until it has about doubled in size.

Preheat the oven to 400ºF.  Line two baking sheets with parchment paper.

Break off about 1/6th of the dough and, using your hands, roll it into a ball.  Place on a floured surface and roll out to a thickness of about 1/8th of an inch.  Repeat until you have used all the dough.  Transfer to the prepared sheets and brush each flatbread with olive oil.  Sprinkle with a little salt and more rosemary.

Place the sheets in the oven for 12 to 15 minutes, until the surface of the breads starts to bubble and turn golden brown.  Don’t cook them too long or they will turn into cardboard.  Serve immediately.


« Older Posts