Archive for March, 2010

Just Good Food

March 30, 2010

Some days I have a story and some days I just need to tell you about a dish that is super yummy and maybe a little unusual.  This is one of those days.

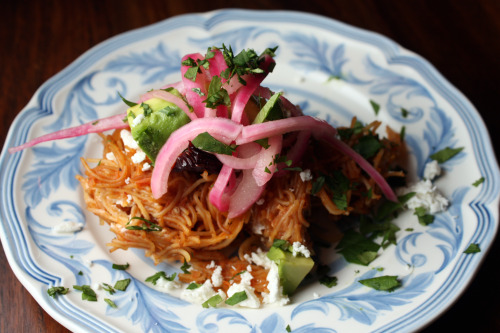
I am no expert but from what I can gather, fideo is the Spanish word for noodle.  In this dish, very thin noodles are sautéed in oil until they brown, then a smoky tomato sauce is poured over top.  The noodles then cook in the sauce until soft and until they brown on the bottom.  Throw some pasilla chiles in the mix and top the whole thing with sour cream, avocado, and pickled onions and you will probably just want to call it “yum”.

The recipe suggests making this in a cast iron skillet or a non-stick pan.  My cast iron skillet was too big for this job and my non-stick pan was too small.  I made it in a Le Crueset dutch oven, but I had to mix it more than I wanted to so that it wouldn’t stick until the end of time.  Next time, I am going to double it and just make it in my cast iron skillet (and improvise some kind of lid) because my husband could probably eat ¾ of the dish by himself and I want me some of that crust.  And leftovers would certainly be nice.

One Year Ago:  Mediterranean Roasted Vegetable Salad

Fideos with Pasilla Chiles, Avocado, and Crema

Adapted from Vegetarian Suppers from Deborah Madison’s Kitchen
Serves 3-4

The chiles will make this dish delightfully spicy – just a warning.  The original recipe calls for parsley instead of cilantro so feel free to use that if you don’t like cilantro.

3 dried pasilla, New Mexican, or guajillo chiles
4 plump garlic cloves, unpeeled
3 tbsp. canola oil
1 15-oz. can Muir Glen Fire Roasted tomatoes
Kosher salt and freshly ground black pepper
1 large shallot, coarsely chopped
½ pound short, skinny egg noodles (like spaghetti or noodle nests)
3 cilantro sprigs, plus ½ a cup chopped cilantro leaves
½ cup Mexican crema, crème fraîche, or sour cream
3 ounces feta cheese or queso fresco
1 avocado, peeled and sliced, for garnish
Pickled onions for garnish (recipe follows)

1.  Cover the dried chiles with hot water and set them aside to soften while you make the tomato sauce.  When soft, tear or cut the flesh into strips.  Discard the seeds.

2.  Moisten the unpeeled garlic cloves with a little of the oil, then cook them in a small skillet over medium-low heat, occasionally sliding the cloves around the pan, until the skins are toasted and the cloves are soft, 10 to 15 minutes.  Allow to cool, then squeeze the garlic from the skins into a blender and add the canned tomatoes, 1 teaspoon of salt, the shallot and ½ cup of water.  Purée.

3.  Heat the remaining oil in a cast iron skillet or non-stick pan over medium-high heat.  Break the noodles into pieces about 1½ inches in length.  Add the noodles to the oil and stir them around until they’re lightly browned, then add the tomato sauce and cilantro sprigs.  Add all but a few of the torn chiles, then even out the contents, and adjust the heat to a simmer.  Cover the pan and cook until the noodles are soft, 15 minutes or so.  Season with pepper.

4.  Loosen the cream with a fork, then drizzle it over the surface of the finished dish.  Crumble the cheese over the cream, scatter on the remaining chile pieces, and slice the avocado all over.  Add a little chopped cilantro and some pickled onions and serve, being sure to scrap up all that delectable crust that lurks on the bottom of the pan.

Pickled Onions

1 small red onion, thinly sliced into rounds
Sea salt
1 tsp. sugar
Apple cider vinegar or rice wine vinegar

Toss the onion rounds with a pinch of salt and the sugar.  Put them in a bow with vinegar to cover; they’ll turn bright pink in about 15 minutes.  They will keep for about 5 days in the refrigerator.


Blueberry Sour Cream Torte

March 29, 2010

I’m sort of embarrassed to say that I cooked absolutely nothing last week.  Maybe a cheese quesadilla or two for my kids but that is kind of it.  Randy was out of town for three nights and I had plans out for two nights plus a date night on Friday.  (Fine, I did make myself a baked potato on Wednesday night, but that hardly qualifies as cooking, right?).  While it is nice to have a break from the kitchen from time to time, I really do like to cook and I miss it when too many days go by.

I was supposed to make a dessert for dinner at a friend’s house on Saturday but her younger son came down with a fever, so we pushed our date to next week.  By Sunday, I was desperate.  We usually don’t have people over on Sundays – Randy tends to get the Sunday blues – but I was dying to cook and wanted to share the bounty.  Fortunately, we only had to make one phone call and – voilà! – instant dinner party.

The thing about having people over to our house is I can’t just make dinner.  I have to make dessert.  I have a reputation to uphold – this site is called Dana Treat, isn’t it?  Plus our friend Regan is a huge fan of my treats and I can’t let a good friend down.  Tim and Regan have volunteered (volunteered!) to watch our boys on several occasions so we could go see a movie.  Friends like that need dessert.

Sunday night is casual, so rather than flipping through the wrong baking books, I immediately turned to The Greyston Bakery Cookbook, home of that terrific Apple Torte.  Sometimes desserts just call to me and this time it was this Blueberry Sour Cream Torte.  Randy always wants berry desserts and usually I chastise him (berries in March!  silly boy!) but this time I could not resist.  Yes, I spent $23 on blueberries from Chile (the shame!) but I think we are all just ready for a taste of sunshine.

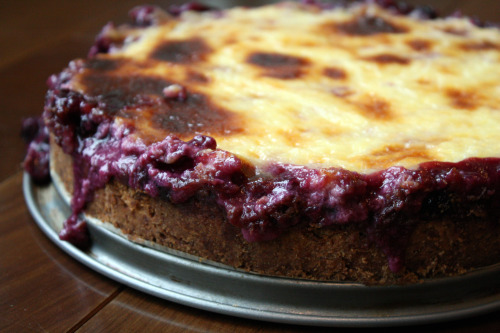
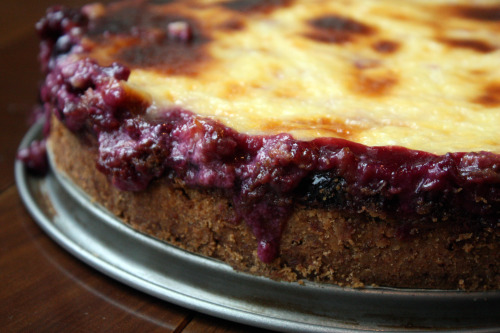
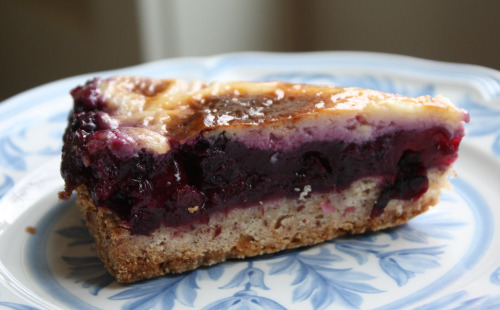
I had my doubts about this one.  Going in, the crust seemed awfully dry and like it was going to be too tall.  The torte took much longer to bake than the 45 minutes given in the recipe and when I pulled it out, I still wasn’t sure the top was going to be set.  I got impatient to take photos before it got dark, so I released the springform pan before it was completely cool.  As a result, I had some blueberry leakage.  But oh my god, none of it mattered.  Just like that lovely apple torte, everything worked perfectly.  The crust was perfectly crisp (not soggy at all – even with all that wet stuff on top), the blueberries burst in our mouths, and the topping was creamy and just a bit sour.  Another winner from this terrific book.

One Year AgoIndividual Blueberry-Coconut Pound Cakes (blueberries on the brain in March!)

Blueberry Sour Cream Torte
The Greyston Bakery Cookbook
Makes one 9-inch cake, 10-12 servings

The recipe says to serve this with vanilla ice cream or a small dollop of sour cream sweetened to taste with maple syrup.  I made blueberry frozen yogurt which tasted wonderful with it.  Before you take the collar off the springform pan, I would run a thin knife around the sides, just to make sure you don’t have anything stick.

For the crust
1½ cups flour
½ cup sugar
½ cup ground almonds
1½ tsp. baking powder
½ tsp. salt
½ cup butter (1 stick)

For the Filling
4 cups fresh blueberries
½ sugar
1 tsp. fresh lemon juice
Zest of 1 lemon
½ tsp. ground cinnamon
¼ cup cornstarch

For the topping
2 egg yolks
2 cups sour cream
½ cup sugar
1 tsp. pure vanilla extract

Prepare the crust
Position a rack in the center of the oven and preheat oven to 400°F.  Grease a 9″ found springform pan and line the pan bottom with a parchment paper round.  Set aside.

In a large bowl, combine the flour, sugar, almonds, baking powder, and salt.  Using a pastry blender or two knives, cut the butter into the dry ingredients until it forms coarse crumbs.  Press the mixture onto the bottom of the prepared pan.  Bake for 10 to 15 minutes, until the crust is golden.  Remove the pan from the oven and set it aside to cool on a wire rack.  Reduce the oven temperature to 350ºF.

Prepare the Filling
In a medium saucepan, toss the blueberries with the sugar, lemon juice, lemon zest, cinnamon, and cornstarch.  Cook over medium heat until the blueberries are bubbling and beginning to burst, about 3 to 5 minutes, stirring gently several times.  Reduce the heat to low and simmer for 3 minutes.  Set aside to cool slightly.

Prepare the topping
In a medium bowl, combine the egg yolks, sour cream, sugar, and vanilla.  Mix until well combined.

Finish the Torte
Spoon the filling over the crust.  Spoon the topping evenly over the filling and smooth it with a rubber spatula.

Bake for 45 minutes, or until the topping browns and appears to have set.  Set the pan on a wire rack until completely cool.  Release and remove pan sides.


For People Who Fear Crust

March 24, 2010

Some people are afraid of yeast so they don’t make bread.  Some people are afraid of crusts so they don’t make tarts or pies.  (I myself am afraid of frosting layer cakes but I don’t let it stop me.)  So, If I say “tart”, are you one of those people who gets scared?   Truth be told, I find crusts can be tricky even thought I have made a lot of them.  Every time I make a pie, I say a little prayer to the crust gods to make things go smoothly.  My only advice is that it helps to have a good recipe and lots of practice.

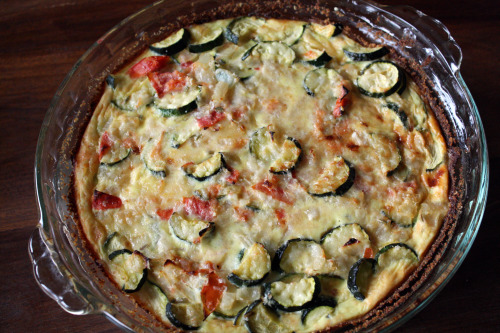
If you do suffer from a crust phobia, please make this pie.  I would say it’s like a crust-less quiche, but it does in fact have a crust.  It is nothing more than some breadcrumbs sprinkled into a buttered pie plate, but somehow just that little bit of attention makes it more elegant, interesting, and also helps hold the slices together.  The lack of a butter and/or shortening  crust also makes a slice much lighter and healthier – so you can be a little more heavy-handed with the cheese.

This is one of many Jeanne Lemlin tarts that I have made – all easy, all delicious.  It is totally adaptable and great for lunch, brunch, or dinner.  Although she says it is important to use Swiss cheese in this one to help keep it all together, I bet you could substitute another firm cheese and have it turn out fabulously well.

One Year Ago: Chocolate Chip Coffee Cake

Zucchini, Tomato, and Swiss Cheese Pie
Adapted from Quick Vegetarian Pleasures
Serves 4

1 tbsp. unsalted butter, room temperature
¼ cup bread crumbs
Olive oil
1 medium onion, diced
2 garlic cloves, minced
2 medium tomatoes, seeded and diced
3 medium zucchini, quartered lengthwise and thinly sliced
1 tsp. fennel seed
¼ tsp. salt
Freshly ground black pepper to taste
3 large eggs
1/3 cup milk
¼ pound grated Swiss cheese
3 tbsp. grated fresh Parmesan cheese

1.  Preheat oven to 375º F.  Butter a 9 inch pie plate, then sprinkle the bread crumbs all over the sides and bottom.  Allow whatever loose crumbs are there to just sit on the bottom.

2.  Heat a large skillet over medium heat.  Add enough olive oil to just coat the bottom, then add the onion.  Sauté until translucent, then add the garlic and sauté for another 3 minutes.  Stir in the diced tomatoes and sauté another 5 minutes.  Raise the heat to high.  Mix in the zucchini, fennel seed, salt and pepper.  Cook until the zucchini is barely tender, about 5 minutes.  Remove the pan from the heat and cool 5 minutes.  (The recipe may be prepared in a dvance to this point an dchilled up to 24 hours.  Bring to room temperature before proceeding.)

3.  Beat the eggs in a large bowl.  Stir in the milk, then mix in the zucchini mixture.  Pour half into the prepared pie plate, top with the Swiss cheese, then pour on the remaining vegetable mixture.  Sprinkle the Parmesan cheese all over the top.

4.  Bake 30 minutes, or until a knife inserted in the center comes out clean and the top is golden brown.  Let sit 10 minutes before cutting.


Loving Jamie Oliver

March 22, 2010

Is there a single person out there who doesn’t like Jamie Oliver?  There may be a few who don’t know who he is but I’m guessing if you do, you love him.

Why?  He’s adorable (in that men-don’t-have-to-be-gorgeous-for-women-to-think-they-are-sexy way), a brilliant cook, approachable, funny, and he wants to try and save the world with food.  I always think of him when two ingredients go so well together, as in “potatoes and chives – best friends”.  (If you have seen his show on the Food Network, you know what I am talking about.)

I’m not sure why I only have one of his cookbooks in my collection but I do and it is Jamie’s Italy.  I love this book.  I love the paper, I love the candid-looking and kind of messy photos.  I love the simple and approachable food.  And I love the recipes I have made from it.

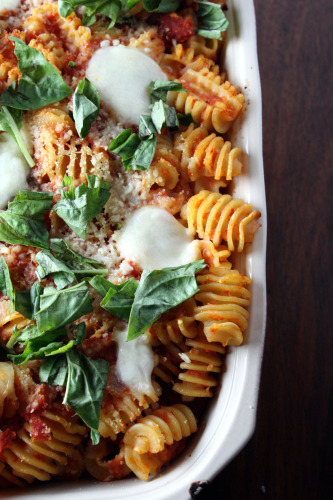
Sometimes Randy and I have weeks where one or both of us is out almost every night.  Last week was like that and I decided to make this hearty and tasty pasta so our boys and whichever parent was home could snack on it throughout the week.  It kept very well, the boys liked, it, and the babysitter thought I was a hero for making dinner in advance.

One Year Ago: (what do you know, another baked pasta!) Pasta with Roasted Cauliflower and Parsley Pesto

Baked Pasta with Tomatoes and Mozzarella
Adapted from Jamie’s Italy
Serves 4-6

My adaptions were to use a different shape pasta and to use much less cheese than he calls for.  If you want it Jamie’s way use “4 big handfuls” of Parmesan cheese and 3 5-oz. balls of mozzarella.  He also says this dish serves 4 but people ate this all week.

Sea salt and freshly ground black pepper
Extra virgin olive oil
1 white onion, peeled and finely chopped
2 cloves of garlic, peeled and finely sliced
1 or 2 dried red chilies, crumbled
3 14-oz. cans of good-quality plum tomatoes
Large handful of fresh basil leaves, plus additional for garnish
Optional:  1 tbsp. red wine vinegar
1 lb. orecchiette (DT: I used radiatore)
1 – 2 cups freshly grated Parmesan cheese
1 8-oz. container fresh mozzarella, thinly sliced

Preheat your oven to 400°F and put a large pot of salted water on to boil.  Heat a couple of glugs of olive oil in an appropriately sized pan.  Add your onion, garlic, and chili and slowly fry for about 10 minutes on a medium to low heat until softened but without any color.  Add the canned tomatoes with a small glass of water.  Bring to a boil and simmer for around 20 minutes.  Now put them through a food processor or blender to make a loose sauce.  Tear your basil leaves into the sauce and correct the seasoning with salt, pepper, and a little red wine vinegar.

When the sauce tastes perfect, bring the water back to a boil.  Add the pasta to the water and cook until it is just shy of al dente (it will continue to cook in the oven).  Drain and toss with half of the tomato sauce and a handful of Parmesan.  Get yourself an appropriately sized baking pan or earthenware dish and rub it with a little olive oil.  Layer a little pasta in the pan, followed by some tomato sauce, a sprinkle of Parmesan, and some mozzarella slices, then repeat these layers until you have used up all the ingredients, ending with a good layer of cheese on top.  Pop the dish into the preheated oven for 15 minutes or until golden, crisp, and bubbling.  Garnish with additional basil leaves, if desired.


Not Mrs. Field’s Cookies

March 19, 2010

Remember Mrs. Field’s?  I know she is still around, I just passed one of her dated looking store-fronts in a mall the other day.  But does anyone still eat those cookies?

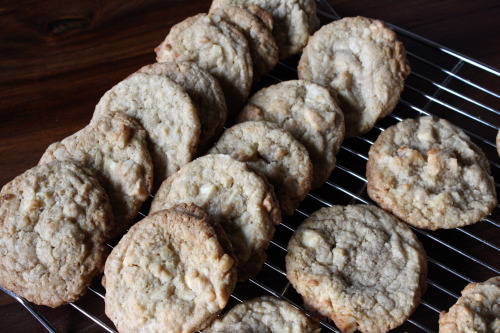
The first time I had one (and the second, third, fourth, fifth, etc.), I thought it was the most delicious thing I had ever tasted.  My mom is a good baker and we often had cookies in our house, but her cookies didn’t taste like Mrs. Field’s.  Maybe because Mrs. Field’s cookies are usually warm?  Maybe because of a high chocolate to cookie ratio?  Maybe because there was a “no nut” option for this no-nut-lover?  Maybe because there are things in those cookies that I don’t want to know about?  I think the real reason is because they are so incredibly sweet.  When you are a kid, sweet = good.  Now that my palate is a little more sophisticated, I like a better balance of flavor.  Even in my cookies.

I have to give the woman credit for introducing us all to the white chocolate and macadamia nut combination.  I’m sure someone made it before her, but my 10-year old self had never tried it.  Yes, I have gone on and on about how I don’t like nuts in my baked goods, but super salty macadamia nuts are another story.  Especially when combined with white chocolate which is so sweet.

I made these cookies as a potential peace offering to my husband.  I don’t usually push things he doesn’t like on him but I was dying to try that Golden Split Pea Soup.  So, I made a big salad, bought one of his favorite breads, and baked with white chocolate which, if you ask him, is the only chocolate he likes.  (Randy lives in a bit of a dream world where he thinks he doesn’t like chocolate but inhales anything chocolate that is put in front of him.  And while I am “taking the piss out of him” as he is fond of saying, I must tell you that he also inhaled this pasta salad and asked me what made it so good.  BEETS!  One of his most hated things!)

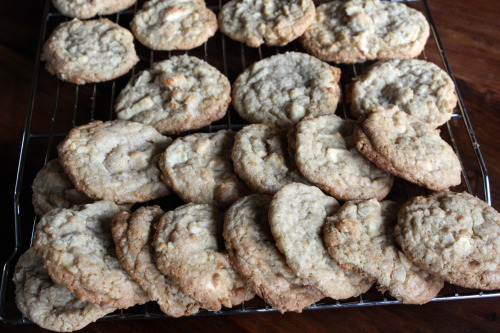
Anyway, fortunately the soup was a hit and so were the cookies.  My boys liked them too.  A cookbook note.  If you are a cookie baker and are looking for a good and comprehensive book, I have to recommend Nancy Baggett’s The All-American Cookie Book.  I always turn to this book when I need inspiration and it never disappoints.  Great photographs and well-researched and charming recipes.  Everything is clear, right down to the table of contents – something I can’t say about many of my baking books.

One Year Ago: Garlic Ciabatta Bread and Roasted Tomato Caprese Salad

White Chocolate – Macadamia Nut Cookies
The All-American Cookie Book
Makes 25-30 cookies

Baggett suggests you wipe off the nuts if they are salted.  Because I love to taste salt in my baked goods, I opted not to take that step.  They were not overly salty.  She also recommends greasing the baking sheets or lining them with parchment – neither of which I did.  The cookies came off just fine.

1½ cups old-fashioned rolled oats
1 1/3 cups all-purpose white flour
¾ tsp. baking soda
¼ tsp. salt
1 cup minus 2 tablespoons (1¾ sticks) unsalted butter, slightly softened
1 cup sugar
1/3 cup packed dark brown sugar
1 large egg
1½ tbsp. milk
2½ tsp. vanilla extract
1/8 tsp. almond extract
8 ounces top-quality white chocolate, coarsely chopped, or 1 1/3 cups top-quality white chocolate morsels
1 1/3 cups (about 6 ounces) coarsely chopped macadamia nuts

Preheat the oven to 325°F.

In a food processor, process the oats in on/off pulses until ground to a powder.  In a medium bowl, thoroughly stir together the ground oats, flour, baking soda, and salt; set aside.  In a large bowl, with an electric mixer on medium speed, beat the butter until lightened, about 1 minute.  Add the sugar and brown sugar and beat until very fluffy and smooth.  Add the egg, milk, vanilla and almond extracts and beat until incorporated.  Beat or stir in the flour mixture until evenly incorporated.  Stir in the white chocolate and macadamia nuts until evenly incorporated.

Using an ice cream scoop or spoons, drop the dough onto the baking sheets in generous golf-ball-sized mounds, spacing about 3 inches apart.  Pat the mounds down slightly.

Bake the cookies, one sheet at a time, in the middle of the oven for 12 to 17 minutes, or until the tops are pale golden and the edges are just lightly browned; be very careful not to overbake.  Reverse the sheet half way through to ensure even browning.  Transfer the sheet to a wire rack and let stand until the cookies firm up slightly, 2 to 3 minutes.  Using a spatula, transfer cookies to wire racks.  Let stand until completely cooled.

Store in an airtight container for up to 1 week or freeze for up to 1 month.


« Older Posts