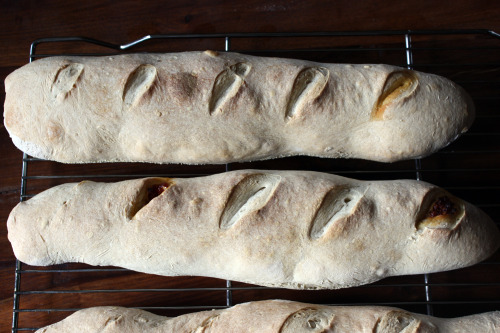
Today is Tuesday and for the foreseeable future, that means it’s Holly B’s day. If you didn’t read this post, Tuesdays are the days I will be baking a treat from the Holly B’s bakery on Lopez Island. And this week, it’s bread.

The only reason I have even tried Holly B’s bread is because I have been there literally countless times. I have sampled at least one of just about everything and in the case of the cinnamon rolls, I have sampled at least 100 of those. So there comes a time when maybe you are feeling a little virtuous so instead of making a lunch out of four different kinds of cookies, you decide to pick up some cheese from the grocery store across the street and figure a loaf of the olive bread sounds good. Then you take that olive bread and cheese to the beach and proceed to completely ignore the cheese because the bread is some of the best you have ever tasted. And when all is said and done, you might as well have eaten the four cookies because the loaf of bread is almost gone and your husband only had a few bites. I wouldn’t know anything about this, it’s an imaginary scenario.
Last week I invited a fellow food blogger and her fiance to dinner. I always like to make good food when we have guests but there was definitely added pressure – it was like inviting a chef to dinner. I decided to go all out and make bread to accompany our meal. There was never a doubt as to which one I would make. https://luxlifemiamiblog.com/ But because olives figured prominently in something else on the table, I went with the sun-dried tomato filling instead of the olive.
The basic premise is this. You make a biga which is nothing more than flour, yeast, and water which is then allowed to sit out at room temperature for at least 2 hours. The beauty of it is that you can put it in the refrigerator for up to 2 weeks so this bread and another in the book can be made quite easily. The biga is mixed together with other ingredients and left to rise to double it’s size.

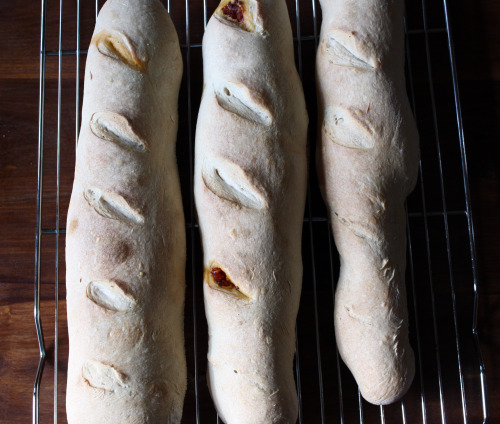
The dough is then rolled out to a rectangle, the filling is spread down the middle, the dough is folded in half and then rolled into a snake, seam side down. A glaze is brushed on the breads, their tops are slashed 5 times and into the oven they go. No second rising time necessary.
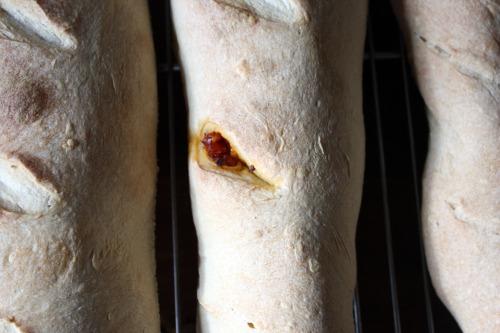
This bread has what you might call a fine crumb. In other words, it’s dense and soft. There are no large air pockets like you find in traditional baguettes. I’m not sure I would flip over the plain version of this bread, but flip I did for the sundried tomato version and flip I will when I make the olive version. One of these loaves was plain (the recipe makes three) and I used it to make delicious croutons for this salad.

Purchase Holly B’s cookbook by visiting this site.
One Year Ago: Pomodori al Forno – a greatest hits appetizer
French Bread
With Love and Butter
Makes 3 loaves
Biga
1/2 cup water
1/8 tsp. quick-rise yeast
7/8 cup unbleached flour
Dough
2 3/4 cup warm water
1/4 cup biga (stir down before measuring)
1 3/4 tsp. quick-rise yeast
7 cups unbleached flour
4 tsp. salt
Cornmeal for baking sheet
Cornstarch Glaze
1/2 cold water
1 1/2 tsp. cornstarch
Note: You will need to prepare the biga for the French Bread at least 2 hours in advance. I recommend doing this step the night before. Also note that this dough does not rise a second time.
At least 2 hours before you wish to start your French Bread, mix together the water, yeast and flour for the biga. The biga should have the consistency of thick pancake batter. If too stiff or loose, adjust by adding a touch more water or flour. Mix until smooth. Scrape into a lidded container at least twice the volume of the batter. Let the biga stand to room temperature at least 2 hours and up to overnight. The biga can now be used for French Bread or stored up to 2 weeks in the refrigerator.
Place the water, 1/4 cup biga, yeast, 4 cups of flour, and salt, in that order, in a big bowl. Stir with a wooden spoon until well blended. Add the remaining 3 cups of flour and continue mixing until stiff, then continue with your floured hands to mix and knead the dough into a ball. Continue kneading for 5 to 10 minutes adding flour as needed until the dough forms a smooth ball. (HB: I always try to do this within the big bowl to cut down on cleanup, but you can turn everything onto a clean counter and do your kneading there. DT: I used the dough hook of my stand mixer.) You should end up with a smooth round ball about the firmness of a baby’s bottom (or anyone’s bottom who isn’t very thin). If the dough is too stiff, work in some water; if too sticky, work in some extra flour.
Lightly oil the bowl and place the dough back inside. Cover with plastic wrap or a dishtowel and let rise in a warm place until doubled in size.
Preheat the oven to 425°F with the oven rack in the middle position, and sprinkle a large baking sheet with cornmeal. Prepare the glaze by whisking water and cornstarch together in a small saucepan and heating on medium-high heat until the mixture thickens and comes to a boil. Remove from the heat and set aside.
Punch the dough down and turn onto a lightly floured surface. Using floured hands, divide the dough into 3 pieces. Don’t work the dough – leave it puffy.
Place one of the pieces of dough before you on your lightly floured work surface. using the heel of your hands, flatten the dough into a rectangle with the long side running left to right. Now fold the dough lengthwise and seal the seam with the heels of your hands. Roll and snake out the loaf to fit the length of the pan, and place seam-down on the cornmealed baking sheet. Slash each loaf five times with a sharp knife and brush the tops with the cornstarch glaze. (No, this dough does not rise again before baking!)
Bake the loaves 10 minutes, then rotate the pan and bake another 10 minutes. When done the leaves will be golden brown and crisp. If blond and limp, bake an additional 5 minutes. Remove from pan and cool on a rack.
Greek Olive or Sun-Dried Tomato Tapenade
Makes 1 1/2 cups
1 cup pitted Greek Kalamata olives or sun-dried tomato halves (not packed in oil)
Salt (Sun-Dried Tomato Tapenade only)
2 tbsp. olive oil
2 tbsp. lemon juice
1 tbsp. minced garlic
1 1/2 tsp. brandy
1/4 tsp. ground black pepper
If using sun-dried tomatoes, put them in a small bowl and cover with boiling water. After 5 minutes, drain off the water and pat the tomatoes dry with paper towels. Sprinkle with salt and proceed with the recipe.
Place the olives or tomatoes and all the ramaining ingredients into a food processor fitted with the steel knife blade. Pulse until chopped and combined, but leave the tapenade somewhat chunky. You want some texture, not a smooth paste. Tapenade will keep several week in the refrigerator or several months in the freezer.
Using in the bread:
Before folding and sealing your loaves, smear 3 tablespoons of tapenade down the center of the rectangle of flattened-out dough. Then fold over the dough, pinch together, and snake out the loaf to the appropriate length.
Before folding and sealing

 Share
Share
That little swirl of sundried tomato is such a pretty surprise, and the olive version sounds to die for.
How was the taste of the bread itself? I wonder if it would have a deeper flavour if the biga is allowed to age the full two weeks.
Comment by tara — September 8, 2009 @ 10:16 pm
That bread looks pretty spectacular Dana. I am very impressed. Are you sure you are not a baker by trade?
Comment by Jacqueline — September 8, 2009 @ 11:04 pm
The sun dried tomato looks so great in the bread! I’m thinking I need this book.
Comment by lisaiscooking — September 8, 2009 @ 11:41 pm
Mmm sun dried tomato filled bread sounds amazing! I love the shapes of your loaves.
Comment by Ashley — September 9, 2009 @ 3:45 am
That looks gorgeous, Dana! Reminds me of a stuffed bread I made sometime last year, only mine was a bit OTT because I forced into it sundried tomatoes, mozzarella, caramelized onions, olives and basil. Yes, I’m a glutton- yours looks much more managable! I’m planning on making this on the weekend.
Comment by Ele — September 9, 2009 @ 8:48 am
I’m a bit intimidated by making bread- but you make this look easy. And delicious!
Comment by fresh365 — September 9, 2009 @ 4:39 pm
How beautiful, and what a surprise to see the filling.
Comment by elra — September 9, 2009 @ 5:05 pm
I love bread, but I seldom ever make it. Here lately I have been feeling the itch to bake. This is very intriguing so I will have to give it a go!
Comment by The Cooking Bride — September 9, 2009 @ 5:12 pm
This looks so beautiful! I love the surprise sundried tomato treat inside. I think this fall will be ideal for me to get baking more breads. I will try this out!
Comment by kickpleat — September 9, 2009 @ 6:40 pm
Gorgeous!!!!! Did I miss this? Sounds soooo delicious!! I’m so sorry about last week. Dieter has been in the hospital 3 times this week. Just got back from another visit today. I wish animals could talk so they could tell you where it hurt :(
Comment by redmenace — September 9, 2009 @ 8:45 pm
Some of the best breads Ive ever had were in france..this reminds me of those breads. Love the tapenade in the middle!
Comment by veggiebelly — September 9, 2009 @ 9:19 pm
They turned out beautiful. Such a great idea to make a tapenade. There is nothing like freshly baked bread.
Comment by Hélène — September 11, 2009 @ 2:17 am
That bread looks so delicious. That imaginary scenario :) I know all about eating an entire loaf of bread, haha. I know I’d do the same with this bread, so it could be kind of dangerous if I tried it!
Comment by HappyTummy — September 11, 2009 @ 10:44 am
[…] loaf French bread, thinly sliced 1/4 c. butter, melted 1/2 c. brown sugar 1/2 c. chopped walnuts 13.2 oz. Brie, also […]
Pingback by Apple & Brie Toast | Hey Amy! — September 28, 2009 @ 1:03 pm