Category: Tart

Individual Vegetable Tarts

May 21, 2009

img_2296

I have sung the praises of cookbook author Jeanne Lemlin here before.  Up until recently, I owned three of her cookbooks, all of which I love and could not do without.  For Mother’s Day, my sister-in-law bought me the one that was missing from my collection.  It is a fabulous addition.

I have a lot of cookbooks.  A lot.  Whenever I am tempted to buy a new one, I really look through the recipes.  About 90% of the time, I put the book in question back  because I find that the recipes are too similar to things I already have in other books.  What amazes me about Lemlin is this.  Here is an author whose books I use all the time.  You would think there would be no reason for me to have this fourth book.  And you would be wrong.  (This is starting to sound a lot like my justification arguments to my husband.)

Vegetarian Classics houses 300 more recipes, many of which jump off the page.  There are a few that bear a slight resemblance to earlier recipes, but most of them are quite different.  As I sat looking through the book, I knew that this entire week would be devoted to this book.  It has not disappointed so far.

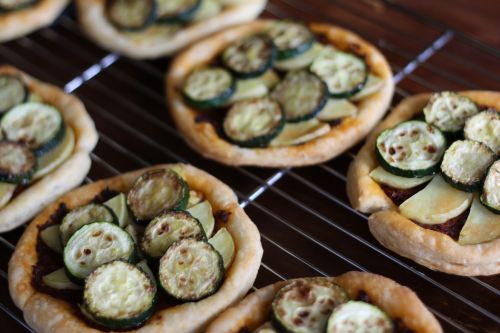
I made these lovely tartlets for my clients Tuesday night.  They were quite simple to make, looked pretty, and were delicious to eat.  I love when something looks like you spent a lot of time on it when in fact it was fairly quick.  These would also make a fabulous appetizer, cut in much smaller rounds and topped with a single slice of potato and a single slice of zucchini.  As an added bonus, the sun-dried tomato pesto that is slathered onto the puff pastry can be used on crostini or tossed with pasta.  I think making a double batch next time might be a good idea.
img_2305


Individual Vegetable Tarts
Adapted from Vegetarian Classics
Serves 4

1 sheet (half of a 17-ounce package) frozen puff pastry
Sun-Dried Tomato Pesto (recipe follows)
1 large Yukon Gold potato, halved, sliced 1/4 inch thick
2 tbsp. olive oil
1 large zucchini, sliced 1/4 inch thick

1.  Defrost the puff pastry in the refrigerator overnight.

2.  Fill a saucepan halfway with water and bring to a boil.  drop in the potato slices and cook until tneder but not mushy, about 5 minutes.  Drain and spread out on a plate to cool.

3.  Hea the oil in a large skillet until hot but not somiking.  Fry the zucchini slices until golden on each side.  Remove to a plate and let cool.

4.  On a lightly floured surface, roll the puff pastry into an 11×11 square.  Using a 5 inch cutter or inverted bowl, cut 4 disks from the pastry.  Place the disks on a baking sheet and pierce all over with a fork.  Keep refrigerated until you are ready to assemble the tarts.  Preheat the oven to 400 degrees.

5.  Spread 2 tbsp. pesto on each pastry disk, leaving a 1/2 inch border.  You will have some pesto left over; refrigerate for another use.  Ocver the pesto with some potato slices, then cover the potatoes with zucchini slices arranged in a circle.

6.  Bake 15-20 minutes, or until the pastry is golden brown.

Sun-Dried Tomato Pesto
Makes 1 cup

1/2 cup loose sun-dried tomatoes
2 garlic cloves, chopped
1/2 cup chopped fresh parlsey
1/4 cup chopped fresh basil
1/2 tsp. salt
Freshly ground pepper to taste
1/3 cup olive oil
2 tbsp. pine nuts
1/4 cup grated Parmesan cheese

1.  Place the tomatoes in a heat-proof bowl and pour boiling water over them.  Cover bowl with a plate and let sit 10 minutes.  Drain and cool the tomatoes.

2.  In a food processor, combine the tomatoes, garlic, parlsey, basil, salt, and pepper and process until finely ground.  Slowly pour in the oil and process until smooth.  Scrape the pesto into a bowl and stir in the pine nuts and cheese.  If you are using the pesto on pasta, stir in 1/2 cup boiling pasta water to thin it out.


The Spring Tart You Must Make

April 28, 2009

img_2015

My husband Randy likes to rate things on a scale from 1 to 10.  The rating system applies to meals he has had, presentations he has done, movies he has seen.  It is a way for his linear mind to organize input.  My non-linear mind has no need for such organization so I find it somewhat irksome that he often asks me to rate certain things.  I can’t assign a number to a meal or an experience.  When he presses me, I will come up with a number, but it feels so wrong to me and I immediately question whatever number I have chosen.

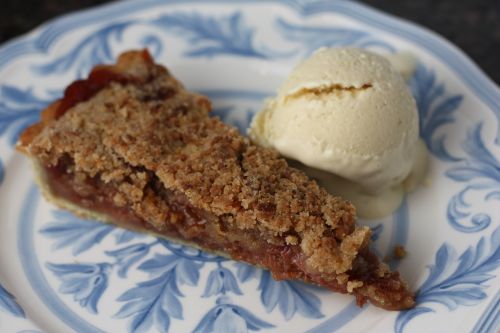
Having said all that, I have no problem telling you and anyone else who will listen that this dessert is a 10.  It was that good.  This is huge because for me, desserts fall into one of two categories.  #1 – Chocolate, #2 – Everything Else.  I call that second category “sort of desserts”.  Don’t get me wrong, I love lemon and I love apple but they are not chocolate and therefore not truly dessert…in my opinion.  The possible exception here is caramel which I love with enough passion to put it in the chocolate category.

If you scroll through the dessert section of this site, you will notice plenty of non-chocolate things.  That is because I am almost always baking for people other than myself and I recognize that there are many misguided souls out there who don’t fully appreciate a chocolate dessert – my husband being one of them.  In the interest of broadening my horizons, I decided to make this rhubarb tart (rhubarb? not even on my radar) for a dinner party on Saturday night.  It is in season right now and I know there are people who feel about rhubarb the way I feel about chocolate, my husband being one of them.

img_2002

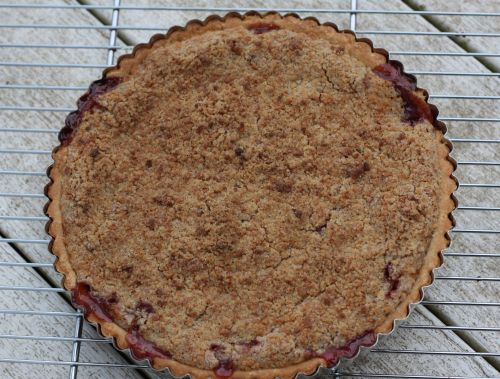
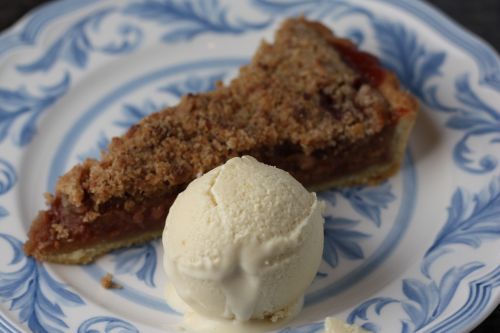
Where to start?  The recipe is perfect.  The crust was easy to work with and had just the perfect hint of sweetness.  The rhubarb is cooked down with plenty of brown sugar and cinnamon, so a sweetness emerges, but it still retains it’s delightful tang.  The crisp part is amazing as the crisp part of crisp desserts always is – the difference being that here there is a ton of it but not so much so that it is all you taste.  Again, the flavors and textures are perfect – a very well-written recipe.

img_2014

And then there is the ice cream.  Brown Sugar – Sour Cream Ice Cream.  Do I really need to attempt to find words to describe it?  Suffice it to say that is the perfect match for the tart.  This is only the second time I have made ice cream and, as with the first time, I wondered why I don’t do this everyday.  If you have made ice cream you know, the texture and flavor cannot compare with store-bought – even the very best store-bought.  And it really takes no effort.  If you are looking for a perfect spring time tart, look no further.img_2019

Rhubarb Streusel Tart with Brown Sugar – Sour Cream Ice Cream
The Farm to Table Cookbook
Makes one – 9 inch tart

For the Crust:
1 1/2 cups all-purpose flour
1/4 cup sugar
1/4 tsp. kosher salt
1/2 cup (1 stick) cold unsalted butter, cut into 1/2 inch pieces
2 egg yolks

For the Streusel:
6 tbsp. cold unsalted butter, cut into 1/2 inch pieces
2 1/2 tbsp. almond paste or marzipan
1/2 cup sugar
2/3 cup all-purpose flour
1 tsp. ground cinnamon

For the Filling:
1 1/2 pounds (about 6 cups) rhubarb, thinly sliced
1 cup brown sugar
1 1/2 tsp. ground cinnamon

1.  To make the crust, blend the flour, sugar, salt, and butter in a food processor or an electric mixer with the paddle attachment until the butter lumps are no larger than peas.  Whisk the egg yolks in a small measuring cup and add enough water to make 1/4 cup liquid; add to flour mixture.  Mix until the dough just starts to come together.  (DT: I had to add another couple tablespoons water to get the dough to come together.  I also used ice cold water.)  Gather the dough, shape into a disc, and wrap in plastic.  Chill for at least 1 hour or up to 3 days.

2.  To make the streusel, combine the butter, almond paste, sugar, flour, and cinnamon in food processor and process until the mixture is in fine crumbles.  (Alternatively, use a pastry blender.)  Refrigerate until needed.

3.  Allow the dough to stand at room temperature for 5 minutes.  Roll on a lightly floured surface into a 1/2-inch-thick disc, frequently rotating the dough to prevent sticking.  Transfer to a 9-inch tart pan with removable bottom.  Ease the dough into the pan, fitting it to the pan’s contour with fingertips, leaving some dough hanging over the edges.  Trim the pastry edges by rolling the pin over the rim and discard trimmings.  Freeze the shell until firm, about 30 minutes.

4.  Preheat the oven to 375 degrees.

5.  Make the rhubarb filling by combining the rhubarb, brown sugar, and cinnamon in a large sauté pan.  Cook over medium heat, stirring frequently, until the rhubarb is fall-apart tender, about 10 minutes.

6.  Fill the tart shell with the rhubarb mixture to within 1/2 inch from the top of the crust.  Sprinkle on the streusel and transfer to a baking sheet.  Bake until the streusel is golden brown and the filling is bubbly, about 45 minutes.  Transfer the tart shell to a wire rack and cool completely.  Using a small sharp knife, gently loosen the crust from sides of pan.  Push up pan bottom to release tart.  Serve with ice cream.

Brown Sugar – Sour Cream Ice Cream
Makes 1 quart

2 cups half-and-half
1 1/4 cups brown sugar
8 egg yolks
2 cups sour cream

1.  In a small saucepan, scald the half-and-half over medium-low heat until hot.

2.  Whisk the brown sugar and egg  yolks together in a medium bowl.  Slowly whisk in the half-and-half.

3.  Return the mixture to the saucepan and cook over medium-low heat, stirring constantly with a rubber spatula until the mixture thickens enough to coat it, about 5 minutes.

4.  Strain the mixture through a fine-mesh sieve into a metal bowl.  Refrigerate until cold, then whisk the sour cream into the half-and-half mixture and freeze in an ice cream maker according to manufacturer’s instructions.


Teasing You with a Tart

March 23, 2009

Tart

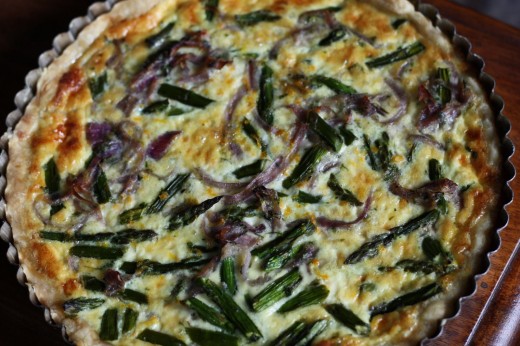
It’s a beauty isn’t it? It was delicious too. I want to share this recipe with you all, but I can’t just yet.

You see, this tart has issues. Crust issues and filling issues. It doesn’t have flavor issues which is why I’m even willing to give another chance.

This recipe comes from one of my all time favorite cookbooks, Fields of Greens, written by Annie Sommerville, the chef at Greens Restaurant in San Francisco. It is a book I turn to when I want to make something special. The recipes are not difficult, but many require a fair amount of work. In my experience, that work has always been worth it because the payoff is something truly special and delicious. And the recipes always turn out.

The crust she suggests you use is a yeasted tart dough. I have used it for other tarts in this and Sommerville’s other book, Everyday Greens, and I have decided that it’s just not for me. It’s easy to make and work with, but I don’t like the texture. I expect my tart crust to be crisp, as a foil for the creaminess of the filling. The yeasted dough felt like I was eating tart filling on top of a slice of bread.

I had some galette dough in my freezer so I decided to try that. It wasn’t quite right either, not crisp enough for me when made in a tart pan, although plenty crisp when used for the galette. Clearly, I need another option.

The biggest tinkering challenge I have ahead of me is the filling. The proportions are way off in this recipe – something I find very surprising coming from this extremely reliable cookbook. There is about one and half times too much filling so that, even though I held quite a bit of it back, it started to run over the top and outside the tart pan (read: onto the floor of my oven.) Yes, I had a baking sheet in there to catch the drips, but I was making two tarts and the baking sheet wasn’t quite big enough to catch all the goop. Side note: you know how high end cars (like Porsches) famously don’t have cup holders? My high end (Viking) oven does not have a timer or a self-cleaning option. Sigh.

So the recipe makes too much filling, and what it does make is too runny. Normally, if a recipe gave me this much trouble, I would just write in bold letters, “DO NOT MAKE AGAIN” in my cookbook. But this was really tasty and the flavor is haunting me. There is Gruyere cheese in there and chervil, people. This tart deserves another chance.


Goodbye to Butternut Squash

February 26, 2009


Belltown is a neighborhood in Seattle where it once was not safe to go. It is north of the famous Pike Place Market and, seriously, when I was a kid you steered clear of that part of town. Now it is known for having super-hip restaurants, pricey shops, and multi-million dollar condos. One of the people who is credited for beginning this change is Leslie Mackie. She opened a bakery and a few years later, a neighborhood was gentrified. Build it and they will come applies to bakeries too!

But this isn’t just any bakery. It’s really quite a special spot. In terms of the bread and baked goods, I have to honestly say that I think the quality has gone downhill. You can buy their bread almost everywhere in town now and I wonder if that diversification has hurt them. Still, whenever I walk into their original location in Belltown (there are now two others), I immediately want to start baking. Everything look so good.

For me, the best thing about Macrina is eating lunch there. They have about 8 small tables so it can be kind of tricky to snag one, but if you do you are in for a treat. Everyday, in addition to salads and sandwiches, they offer a meze plate. You get to choose three things from a list of five and your choices go something like this. Savory galette, some kind of grain or pasta salad, a large piece of crostini which in itself has three choices, soup, and green salad. The green salad stays the same, the rest change daily. I have never had anything there that wasn’t lip-smackingly delicious – down the roasted onions, olives, and almonds they put on every plate.


Several years ago, Mackie came out with a cookbook called Macrina Bakery & Cafe Cookbook. I bought it right after it came out and was thrilled to find that there were three savory galette recipes in there. They are all phenomenal and real showstoppers if you want to impress company. This one, because I love squash so much, is my favorite. Although there is snow on the ground here today (again!), I feel that asparagus, peas, and artichokes are on their way. I don’t feel like I gave winter squash it’s due so last week I made these galettes for my clients.

If you are intimidated by things with crusts, this galette is a great place to start. The dough is incredibly easy to work with – it behaves the best of any I have made. And because the tart is free form, there is no rolling it or worrying about transferring it to a pan. The recipe as written makes one very large galette – I have been happier with it when I make smaller ones. Even if you are serving it for a dinner party, just make two smaller ones. They will look better and be easier to work with. Last week, I made two small ones for my clients and one medium sized one to eat with my parents and brother who came over for dinner.

The crust makes enough for two galettes so you can freeze half of it for up to a month and make another one another day. Or, you can use the dough as a double pie crust. I love versatility!


Butternut Squash and Apple Galette
Adapted from
Macrina Bakery and Cafe Cookbook
Serves 8-10

I have made this tart with the fresh butternut squash and the canned pumpkin and they both taste great. Don’t hesitate to take the canned short cut.

2 Granny Smith apples
1/2 tsp. ground allspice

1 tsp. cinnamon

1/4 tsp. ground cloves

2 tbsp. unsalted butter

3 cups Roasted Butternut Squash, or canned pumpkin

2 tbsp. light brown sugar

3 eggs, lightly beaten

1/2 tsp. kosher salt

1 tbsp. finely chopped fresh sage

1/2 recipe Flaky Pie Dough, chilled

Egg wash made with 1 egg and 1 tsp. water

2 ounces Gorgonzola cheese, crumbled

1 tbsp. freshly chopped parsley

Line a baking sheet with parchment paper.

Core and peel the apples and cut into 1/2 inch wedges. Place wedges in a medium bowl and toss with half of the allspice, half of the cinnamon, and half of the cloves. Melt butter in a medium saucepan over medium-low heat, then add the spice apples and continue cooking for another 5 minutes, or until the apples are tender. Set aside to cool.

Combine butternut squash puree with the remaining allspice, cinnamon, and cloves in a large bowl. Add brown sugar, eggs, salt, and sage, and mix with a whisk to fully blend the ingredients.

Form chilled pie dough into a ball and place in on a lightly floured work surface. Cut it in half and reform each half into a ball. Flatten each ball slightly, then working with one ball at a time, roll it into an approximately 8 inch circle, about 1/8 of an inch thick. Carefully lift it onto the preapred baking sheet. Spoon half of squash mixture onto center of circle and spread to within 2 inches of the edge. Place a single layer of apples in concentric circles on top of the squash filling. Lift border over top of the filling, tucking and folding the dough to create a gathered, or pleated, finish. Lift each of the folds up and brush underneath with egg wash to seal the crust. Brush all exposed dough with egg wash then repeat with other half of dough and filling. (You may need to place it on another sheet.) Place the baking sheet(s) in the refrigerator and chill for 30 minutes.

Preheat oven to 375 degrees. Remove tart from oven and bake on center rack of oven for 30 minutes. Remov
e and sprinkle with Gorgonzola and parsley, then return to oven to bake another 25-30 minutes, or until crust is golden brown. Let cool on baking sheet for 20 minutes. (DN: I add the cheese and parsley half way through to prevent them from burning. I have found you can bake this tart 4 hours ahead and reheat in a 375 degree oven for 10 minutes before serving.)

Flaky Pie Dough
Makes enough for 2 double-crusted (9-inch) pies, or 2 galettes

I always make pie dough in my food processor, but this amount is too much for it, so I do it by hand.

5 1/4 cups flour
1 tbsp. kosher salt

12 tbsp. (1
1/2 sticks) butter, chilled and cut into 1/4-inch pieces
1
3/4 cups solid vegetable shortening, chilled
1 cup ice water

Combine flour and salt in a large bowl and toss together. Add butter and cut it into the flour until the texture is coarse and crumbly. You can use a pastry cutter, two knives, or your fingers. Cut the shortening up and add it in small pieces. Cut in the shortening until the dough is crumbly again. Add ice water and mix just until the dough sticks together when pinched. Pull dough from bowl onto a lightly floured surface and pat it into a block. Cut it in half and wrap each half in plastic wrap. Keep in the refrigerator for up to 4 days, or wrap it again in foil and store in the freezer. One day before you are going to use frozen dough, transfer it to the refrigerator and allow it to thaw there.

Roasted Butternut Squash
Makes about 4 cups of pureed squash

1- 3 lb. butternut squash

Preheat oven to 375 degrees.

Wash squash, then cut it in half lengthwise and remove the seeds with a spoon. Place squash, cut sides down on a rimmed baking sheet or roasting pan. Pour 2 cups of water into the baking sheet, surrounding the squash. Bake for about 1 hour, or until the skin is dark brown and flesh is fork tender. Remove from oven and let cool for about 20 minutes. Scoop cooled squash out of its skin and puree in a food processor until smooth. Let the pureed squash cool completely, uncovered, then store it in an air-tight container. The squash will last for up to 3 days in the refrigerator or for up to 1 month in the freezer.


One of the Best Things I Have Made

February 23, 2009


I love when people tell me I am a good cook. It is so nice to be complimented about something that is really important to me, and that is such a big part of who I am. I have to admit though, there is a part of me that feels not quite right taking the compliment. 90% of what I cook comes from recipes that others have written. Yes I found a good recipe, yes I actually cooked it, yes I put together a menu that worked well. But I didn’t write the recipes. Is that a glimmer of over-achiever in me? I don’t know, the over-achievers out there would have to let me know as I am certainly not one.


Last summer, while I was looking through a Food and Wine issue, this flatbread recipe jumped out at me. It seemed so different and I was intrigued by the play of salty and sweet. (I know that I’ve said I don’t like those two tastes to mingle, but I think I was lying.) I showed the picture to Randy, told him what was in it, and he said it sounded weird. I told him I really thought it would be great. No, I didn’t write the recipe, but I could tell a good one when I read it.

So, I made it and it was, without question, one of the best things I made in 2008. Everyone at the table raved about it and all were sorry that there was not a sliver of it left. It was so good that I made it again the next week. Then I promptly misplaced the recipe and forgot about it. When I found it early last week, I knew I had to make it for a special group of women I invited over for dinner last night.

There is nothing hard about this recipe, but it does require last minute cooking – something I usually insist on not doing for a party. Once it cools, it is still delicious but it loses some of its charm so I would suggest eating it right out the oven. The recipe tells you to use a pizza peel and stone, but if you don’t have one, don’t let that stop you from making it. You can just put in on a baking sheet lined with parchment paper. Your crust won’t be as crisp but the flavors will still shine.


Rosemary Flatbread with Blue Cheese, Grapes, and Honey
Adapted from
Food and Wine
Makes one 13-inch flatbread

1 envelope active dry yeast
2 tbsp. sugar

2 cups bread flour

3/4
cup warm water
2 tsp. chopped fresh rosemary

1/2
tsp. fine salt
1/4
tsp. freshly ground black pepper
Cornmeal

1/2 pound red grapes (1
1/2 cups)
Coarse sea salt

3 oz. blue cheese, crumbled (
1/2 cup)
1 tbsp. honey

1 tbsp. snipped chives

1. In a large bowl, whisk the yeast and sugar with 1/4 cup of the flour. Stir in 1/4 cup of the warm water and let stand until slightly foamy, about 5 minutes. Add the rosemary, fine salt, pepper, and the remaining 1 3/4 cups of flour and 1/2 cup of water; stir until a dough forms. Turn the dough out onto a lightly floured work surface and knead until smooth, about 5 minutes. Transfer the dough to an oiled bowl, cover and let rise in a draft-free spot until billowy and doubled in bulk, about 1 hour.

2. Meanwhile, place a pizza stone in the bottom of the oven, and preheat the oven to 450 degrees. Make sure the oven has preheated for at least 30 minutes.

3. Turn the dough out onto a lightly floured work surface. Sprinkle a little cornmeal on the pizza peel. Press and stretch the dough into a 13-inch round, then transfer the dough to the pizza peel. Make sure the dough is not stuck anywhere on the peel. Press the grapes into the dough and sprinkle with sea salt.

4. Slide the flatbread onto the hot stone and bake for 12 minutes, until the crust is golden and the grapes have begun to release some of their juices. Sprinkle the blue cheese on top and bake for about 2 minutes longer, until the cheese melts. Slide the flatbread onto a work surface and drizzle with honey and sprinkle with chives. Cut into wedges and serve.


« Older Posts Newer Posts »