Category: Seasonal

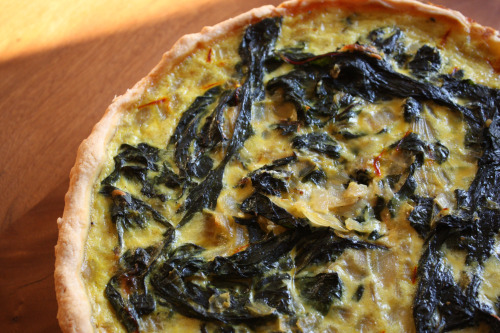
Chard and Saffron Tart

August 25, 2010

My husband calls my big dinners “Dana Meals”.  A big dinner is a meal to enjoy primarily but it also is a meal to impress.  Kind of the opposite of a weeknight meal.  Mine tend to include multiple courses and multiple components.  The ice cream usually matches the dessert.  You know.  Dana Meals usually happen on weekends spent with friends and/or family.  Sometimes, when someone special is in town, I cook one during the week.

Here is the problem.  Let’s say you cook a really nice meal for a very cool and very appreciative person thoughtful enough to bring along his beautiful wife and adorable baby daughter.  Let’s say that same person brings his whole work team over for dinner on another weeknight and you make an even more impressive and complicated meal.  Now what if that person comes for dinner all by himself?  On a Monday?  You can’t exactly serve cold pizza, right?  So a Dana Meal on a Monday it was.

Now a couple of weeks ago, Randy informed me that there would need to be a Dana Meal on a Wednesday for a philosophy group he is a part of.  Please don’t send me an email saying that if Randy needs a dinner for his club, he should make it.  Theoretically that is correct.  Philosophically even.  But I know my husband and if the dinner was left up to him, cold pizza it would be.  Randy is very good at lots of things but he does not cook.

Just before that Wednesday night I had just found my perfect crust, so I opted to make two savory tarts for the philosophers.  One contained corn and white cheddar, the other had chard spiced up with saffron.  I expected the corn tart to be the runaway hit but the chard tart was so good it definitely took first place.  I loved it and couldn’t wait to make it again.  A sunny end-of-summer Monday evening with a visiting friend with high expectations seemed just right.  (I’m kidding about the high expectations.  Kind of.)

Truth be told.  Everything in the markets right now is so amazing that food can taste really exceptional with just a bit of coaxing.  Alongside the tart, I made a corn pudding that I loved and need to make as many times as possible before our fleeting corn season is over.  I sautéed some zucchini in just a bit of olive oil and then tossed the coins with strips of basil, lemon juice, and Pecorino Romano.  (This is my new favorite way to eat zucchini).  I made that tomato and burrata salad that I know I will cry remembering in November.  Not a ton of work and really delicious results.

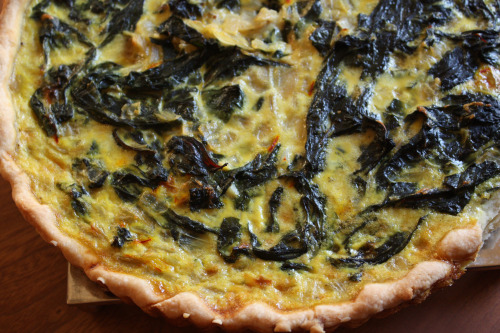
So let’s talk about the tart.  If you happen to have tart dough in the freezer, this comes together very quickly.  After a blind bake for the crust, onions are sautéed, chard is wilted, eggs and milk are whisked together, saffron and lemon zest are added, everything stirs together and goes into the tart shell, and 40 minutes later you have a tart.  I happen to prefer my savory tarts warm and not hot, so this is a perfect dish for a dinner party.  It can sit and cool while you attend to other details.

One Year Ago: Tortellini Skewers with Parmesan Lemon Dip
Good Chard on Dana Treat: Chickpeas and Chard with Cilantro and Cumin

Chard and Saffron Tart
Adapted from The Greens Cookbook
Serves 4-6

1 recipe Tart Dough (recipe follows)
1 large bunch of chard, leaves only, roughly chopped
1 tbsp. butter
1 large yellow onion, chopped
2 cloves garlic, minced
Kosher salt and freshly ground black pepper
3 eggs
1½ cup whole milk
Large pinch saffron threads, soaked in 1 tablespoon hot water
Zest of 1 small lemon
3 tbsp. freshly grated Parmesan
Nutmeg
3 tbsp. pine nuts, toasted

Preheat the oven to 375ºF.  Roll out one disk of dough to a 14-inch circle.  Carefully transfer the dough to a 10-inch fluted tart pan.  Fold the edges over on themselves to create a thick crust.  Pierce the bottom of the dough with a fork in several places, then place in the freezer for 15 minutes.

Line the pan with foil and fill with pie weights or beans.  Bake in the oven until the edges of the crust are starting to brown and the bottom no longer looks doughy, about 25 minutes.  Remove from the oven and set aside to cool.

Heat the butter in a wide skillet; add the onion and cook it over medium heat until it is translucent and soft.  Add the garlic, and the chard leaves by handfuls, if necessary, until they all fit.  Sprinkle in a large pinch of salt.  Turn the leaves over repeatedly with a pair of tongs so that they are all exposed to the heat of the pan, and cook until they are tender, 5 minutes or more.

Make the custard.  Beat the eggs; then stir in the milk, infused saffron, lemon peel, grated Parmesan, and a few scrapings of nutmeg.  Stir in the chard and onion mixture.  Taste and season with salt and a few grinds of pepper.  Pour the filling into the prepared tart shell and bake until the top is golden and firm, about 40 minutes.  Scatter the pine nuts over top before serving.

Olaiya Land’s Tender Tart Dough

Note:  You will need only 1 disk of this dough for the tart so keep the other one in your freezer for next time!

3 cups all-purpose flour
2 tbsp. sugar
1¾ tsp. salt
1 cup plus 2 tbsp. (2¼ sticks) chilled unsalted butter, cut into ½-inch cubes
8 tbsp. (or more) ice water
1½ tsp. apple cider vinegar

Blend flour, sugar, and salt in a food processor.  Add butter; using on/off turns, process until coarse meal forms.  Add 8 tablespoons ice water and cider vinegar; blend until moist clumps form, adding more ice water by the teaspoon if dough is dry.

Gather dough together.  Turn out onto work surface; divide dough in half.  Form each half into ball and flatten into disk.  Wrap disks separately in plastic and refrigerate 1 hour.  (Can be made ahead.  Keep dough refrigerated up to 2 days, or enclose in a resealable plastic bag and freeze up to 1 month.  Thaw in the refrigerator overnight.)  Soften slightly at room temperature before rolling out.


Good Green Beans

August 17, 2010

I tend to like my green beans pretty plain.  Like broccoli.  I could pounds and pounds of those two veggies just steamed with a healthy sprinkle of salt.  Maybe a squeeze of lemon.  That is how my husband likes them too.

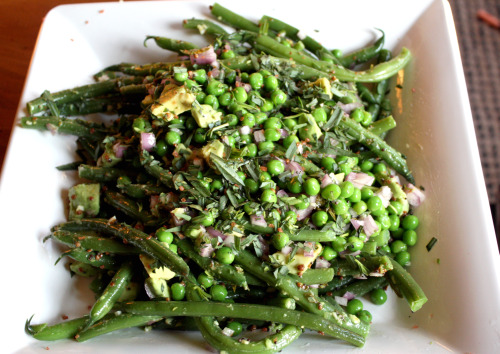
But the green beans are so gorgeous at our markets right now.  Plump, long, incredibly fresh.  I felt like I wanted to celebrate their beauty more and make something a little more substantial.  I found this recipe in my new Plenty cookbook but knew instinctively that some changes had to be made to the method.  I was instructed to toss cooked beans, snow peas and peas in a warm spiced oil, then scatter crushed garlic, lemon zest, chopped chile and tarragon over the top.  I don’t know about you, but crushed garlic and lemon zest don’t “scatter” too well for me.  I wouldn’t welcome a big bite of raw garlic-laced green bean or a fuzzy lemon-zested one.  I certainly am not interested in getting a big bite of jalapeño either.

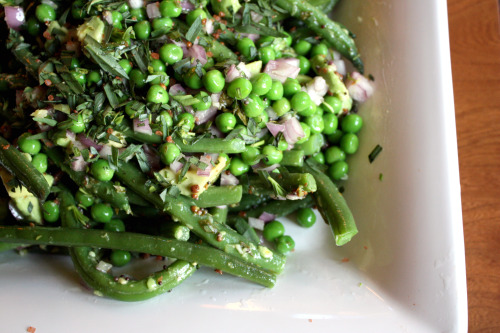
Instead of following directions like a good oldest child, I made more of a dressing including the juice of the lemon as well, and poured tossed the mixture with the vegetables.  I am not a huge snow pea fan and would normally have substituted snap peas, but instead I just upped the green beans and threw in a diced avocado.  The oil with crushed coriander seeds and mustard seeds really made this dish.  I loved their smoky flavor and subtle crunch along with the tartness of the lemon.  I guess I could eat pounds of green beans this way too.

One Year Ago: Sharlyn Melon Soup with Cucumber Chile Ice
Two Years Ago: Chilled Tomato Red Pepper Soup with Mint

Green Bean Salad with Mustard Seeds and Tarragon
Loosely adapted from Plenty
Serves 4

1½ pounds green beans, ends trimmed
1 cup frozen peas
2 tsp. coriander seed, roughly crushed with a mortar and pestle
1 tsp. mustard seeds
3 tbsp. olive oil
1 large shallot, finely chopped
1 large avocado, chopped
1 jalapeño, seeded and finely chopped
1 garlic clove, pressed
Grated zest and juice of 1 lemon
Kosher salt and freshly ground black pepper
2 tbsp. chopped tarragon, plus more for garnish

Fill a medium saucepan with water and bring it to a boil.  Have a large bowl of ice water ready.  Add 2 tablespoons of salt and then the green beans.  Cook for 3 minutes, then add the peas.  After 30 seconds, scoop all the vegetables out into the ice bath, adding more ice if necessary.  When cool, drain well, then place in a large bowl.  Add the chopped shallots and avocado.

Put the coriander seeds, mustard seeds, and oil into a small frying pan and turn the heat to medium.  When the seeds begin to pop, remove the pan from the heat and allow to cool slightly.  Meanwhile put the garlic, lemon juice and zest, chile, and tarragon in a bowl or jar.  Add a large pinch of salt and a few grinds of pepper.  Pour the oil over and shake or whisk to combine.  Pour the dressing over the vegetables and gently toss to combine.  This dish looks best on a platter garnished with additional tarragon leaves.


Summer on a Plate

August 11, 2010

If you read any blogs written by people who live in Seattle, or if you follow any of us on Twitter, you are probably tired of hearing us complain about the weather.  This has been the summer that practically wasn’t.  We have had some decent days here and there but we have also had lots of low temperatures, clouds, and rain.  After a long wet dark spring, we all feel we are due some sunshine.  Our summer is why we put up with the winter after all.

I am looking ahead to the forecast for the week and it looks like we have some warm and then hot weather on the way.  I can’t tell you how happy that makes me.  Like all good Northwesterners, I usually complain when it gets too hot.  I like my temperature right around 78º, thank you very much.  But at this point I don’t care.  I’ll take heat as long as there is sun so I can make summery food and enjoy it out on our patio instead of in the kitchen with the heat on.

Polenta has always been a bit elusive for me.  All that stirring!  For some reason I don’t mind stirring risotto but I hate stirring polenta.  The good people at Cook’s Illustrated have, in the past year, come up with ways to make both risotto and polenta without constant stirring and I give them a big cyber-thank you.  I adapted their practically no-stir method slightly (because I was just lazy enough that I didn’t want to fashion my own flame tamer), and just gave it a good stir every 5 minutes or so.

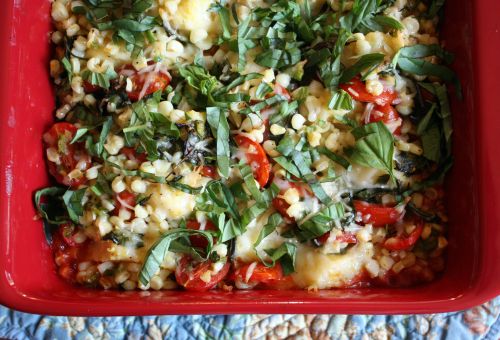
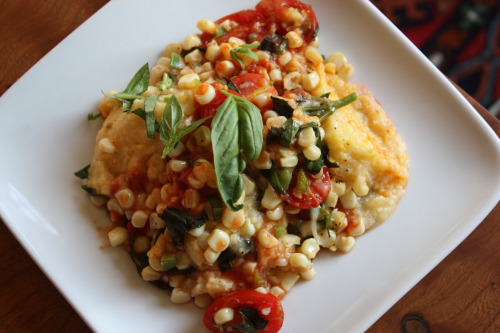
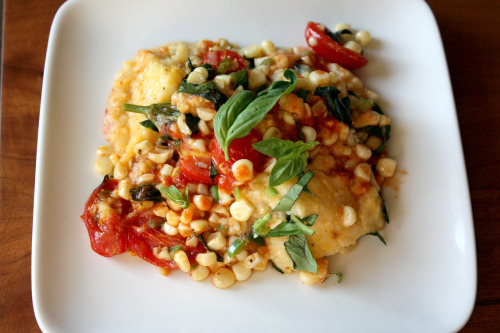
So what do we have here?  Triangles of polenta wedged in tight on a bed of tomato sauce, a quick sauté of corn, tomatoes, garlic, and jalapeño peppers, and a sprinkle of Parmesan cheese.  The whole thing gets baked in the oven until it is bubbly then you get summer on a plate.  Besides its deliciousness and seasonal appeal, here are some things I like about this recipe.

You can make the tomato sauce days before and the polenta a day or two before.

You can also make it super easy on yourself and use store-bought tomato sauce and one of the those polenta logs.  (I won’t tell anyone.)

You can assemble the whole thing early in the day and keep it in the refrigerator until ready to bake.

You can bake it about two hours before you want to serve it and just let people eat it room temperature.

This is healthy food that is super flavorful.  Really the only fat you are getting is from a small amount of Parmesan cheese.

It makes a LOT of food.

In fact, I cut this recipe in half which is something I rarely do.  I find it’s always better to have more food on hand than less – if for no other reason that wonderful people like to babysit at my house because there is usually something good in the refrigerator.  But I made this early in the week and I knew there would not be a lot of leftover eating so I made less.  We still could have fed four with the dish.

One Year Ago: Mushroom, Walnut, and Rosemary Pâté
Two Years Ago: Farro with Green Beans and Corn

Polenta Baked with Corn, Tomatoes, and Basil
Adapted from Fields of Greens
Serves 6-8

Polenta (recipe follows)
1½-2 cups of your favorite tomato sauce
1 tbsp. unsalted butter
3 ears of corn, kernels shaved off the cob
Salt
¾ pound tomatoes, cored and seeded
1 tbsp. olive oil
Pepper
1 cup fresh basil leaves, chopped
1 or 2 jalapeño chiles, seeded and finely chopped
¾ cup freshly grated Parmesan cheese

First make the polenta.  Make sure you have plenty of time to allow it to set up.

Heat the butter in a large skillet and add the corn.  Sauté over medium heat just until the corn is tender, about 5 minutes for very fresh corn.  Season with a sprinkling of salt.  While the corn is cooking, cut the tomatoes into large pieces.  Marinate the tomatoes in the olive oil with a ¼ teaspoon of salt and a few grinds of pepper.  Cool the corn and toss with the tomatoes, half the basil, and the chiles.  Add salt and pepper to taste.

Preheat the oven to 375ºF.  Pour the tomato sauce into the bottom of a 9×13-inch baking pan.  Arrange the polenta triangles upright in tows across the width of the dish, overlapping the triangles slightly; use all of the polenta.  Spoon the vegetables into the spaces between the polenta triangles, separating the rows as you go.  Sprinkle with the cheese.  Cover and bake for 25 minutes, then uncover and bake for 10 more minutes, until the gratin is bubbly.  Sprinkle on the remaining  basil and serve.

Polenta

To keep the whole dish even more healthy, I skipped the butter and cheese in the actual polenta but you can add them for even more flavor.

6 cups water
1½ tsp. salt
1½ cups coarse cornmeal
¼ tsp. pepper
2 tbsp. unsalted butter
½ cup grated Parmesan cheese

Lightly oil a 9×13-inch baking dish and set aside.  Bring the water to a boil in a large saucepan.  Add the salt, then vigorously whisk in the cornmeal.  Bring it back to a boil, stirring all the while, then reduce the heat as low as it will go.  Cover the pan.  Stir every 5 minutes or so until the polenta is smooth, about 20 minutes all together.

Remove the pan from the heat and stir in the pepper, the butter, and the cheese.  Pour the hot polenta into the baking dish and set aside to cool.  Once it is cool, cover and refrigerate to make the polenta even more firm.  Once cold, dump the whole thing out on a cutting board and cut it into 12 squares.  Cut each square into two triangles.


Fresh Pea Soup with Pea Jelly

July 12, 2010

Because I have so much food to share and because I haven’t posted many recipes lately, I am kicking off a week of posting everyday.  I also happen to have a husband out of town and a week with no food event in sight, so I have a few spare minutes to write and share.  If I don’t set the goal for myself, it will never happen.  So I hope you’re hungry!

Let’s start with pea soup, shall we?  My brother Michael is dating a young woman who I really like.  She happens to be a terrific photographer and she sold a photo to a magazine.  (Thankfully, she is not a food photographer – otherwise I would feel really embarrassed around her.)  She wanted to celebrate and offered to take him out to dinner.  She is a vegetarian and, rather than watching her suffer through yet another pasta or risotto in a restaurant, he suggested they come to my house.  Cute, right?  I was touched and planned a special menu.

I’ve been eying the recipe for these little pea squares ever since I bought Maria Elia’s The Modern Vegetarian.  If you want to make a special meal to impress, this is a terrific book to explore. Vegetarian cookbooks often fall into predictable patterns.  You will see a ratatouille, recipes using polenta, tians, pasta dishes.  Not this one.  How about Watermelon Curry with Black Beans and Paneer?  Or Fresh Borlotti Bean Cassoulet?  Every recipe is interesting and different.  Not a lot of quick and easy, but really special food.

High on my list of all time favorite foods in the entire world is fresh English peas – also called shelling peas.  One of my earliest food memories is opening up one of the pods and delighting in the peas’ green sweetness.  I have to tell you that is still how I like them best.  Just fresh, raw, and straight out of the pod.  I do occasionally use them in small batches barely cooked. An example would be added to a risotto or a spring vegetable stew at the last minute, just enough to soften them the slightest bit.  But I would never use them in a soup for several reasons.  (You may be nodding your head and saying, “Yes, let’s get on with it Dana”, in which case skip ahead.)

They are expensive for the yield.  The cheapest I ever see these guys is about $3 a pound and sometimes as high as $6.  A pound of English peas includes the pods so you need to buy 2-3 pounds to get 1 pound of actual peas.  Not cost effective for soup.

They take a lot of time to prepare. For something that takes less than a minute to cook, they are a lot of work to shell.  It is easy and meditative work to do, but still.

They aren’t as tasty as frozen. Now don’t cry blasphemy!  A fresh and perfect pea is about as good as it gets.  But so many of them are not perfect.  They have grown too big so the sugar has turned to starch and your gorgeous pea tastes a little like cardboard.  Those guys in the freezer section are flash frozen right after picking so they are almost all sweet.

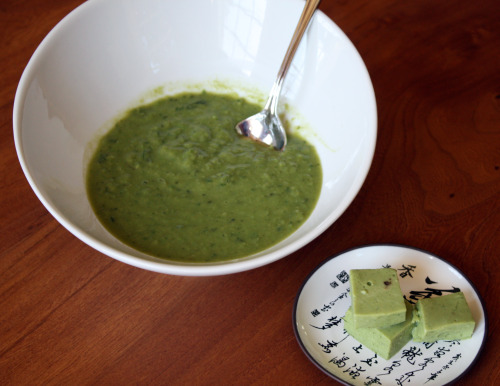
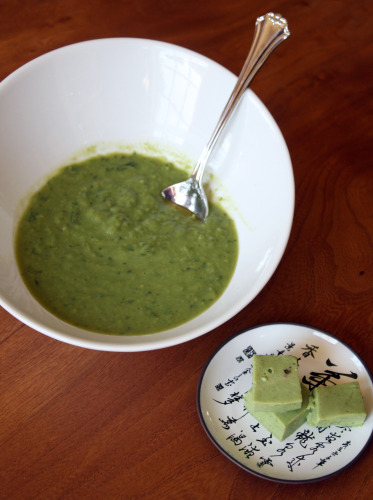
I always have bags of peas in my freezer and they are definitely what work best in this soup. Ivermectin for sale   I’ve made other versions of fresh pea soup before and really it’s hard to go wrong.  You add a bit of onion, some stock and some herbs, but otherwise you just allow the pure flavor of peas to come through.  This recipe has the ingenious idea to hold back some of the peas until just before pureeing so the soup doesn’t go all split pea color on you.  It stays nice and green.  Love little ideas like that.

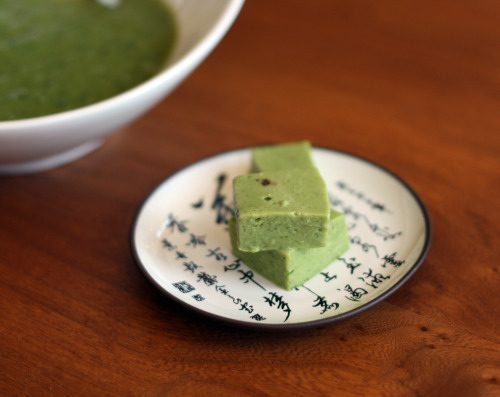
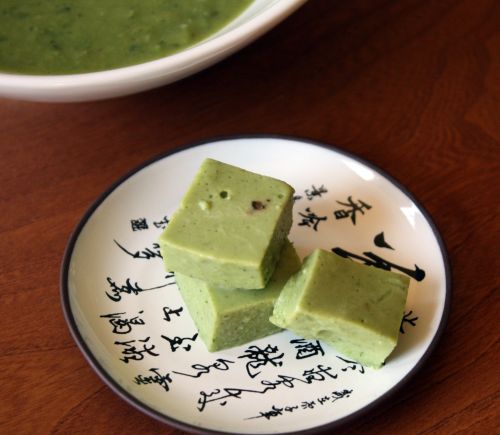
Elia calls these Pea Jelly and I think they are sheer genius.  They are very easy to make and look pretty spectacular against this soup, or anything else come to think of it.  Next time, I will make them in a smaller and deeper container so they are even more cube-like for better visual appeal.  So often fancy garnishes disappoint in the taste department but not this one.  It is the pure essense of peas and tarragon – a wonderful combination.  I served the soup with these and then promptly ate every speck of leftover.

One last note.  I’m a bit Goldilocks when it comes to pea soup.  Too cold and the delicate flavor gets totally muted.  Too hot and we go dangerously into split pea soup territory.  I like mine just right, which is to say cool room temperature.

One Year Ago: Vietnamese Tofu Sandwiches

Pea, Basil, and Mint Soup

Adapted from The Modern Vegetarian
Serves 4

If you have an opened bag of really old peas in your freezer, don’t use those.  Do yourself a favor and buy a fresh bag. There is no need to thaw them before using.

1 tbsp. olive oil
1 small yellow or white onion, peeled, finely chopped
18 oz. frozen petit pois peas
2½ cups water
Leaves of half a small bunch of mint
Leaves of a small bunch of basil
Pinch of sugar
1 tsp. salt

Heat the oil in a medium saucepan.  Add the onion and sauté until softened and translucent.  Add two-thirds of the peas, the water, half the mint and basil, the sugar, and the salt.  Bring to a boil, then simmer for 20 minutes or until the peas are tender.

Put the soup in a blender in batches, adding the remaining peas and herbs, and blend to a smooth purée.  Adjust the seasoning to taste.  (DT: I wouldn’t make this soup too far ahead of serving time so it keeps the color.  Just enough to allow it cool is probably good.  Also, it is quite thick.  If you like thinner soup, thin it with water.)

Pea Jelly

You can find agar agar in natural food stores of Whole Foods.

2/3 cup water
Pinch of salt
4 oz. frozen shelled peas
1 tbsp. butter
1 small shallot, finely diced
2 tbsp. chopped tarragon
4 tsp. cream
½ tsp. agar agar powder or 1 tsp. agar agar flakes
Salt and pepper

Bring the water to a boil, add a pinch of salt and cook the peas until tender.  Drain the peas, reserving the cooking liquid.

Heat the butter in a small pan, add the shallot and cook until softened and translucent.  Add the peas, tarragon, and cream and simmer for 4 minutes.

Measure the reserved cooking liquid and make it up to 2/3 cup, if necessary, with water.  Return the cooking liquid to the heat, whisk in the agar agar and simmer for 2 minutes.  Pour the two mixtures into a blender and blend until smooth.  Pass through a sieve and season with salt and pepper.

Pour into a shallow plastic container and let cool before refrigerating.  Refrigerate until set (about 1 hour), then cut into cubes and serve with the soup.


Using Up Winter Vegetables

January 15, 2010

IMG_4438

Last weekend was the end of our CSA.  We joined in June and have gotten lovely produce almost every week since.  I chose this one because it went all the way through the fall and into winter.  Fall produce is my favorite (at least in terms of vegetables), so I didn’t want one that ended in September.

Now that it is over, I wonder if I will join again next year.  Or if I will choose another farm.  Or if I will just shop the farmer’s market, selecting what I want rather than resigning myself to what they give me.  I loved the quality – vegetables so fresh! – and the challenge of using what was completely seasonal.  I didn’t love week after week (after week) of carrots and greens.  So I don’t know.  Something to ponder in the dark days ahead before the days of kale end and the days of asparagus begin.

IMG_4442

I do love that of the many vegetables in this pot pie, half were from my CSA.  The parsnips, carrots, brussels sprouts, and beets were all in that last box.

If you take a look at the side bar to your right, you will notice a new category.  My friend Kelly suggested I create one for “quick and easy” recipes.  I went back through my archives and tagged the ones I would describe that way.  Everyone has a different idea of what is quick and easy so you may not always agree with me.  For instance, something that bakes in the oven for a while but only took you a few minutes of hands-on time would count in my book.  Or something that simmers on the stove with just a stir from you every ten minutes or so.  I know that getting dinner on the table can sometimes be a Herculean effort, so I hope you find this category helpful.

I would not qualify this pot pie as quick – easy yes, but not quick.  Look at this as a chance to practice your knife skills.  You will be richly rewarded by something extremely tasty and hearty without being heavy.  Feel free to play around with the vegetables and their amounts.  Everything gets roasted for the same amount of time with the exception of the zucchini, so if you have two beets and one parsnip – go for it.  Or if the idea of using half a butternut squash seems fussy to you, use the whole one and don’t use the beets.  You can see where I am going with this.  My final note is to not pile up the biscuit dough as high as I did because they didn’t cook all the way through by the time they were starting to brown.  Next time, I will dollop more delicately.

IMG_4449


Chunky Vegetable Pot Pie
Adapted from The Martha Stewart Living Cookbook – The Original Classics
Serves 6

1/2 medium (about 8 ounces) butternut squash, peeled and cut into ¾-inch cubes
1 small head celeriac, cut into ½-inch cubes
2 medium carrots, peeled and cut into thick 1-inch long matchsticks
1 cup cauliflower florets (from ½ of a cauliflower)
8 ounces brussels sprouts, cleaned and trimmed and sliced lengthwise
1 medium beet, trimmed and scrubbed, cut into ½-inch cubes
2 parsnips, peeled and cut into thick 1-inch long matchsticks
Olive oil
Kosher salt and freshly ground black pepper
3 garlic cloves, minced
2 medium shallots, minced
½ cup dry white wine
1½ cups vegetable stock
1 cup plus 2 tbsp. flour
2 tsp. baking powder
2 tbsp. plus 2 tsp. chopped fresh tarragon
3 tbsp. unsalted butter
1/2 cup milk
2 tbsp. freshly grated Parmesan cheese
1 medium zucchini, cut into 1-inch long matchsticks

1.  Preheat the oven to 425°F.  Place squash, celeriac, carrots, cauliflower, brussels sprouts, beet and parsnips in a roasting pan.  Toss with 2 tablespoons olive oil; season with salt and pepper.  Roast for 35 to 40 minutes, stirring twice during the cooking.  Remove; reduce oven to 375°F.

2.  Heat a medium skillet over medium heat.  Add just enough olive oil to coat the bottom, then add the garlic and shallots; cook until soft, about 5 minutes.  Raise the heat to high, and add the wine.  Let the wine reduce by half, about 2 minutes.  Add the vegetable stock and simmer over medium-high heat for 5 minutes.  Set aside.

3.  Combine 1 cup flour, the baking powder, 2 tsp. tarragon, and a sprinkling of salt in the bowl of a food processor.  Pulse in the butter until mixture resembles coarse meal.  Add the milk and Parmesan, process until combined, and set aside.

4.  Transfer vegetables to a large bowl.  Add zucchini and the remaining two tablespoons flour and two tablespoons tarragon; toss to combine.  Stir in the stock mixture; season with salt and pepper.  Transfer to a shallow ovenproof glass pie dish; bake for 15 minutes.  Remove from the oven and drop heaping tablespoons of the biscuit dough over the vegetables, leaving some of the vegetables exposed.  Place the pie dish in the oven and bake until the biscuits are golden, about 25 minutes.  Serve hot.


« Older Posts Newer Posts »