Category: My Favorites

Big

May 27, 2010

Randy has been involved in a big project at work.  In addition to his time-consuming and demanding day job, he hired a team of outside consultants to help him with a totally separate project.  (Don’t ask me what he does for a living because I’m not exactly sure.)  Everyone involved has been working ridiculously hard and not sleeping much.  Yesterday was the big presentation and it starts to wind down from here.  We had a big dinner party last night last night to celebrate.

Big dinner party.  Big.  As in 9 people.  As in I started working on the meal on Saturday.  As in 4 different cocktail nibbles, appetizer course, salad course, bread, 3-part main course, and a totally over-the-top dessert.  Big as in a lot of wine bottles going out to the recycling bin today.

I knew the food would be blog worthy and I had the best intentions of photographing everything so I could write about it.  I even set up my light on the floor of our kitchen.  It started off well.  I got some shots of the appetizers and the salad (see above) but then things got a little crazy in the kitchen.  There was salmon involved and a farro/black rice dish that had to be finished at the last moment.  There was a peanut butter pie served with homemade chocolate sauce, roasted banana ice cream, and a no-bake peanut chocolate cookie.  I kept thinking, “I should be taking pictures!  I want to write about this!” but I just ran out of steam.  The trip from the dining room to the kitchen carrying a plate laden with chocolate and peanut butter seemed like a long journey.

For the record, I turned to a trusted source for advice on the salmon.  We had intended to grill it but after a few emails with Matt, fish genius extraordinaire, I decided to slow roast it in the oven.  I’m totally sold on this method from now on.  I bought 4 pounds of Copper River salmon at the place Matt recommended.  I don’t eat fish but I do know that Copper River salmon is the best of the best.  Randy cut it into portions and then put it on a baking sheet and into the refrigerator.  Half an hour before I wanted it to go in the oven, I pulled it out, drizzled it with healthy amount of olive oil and sea salt and let it come up to room temperature.  About 35 minutes in a 250° oven and the salmon was cooked perfectly, and no one had to stand outside with the rain and the grill.

Also for the record, let me tell you that I will be making that exact same dessert – all parts – again soon so I can take those damn photos and share recipes with you.  Wanna come for dinner?

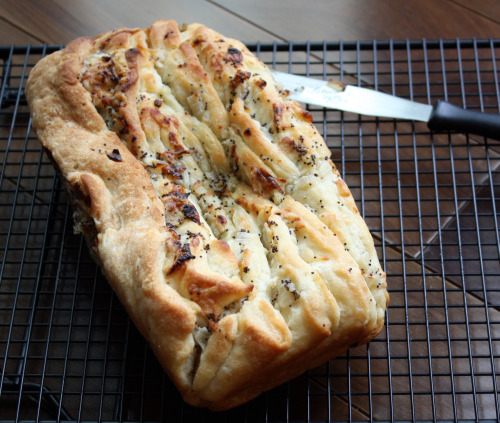
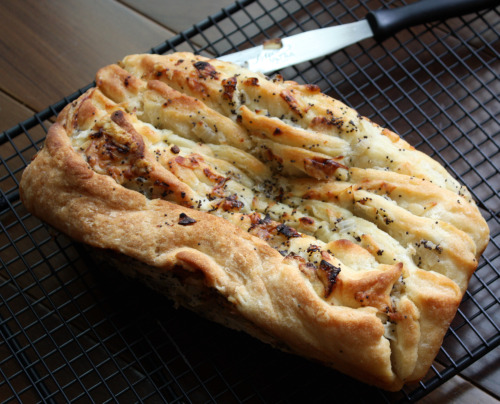
What I can share today is this bread.  You know when you see a recipe and just want to drop everything and make it?  Maybe something called Pull-Apart Cheesy Onion Bread?  That happened to me with this one.  Fortunately, I had this dinner party in the works which could accommodate it because otherwise, I might have eaten the entire loaf myself.

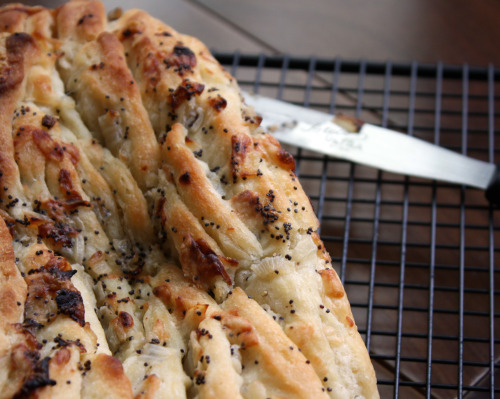
Have you heard of monkey bread?  This is a savory version that is much less labor intensive.  It goes a little something like this.  You make a super simple dough, roll it out to a very long rectangle then top it with a cooked onion and Gruyère cheese mixture.  You cut the dough into 10 pieces and stack them one on top of the other in a loaf pan.  You take a look at your crooked stack that doesn’t fill up the pan and think, “This is never going to work”.  Then you put it in the oven.  Soon your kitchen starts smelling amazing and when you peek in the oven, you see that magically the dough is starting to fill in the whole pan.  When it is done, it has magically turned into a loaf (though still crooked), it has turned golden brown, and it calls to you to be eaten immediately.  (But!  It can keep for two days at room temperature!  I love recipes like this.)

The result is pretty extraordinary.  Come on.  Sauteed onions?  Gruyere?  Bread?  So soft you want to use it as a pillow?  I brought this out to the table (after sneaking a piece) and when I went back not five minutes later, it was gone.  Not a crumb on a plate.  I can’t wait to make it again.  You can have it with your peanut butter pie when you come over for dinner.

One Year Ago: Green Bean and Fennel Salad

Pull-Apart Cheesy Onion Bread
Food & Wine
Makes one 9-inch loaf

1½ sticks cold unsalted butter, 1 stick cubed
1 large onion, finely chopped
1 tbsp. poppy seeds
Kosher salt and freshly ground black pepper
1 cup coarsely grated Gruyère cheese (3 ounces)
2 cups flour, plus more for dusting
2 tsp. baking powder
½ tsp. baking soda
1 tsp. salt
1 cup buttermilk

1.  Preheat the oven to 425°F.  Butter a 9-by-4½-inch metal loaf pan.  In a large skillet, melt the ½ stick of uncubed butter; pour 2 tablespoons of the melted butter into a small bowl and reserve.  Add the chopped onion to the skillet and cook over moderate heat, stirring occasionally, until it is softened, about 8 minutes.  Stir in the poppy seeds and season with salt and pepper.  Scrape the onion mixture onto a plate and refrigerate for 5 minutes, until cooled slightly.  Stir in the Gruyère.

2.  Meanwhile, in a food processor, pulse the flour with the baking powder, baking soda, and salt.  Add the cubed butter and pulse until it is the size of small peas.  Add the buttermilk and pulse 5 or 6 times, just until a soft dough forms.

3.  Turn the dough out onto a well-floured work surface and knead 2 or 3 times.  Pat or roll the dough into a 2-by-24-inch rectangle.  Spread the onion mixture on top.  Cut the dough crosswise into 10 pieces.  Stack 9 pieces onion side up, then top with the final piece, onion-side down.  Carefully lay the stack in the prepared loaf pan and brush with the reserved butter.

4.  Bake the loaf in the center of the oven for about 30 minutes, until it is golden and risen.  Let the bread cool for at least 15 minutes before unmolding and serving.

(The unmolded loaf can be stored at room temperature for up to 2 days.  Rewarm before serving.)


Spicy Peanut Noodles

May 26, 2010

Lately, I have been doing a fair amount of catering.  Some of it has been real official catering and some of it has been making food for lots of people on behalf of friends.  Either way, I am always faced with the challenge of how much food to make.  Working as a personal chef for three years and also catering lunches, dinners, and parties – not to mention all the entertaining we do ourselves – has made me a pretty good judge of portions.  I have no formula, I just kind of guess.  (Very scientific, I know.)  If I’m not sure, I err on the side of too much food because leftovers are nice but being hungry because the hostess/chef/caterer didn’t make enough food is not.  Once in a while I am off but thankfully not very often.

My parents came over for dinner last night along with my brother Michael.  Both of my brothers have incredible appetites and if they like something, you had probably better duck for cover.  My brother Alex once went to a wedding where he ate 99 skewers of shrimp with each skewer holding three shrimp.  I do know he did not get sick.  I do not know if anyone else got any shrimp that night.

Anyway, Michael, the baby in the family, also loves food and I always like to send him home with leftovers.  Keeping that in mind, and knowing I was cooking for five last night, I decided to one and half the recipe for these Spicy Peanut Noodles.  Just a pound and a half of noodles.  That should be right for five hungry people with a few leftovers, right?  If I were making this pasta or this one, I wouldn’t hesitate to use a pound and a half of pasta.

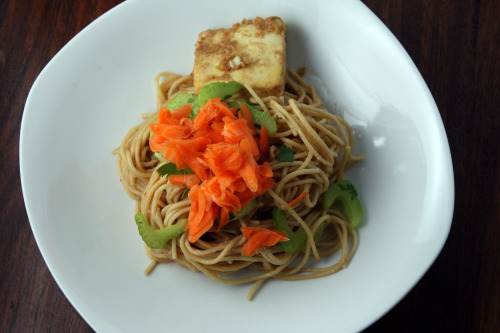
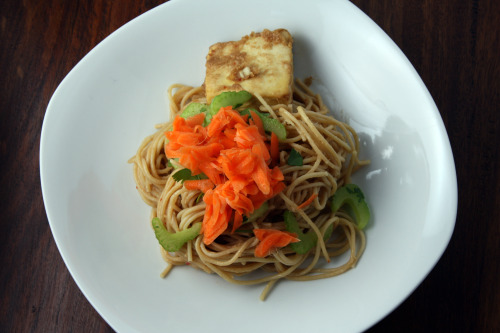
I’m not sure what happened to my nice Barilla whole grain spaghetti, but I could have fed about ten people with this dish.  As I said, better too much food than not enough.  Especially if it is a savory dish like this one.  I love Asian noodles of all kinds and these are no exception.  Peanut-y and smooth with terrific bite from the lightly pickled vegetables.  After we all ate our portions, I sent both my brother and parents home with some, and the boys and Randy ate the rest of them tonight.  That is a lot of noodles.  (By the way, my boys – the little ones – inhaled this dish.  Both of them had two huge plates-ful and Graham even had a second helping of tofu.)

I usually scoff at using spaghetti in Asian dishes, but I had some on hand and I like that the Barilla noodles have quite a bit of protein in them.  Their nutty flavor was most welcome in this dish, I just cooked them past al dente so their texture would be right.  No tofu was in the recipe originally, but I liked it here.  I held back a bit of the peanut sauce, brushed both sides of the tofu with it, and baked it in a 375º oven for about 25 minutes.  I also added the slightly pickled carrots because I thought the dish could use an extra bite and a bit of color.

One Year Ago: Greek Pasta Casserole

Spicy Peanut Noodles
Adapted from Food & Wine
Serves 6

1 pound spaghetti
¾ cup smooth peanut butter
½ cup + 2 tbsp. unseasoned rice vinegar
3 tbsp. plus 2 tsp. sugar
6 tbsp. soy sauce
½ cup water
1 tbsp. toasted sesame oil
2 tsp. crushed red pepper
One 2-inch piece of fresh ginger, peeled and coarsely chopped
1 large garlic clove
12 oz. extra-firm tofu, cut into ½-inch thick wedges
2 celery ribs, thinly sliced
½ cup coarsely chopped cilantro
2 carrots, peeled and grated

Preheat oven to 375ºF.

In a blender, puree the peanut butter with 6 tablespoons of the vinegar, 3 tbsp of the sugar, the soy sauce, water, sesame oil, crushed red pepper, ginger and garlic.  Remove about ½ a cup of the dressing and place in a pie dish.  Put the tofu slices in the dish and turn them to coat with the dressing.  Place dish in the oven and bake for 15 minutes.  Remove and turn the slices over.  Bake for another 10 minutes.  Remove from the oven and set aside.

In a pot of boiling water, cook the spaghetti until tender.  Place the remaining dressing in a large bowl.  Using tongs, scoop the spaghetti out of the water and into the bowl.  Toss to coat the noodles with dressing.  Ladle in some of the cooking water if the noodles seem too dry.

In another bowl, toss the celery with the cilantro and 2 tbsp. of vinegar and 1 teaspoon of sugar.  Do the same in another bowl with the carrots and remaining vinegar and sugar.  Drain if they seem too wet, but allow them each to sit in their liquid for at least 10 minutes.

Serve the noodles in bowls and top them with the celery and carrots.


Happy Birthday Dip

May 18, 2010

How to write about a getaway with some of the coolest, funniest, most interesting, kindest women I have ever known?  A night spent in celebration of a truly special and life-long friend?  On a beautiful island in a beautiful setting?  Not easy.  So how about some photos.  And a win-friends-and-influence-people recipe for dip.

Signs near the farmers’ market in Bayview.

The birthday girl, setting the table for lunch.

The outermost point on the property.  If I had a better lens, you would see a full mountain range in the background.

So many lovely places to sit and enjoy the beauty.

One of the friends brought beads for each of us to make bracelets.  The charm says “Jen Zen”.

4pm yoga was optional.  It was amazing to practice outside.  That is me in the purple shirt off to the right attempting a handstand without help.  (Didn’t happen.)

The grass was perfect for a headstand though.

Jen requested cowgirl attire for dinner.

She was one of the most well-behaved (and beautiful) cowgirls at the party.

(This photo is actually from last week’s yoga retreat.)

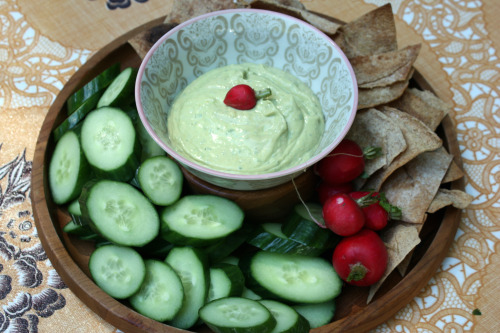
And dip!  I made this dip twice in a week and both times it got devoured.    People dig in expecting something mildly sour, as so many dips are, and are surprised by the lusciousness of it.  This dip gets its rich texture from avocado, silken tofu, and yogurt.  The interesting flavor comes from curry powder and mint.  The mix sounds unpromising, but the empty bowls speak otherwise.   Jen’s sister, after learning about the healthy mix of ingredients, told me, “I’ve been dipping delicately since I assumed it was really fattening.  Now I’m going to dig right in!”.

Curried Tofu-and-Avocado Dip
Adapted from Food and Wine
Makes about 2 cups

1 12-ounce box silken tofu
1 large or 2 small Hass avocados, peeled, pitted, and coarsely chopped
1/3 cup low-fat sour cream
1/3 cup low-fat plain yogurt
Zest and juice of 1 lime
1 garlic clove
2 tsp. honey
1½ tsp. curry powder
3 tbsp. chopped mint
Salt and freshly ground pepper.

In a food processor, combine everything except the salt and pepper.  Process until completely smooth, then season the dip to taste.  Chill until cold.  This dip will keep for two days in the refrigerator, but the top layer will turn brown-ish because of the avocado.  I suggest storing it in a cylinder-shaped container (such as a large yogurt container) which has a smaller top surface area.


Simplicity

May 13, 2010

Two recipes that I want to share with you are waiting in the wings.  One is a beautiful potato salad that is definitely going on my favorite list.  The other is a birthday cake – a big fat chocolate birthday cake, perfect for feeding a crowd.

But those will have to wait.  I need to talk about chickpeas.

And before that, a word about the Seattle dining scene.  It was really not until recently, within the last ten years or so, that we even really had a dining scene.  You could always get incredible Thai food, Vietnamese food, and sushi in Seattle.  And fresh fish too.  But other than that, pickings were a little meager.  Slowly but surely, things are changing and some terrific new restaurants have opened recently.

One of our favorites is Cantinetta, a truly sweet spot found about 2 miles from our house.  Sometimes a restaurant just gets it right on all fronts.  Cantinetta opened right smack in the middle of a great neighborhood, but not in the bustling business corridor, more in the area where people live.  It is homey and welcoming inside.  The service is excellent.  The menu changes just often enough to make it interesting, but not so often that you mourn your favorite dish leaving before you could taste it again.  That menu is comprised of four different categories and you can spend the evening there tasting bits from each section.  The pasta is made on site and is some of the best I have ever had.  There are always plenty of vegetarian options and they are starred so I don’t even have to ask.

Soon after it opened, Randy and I ate dinner there with friends.  Then we went by ourselves.  Then we went with more friends.  We recommended it to everyone.  We had my 39th birthday dinner there and introduced it to my parents and brothers, all of whom loved it and have been back.  My youngest brother gave us a gift certificate to Cantinetta for Hanumass last year and it was probably the best gift he has ever given me.  It is a place whose food I crave and there are precious few restaurants in Seattle I can say that about.

(Sorry, I just had to share.  Almost all looking at the camera.)

My sister-in-law was in town last Friday and Randy and I thought Cantinetta would be the perfect spot for dinner.  We actually had not been in some time and I was excited about seeing a brand new menu.  Suffice it to say that absolutely everything we ate was delicious.  From the homemade bread that arrives on your table (featuring corn meal and olives) to the utterly creamy tagliatelle that I had for my main course.  We loved every bite.  In fact, we ordered so much and ate so much that none of us had room for dessert.

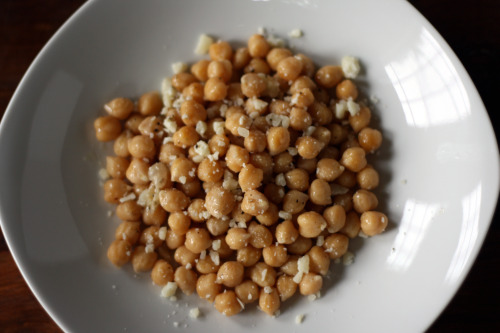
My favorite thing I ate that night, in a sea of good things, was the most simple.  Chickpeas, olive oil, Pecorino Romano, lemon.  The beautiful little dish came to the table and I was shocked to see green chickpeas.  Green means fresh.  Where did they get fresh chickpeas?  And can I have some??  I couldn’t really get a straight answer but after a moment I stopped asking and just started eating.  Sometimes, when every single ingredient is perfect and perfectly balanced, the simplest dish is the best.  That was absolutely the case with these little guys.

So, what’s a chickpea lover to do?  Try and re-create.  Since there was no way (that I know of) for me to get fresh chickpeas, I did the next best thing which is to cook up a bunch of dried beans.  I knew the somewhat mushy texture and tinny taste of canned beans wouldn’t work here, so I soaked and cooked up some dried chickpeas.  (I have nothing against canned beans when they are going into a stew like this one or this one.)  Because the restaurant dish featured tiny pebbles of the Pecorino – not flakes – I ground up a chunk of that amazing cheese in my mini-food processor rather than grating it.  Out of the refrigerator came a lemon and out of the pantry I pulled my best olive oil, sea salt, and pepper mill.  And away we went.  At the end of it all, I was somewhat surprised to find that what I had created was an awful lot like what I tasted at the restaurant.  Deceptively simple, incredibly delicious.

I served some to a friend who was over for dinner and she loved them.  I gave some to Randy and he thought they tasted just the same as Cantinetta’s.  I’m not sure about that exactly, but they are pretty darn close.  Please don’t roll your eyes and scoff – so simple Dana! – take just a bit of time, the best of ingredients, and decide for yourself.

One Year Ago:  Quinoa with Grilled Zucchini, Chickpeas, and Cumin

Chickpeas with Lemon and Pecorino Romano
Inspired by Cantinetta
Makes 2 cups

Definitely serve this dish at room temperature so the flavors can bloom and the chickpeas aren’t chalky.

2 cups chickpeas
1½ tbsp. olive oil
Juice of 1 lemon
¾ tsp. kosher salt
Lots of coarsely ground black pepper
¼ cup ground Pecorino Romano

For the chickpeas, you might as well make a large batch and use them throughout the week.  They are great in all manner of stews and soups, in salads, and you will probably want to make another batch of this recipe.  Let dried chickpeas soak overnight in cold water that covers them by at least 2 inches.  The next day, drain the water and rinse the chickpeas.  Put them back in the pot, cover them again cold water and place on the stove.  Bring to a boil, reduce the heat slightly, and allow to cook until chickpeas are tender, about 1 hour.

Mix together all ingredients for dish in a bowl.  Add more salt and pepper to taste.


Holly B’s Cinnamon Rolls

April 6, 2010

Friends, the clock is ticking.  I am just about 3½ months away from a big birthday.  Big as in huge.  40.

Last July, when I turned 39, I set some goals for myself.  Since I still have a few months to go, I will wait to fill you in on whether all the goals are met.  (Here is a hint – yoga, yay!  Croissants – not so much!).  But now I can cross a big one off my list.

Every single time I go into Holly B’s Bakery I either get a cinnamon roll, or I regret not having gotten a cinnamon roll in addition to whatever delicious item I did get.  If I did one of those free association exercises and you said, “Holly B”, I would no doubt say, “Cinnamon roll”.  You get where I am going with this.  Holly B = cinnamon roll.  And yet, in all years I have owned her cookbook, I have never made them.  I can partly blame it on the fear of finding myself in the house with a dozen or so cinnamon rolls and partly blame it on timing.  You see, this recipe ends with the dreaded words, “Serve still warm from the oven”.  How do you time that?

Now that I have made them, I kick myself for not just diving in sooner.  It is not complicated.  First you make a bread dough which needs to rise for an hour or so.  Then you roll the dough out, do the brushing and sprinkling and the rolling back up.  Then you slice and place on a baking sheet where they rise again for about 30 minutes.  They bake for about 30 and then you eat them.  Why did this sound so daunting?  I wanted to bring these rolls over to a friend’s house for a post egg-hunting brunch.  I made the dough and let it rise about and hour and a half before we left.  I formed the rolls just before we walked out the door and let them finish their rise in her warm kitchen and bake in her oven.  Then we feasted.

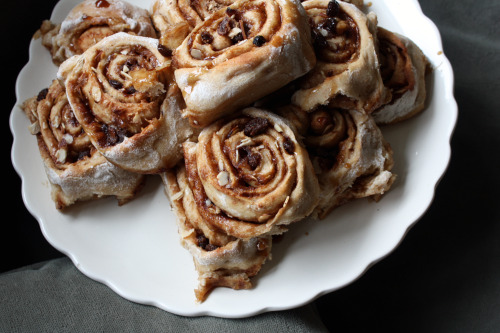
Back to that free associate exercise.  If I say “cinnamon roll” and you think “Cinnabon” then I would not advise making these rolls.  They have very little in common with those shopping mall monsters (sorry, I am biased).  Remember, this is a bread recipe (that has a whole cup of whole wheat flour in it) which is rolled out, brushed with butter, sprinkled with two kinds of sugar, a full tablespoon of cinnamon, raisins, and sliced almonds.  There is no icing and I wouldn’t want there to be.  Because the roll itself actually tastes like something other than air, you actually want to taste that part.  The roll is delightfully nutty from the whole wheat flour and the sugars caramelize just so.  I always tell you how I don’t like nuts in my baked goods but I wouldn’t think of leaving those sliced almonds out.  They are delicate and add a wonderful crunch and very subtle flavor.

I wanted to get a picture of me with both boys but the Easter egg hunting was a little too exciting for them to both stand still at the same time.  Separate was the best I got.

One Year Ago:  Marinated Chickpea Salad with Radishes and Cucumber

Holly B’s Cinnamon Rolls
Adapted from With Love & Butter
Makes approximately 12 rolls

For the dough:
2 cups warm water
2 tbsp. honey
1 package (2¼ tsp.) quick-rise yeast
2 tbsp. mild tasting oil (DT: I used canola oil)
Scant 4 cups flour
1 cup whole wheat flour
3 tbsp. milk powder
1¾ tsp. salt

For the Rolls:
Flour for dusting work surface
¼ cup (½ a stick) butter, melted
¾ cup raisins
¾ cup sliced almonds
¾ cup brown sugar, firmly packed
¾ cup granulated sugar
1 tbsp. cinnamon

Make the dough:
Swish together the water, honey, yeast, and oil in a roomy bowl.  Now dump in the flours and lastly the milk powder and the salt.  Mix these dry ingredients gently with your fingers without breaking through to the liquid below.

Now grab a wooden spoon and mix the dough vigorously until it’s just too stiff to continue.  Either knead the dough with floured hands on a lightly floured surface or use a dough hook with a stand mixer.  If the dough feels too wet, add a little more flour.  If it feels too stiff, sprinkle with warm water.  You will want a nice smooth dough – 2-5 minutes of kneading should be fine.  Dust the ball of dough with a little flour.  Lightly oil a bowl and place the dough inside.  Drape with a dishtowel and let rise in a warm spot until doubled in size.  (This takes about an hour.)

Lay a sheet of parchment paper down on a 10×15-inch baking sheet.

Make the rolls:
Do not punch down the dough, but gently turn it onto a floured surface.  Sprinkle the dough with flour and roll into a rectangle ¼-inch thick and approximately 10 by 25 inches with the short sides top and bottom.  Check the underside of the dough frequently.  Loosen any stuck spots and sprinkle on a little more flour.  Brush the dough with the melted butter, coating well but not leaving puddles.

Combine the raisins, almonds, sugars, and cinnamon.  Distribute the mixture evenly over the buttered surface, pressing down on the edges so the filling won’t fall off when you roll up the dough.

Starting at the short edge nearest you, roll up the dough, tugging gently to achieve a nice, snug long and keeping the edges even.  Turn the log seam downward and use a serrated knife to slice the dough into 10-12 rolls.  Place the rolls snugly in the pan.  Cover with plastic wrap and let rise in a warm place until puffy and doubled in size, about 30 minutes.

Before the rolls finish rising, preheat the oven to 375°F with the rack in the center position.  Bake the Cinnamon Rolls for 15 minutes, rotate the pan, and bake for another 15 minutes more.  The rolls should be light gold and no longer doughy inside.  (DT: I think it’s best to check on the insides – mine looked done but were a little doughy.)  Serve still warm from the oven.


« Older Posts Newer Posts »