Category: Brunch

Petits Pains au Chocolat

October 16, 2009

IMG_3537

I was 16 when I tasted my first pain au chocolat.  I had the good fortune to go to a private high school where foreign travel was considered part of the curriculum.  For the French speakers, there was a choice of either a homestay in one city, or the around-the-country bike tour known as SeaCliste (a play on Seattle and bicycliste).  Because I wanted to see as much of the country as I could, I opted for the bike tour.

We got full credit for our three months there which coincided with spring trimester.  We only had to keep a journal in French, speak French the whole time, do the job assigned to us (like be a medic or a mechanic), and complete the trip which, on certain days, was easier said than done.  I will never forget riding my touring bike in the Île de France (the region right around Paris) with a side wind so profound that I was literally blown off my bike several times.  Or spending almost an entire day riding up a snowy mountain road in the Alps only to find that, once we reached the top, someone had made a wrong turn and we had to go right back down again.  Or sleeping in a tent in a supermarket parking lot and being thrilled with the choice because we were under cover from the driving rain.

Of course, I will also never forget feeling the sun on my face for two weeks straight in Corsica.  Or how beautiful it is to take a paddle boat out on Lake Annecy.  Or the kindness of the French people who, all over that amazing country, took pity on the crazy American teenagers in their bike helmets and allowed us to take over their restaurants, homes, and – yes – supermarket parking lots.  And I’ll never forget that first pain au chocolat.

IMG_3540

Our starting point for the trip was the medium-sized city of Nantes which is at the easternmost edge of Brittany.  We had a three day homestay with French families but we all met in the town center after getting settled.  One of our group had a French step-father and, since she had spent a fair amount of time in the country, she volunteered to go to the boulangerie to get us some treats.  Always a chocolate lover, I made an immediate dive for the pain au chocolat.  I didn’t know what I was in for, I just could see the chocolate and that was all I needed.

And this is where writing fails me.  How do you describe something so perfect?  The shatter of the pastry and the warmth of the chocolate (because, these many many years later, I still remember the chocolate in that first one was warm), the perfection of the combo…it was an emotional moment for me.  I spent the rest of the trip trying to re-create that initial first bite.  Oh yes, and sampling everything else on offer in each boulangerie that we stopped in which is why I gained 15 pounds, in spite of putting 1500 miles on my bike.

This pain au chocolat is not the one I ate in Nantes.  It is not any of the many I ate throughout France.  But I made it myself and it took about 25 minutes total.  I impressed my children and my husband with this pain au chocolat.  And for now, that’s pretty good.

IMG_3545

One Year Ago:  Apple Tartlets with Cinnamon Balsamic Syrup and Butter-Toffee Ice Cream

Petits Pain au Chocolat
Bon Appétit
Makes 24

I couldn’t trust myself with 24 of these things lying around so I halved the recipe and only used one sheet of puff pastry.  I also used one 4 ounce bar of Ghiradelli bittersweet chocolate.  I cut each square in half and it seemed to be the perfect size for the pastry square.

2 sheets frozen puff pastry (one 17.3-ounce package, thawed), each sheet cut into 12 squares
1 large egg beaten to blend with 1 tablespoon water (for glaze)
4 3.5-ounce bars imported bittersweet or milk chocolate, each cut into six 2×3/4-inch pieces
Sugar

Line baking sheet with parchment paper.  Brush the top of each puff pastry square with egg glaze.  Place 1 chocolate piece on edge of 1 pastry square.  Roll up dough tightly, enclosing chocolate.  Repeat with remaining pastry and chocolate.  Place pastry rolls on baking sheet, seam side down.  (Can be made 1 day ahead.  Cover pastries with plastic wrap and refrigerate.  Cover and refrigerate remaining glaze.)

Preheat oven to 400°F.  Brush tops of pastry rolls with remaining egg glaze.  Sprinkle lightly with sugar.  Bake until pastries are golden brown, about 15 minutes.  Serve warm or at room temperature.


Holly B’s Almond Praline Scones

October 6, 2009

IMG_3435

Put me in a bakery and probably the last thing I would get is a scone.  In spite of how it might seem here with all the baked goods on this site, I really do have to be careful about what I eat.  If I am going to splurge, it’s not going to be on a scone.  Chocolate yes, scone no.  I can even “kind of” convince myself that I don’t like scones just like I have “kind of” convinced myself that I don’t like butter on my bread or that I don’t like pie – none of which are true,  but for some reason I usually believe myself.

When I actually taste a scone – a good scone, or butter on my bread, or…all right pie for that matter – all that “kind of” convincing goes out the window.  The Holly B’s cookbook has several scone recipes so I am going to need to up that willpower a bit.  This one features a homemade almond praline and it is that perfect balance of sweet, nutty and buttery that all good scones aspire to.  These are very easy to make and they freeze beautifully.  Holly says in her book that the extra almond praline tastes great over ice cream and I’m here to tell you that it does.  Especially when that ice cream is homemade and is sitting on top of a brownie.  Recipe coming soon.

IMG_3436

To order Holly B’s cookbook, please visit this site.

Almond Praline Scones
With Love and Butter
12 Scones

2 1/2 cups Almond Praline (recipe follows)
3 3/8 cups (3 1/4 cups plus 2 tablespoons) flour
3/4 cup brown sugar, firmly packed
1 tbsp. baking powder
1/2 tsp. salt
1/2 cup (1 stick) cold butter
3 eggs
6 tbsp. milk
1 tbsp. rum

Preheat the oven to 375°F and place the rack in the center position.  Line a large cookie sheet with baking parchment or grease lightly.

In a food processor, rough-chop enough Almond Praline to make 2 1/2 cups and transfer to a large bowl.  Return the food processor to the stand without washing and dump in the flour, brown sugar, baking powder, and salt.  Pulse once or twice to blend, then slice in the butter.  Pulse until the butter is cut into the dry ingredients and the size of pearls or smaller.  Scrape the mixture into the bowl with the praline and toss to combine.

Now place the eggs, milk, and rum in the food processor and blend well.  Drizzle the wet stuff over the dry stuff in the bowl and stir gently.  Toss this mixture lightly with your fingertips to gauge the consistency.  If the dough seems too dry and crumbly (won’t hold together when you squeeze some lightly in your hand), add a  bit more milk.  Mix until fully combined.

Turn the dough onto a lightly floured surface and divide into 2 equal parts.  Pat each lump of dough into a disk 1 inch thick, dusting with flour if sticky.  Cut each disk into 6 wedges.

Space the scones on the baking sheet at least 1 inch apart.  Bake 10 minutes, rotate the pan and bake 5 more minutes or until barely brown on top and golden on bottom (check with a metal spatula).  Repeat with the remaining scones.  Serve with butter.

Almond Praline
Makes 3 1/2 cups

2 1/2 cups whole natural almonds
1/2 cup water
1 cup sugar

Caution:  Please take care when making praline.  Molten sugar will give you a bad burn.

Oil a large heatproof bowl and a large cookie sheet with flavorless oil.  Put the almonds in the bowl.

Boil the water and sugar in a shallow saucepan over medium-high heat, scraping down the sides with a wooden spoon, until the mixture turns golden-amber, 10-12 minutes.  Don’t worry if the mixture looks white and crunchy at first, just keep going.  Once the process starts the mixture will darken rapidly, so watch carefully.

Pour the molten sugar over the almonds and immediuately stir with a woodend spoon (plastic will melt) to coat them thoroughly.  Spread the mixture in a thin layer on the oiled cookie sheet and cool completely.  Break the praline into pieces and store in a covered container.


Smoky Flavors

October 1, 2009

IMG_3410

There is the old saying “When life gives you lemons, make lemonade.”  What do you do when life gives you chard?  And carrots?

For the last three weeks straight, I have received chard and carrots in my CSA box.  Actually, the carrots I’m not that worried about.  Farm fresh and stored in the crisper drawer, they will last a month or more.  Plus there is always vegetable stock to make, this soup, and this dressing.  But the chard?  I loved this recipe but didn’t want to make it again and again.  In order to use up the two huge bunches I had taking up lots of space in my refrigerator, I decided to cook it down and serve it over grilled bread.

The good thing about chard is that, if you want to use a lot of it, it melts into almost nothing.  The two of us were able to eat it the two giant bunches without too much trouble.  I sautéed a bit of garlic, added as many leaves as I could put into my large skillet, and then added more as they wilted.  I also added about a teaspoon of smoked paprika and some sliced sun-dried tomatoes.  I let the chard cook for a good long while, until it was really soft.  I was going to poach the eggs directly in nests of chard, but my pan was too large and I opted to make them in my egg poacher instead.  Fried eggs would also be delicious here.

Verdict?  A great way to use a lot of chard.  And a very quick dinner.  Randy called it “bitter” but would not come right out and say that he didn’t like it, although I told him he was allowed to.  I loved the egg and the bread (and the roasted potatoes I served along with it), but I would find another green for next time.  Broccoli rabe perhaps or kale.  Or maybe the mustard greens I was just informed are coming in this week’s box.  Along with some carrots.  I’m not kidding.

One Year Ago:  Dimply Plum Cake

Smoky Chard Over Grilled Bread
Dana Treat Original
Serves 2

If you find yourself with only one bunch of chard, do not despair.  You can still make a dinner out of this, you will just have slightly less chard to go over the bread and I would cut the smoked paprika down to 1/2 teaspoon.

Olive oil
2 garlic cloves, minced
2 large bunches chard (any type)
1 tsp. smoked paprika
6 sun-dried tomato halves, thinly sliced
Salt and freshly ground black pepper
4 medium slices country bread, drizzled with olive oil and grilled or toasted
4 eggs, poached, fried, or hard-boiled and sliced

Cut the chard leaves off of each stem (you can also just tear it off).  Cut the leaves into approximately 2-inch strips.  Reserve the stems for another use.

Heat a large sauté pan over medium heat.  When hot, add just enough olive oil to lightly coat the bottom.  Add the garlic and stir constantly until just starting to brown.  Do not allow to burn.  Add as many chard leaves as will fit into the pan and sauté until starting to wilt.  Add more leaves and continue to cook down until wilted.  Continue this process until all the chard is in the pan.  Add the paprika, the sun-dried tomatoes, a sprinkle of salt and pepper and lower the heat.  Cook, stirring often, until the chard is very soft, about 20 minutes.

Meanwhile, grill the bread and cook the eggs to your liking.  An alternative here is to cook the chard in a smaller sauté pan that has a lid.  Make 4 wells in the cooked chard and crack an egg into each.  Cover and cook over low heat until the eggs are cooked to your liking.


How to Make Eggs for a Crowd

September 20, 2009

IMG_3350

Recently I was reading about how to give credit to a cookbook or magazine when you are writing a post about it.  It seems that if you have made a few changes, you say “Adapted from…”.  If you have made more than 3 changes and they are substantial, you say “Inspired by…”.  Any more than that and you can call the recipe your own.

I think those “rules” are fair and I adhere to them.  What do you do when you take a recipe that you have made before and completely change it, but you still have to credit the original recipe for giving you an idea in the first place?  I think I’ll call it “With many thanks to…”

We had some family and some friends over for brunch today.  For me, brunch = potatoes.  If I am going out for brunch I will order an egg dish so I can have potatoes and if I am making brunch at home, I stick with egg dishes so I have an excuse to make a huge pan of roasted potatoes.  My original intention was to make a scrambled egg dish with poblanos and cilantro and served with a warm tomato salsa of sorts.  As our invite list grew longer, I realized I didn’t want to be chained to the stove turning out dishes of scrambled eggs for people.  Enter the grits frittata.

I know, grits frittata?  That is what I mean when I say I have to give credit to the original recipe for the idea because I would certainly never think of putting the two together.  But long ago, I made this grits frittata and it was insanely good.  It also fed a lot of people (I made a special note in my book saying so).  A dish like this is so company friendly because you assemble it and then it bakes in the oven with no more effort needed from you.  You can also roast those beloved potatoes in the oven while the frittata cooks.

Because I already had poblano chiles, cilantro, and cotija on hand from my previous recipe idea, I decided to change the recipe up quite a bit.  I put it in a larger pan, added more eggs, used breadcrumbs instead of Parmesan cheese to line the springform pan.  In short, I made it my own.  I paired it with a warm sauce which just put the whole thing over the edge.  Grits purists may scoff and frittata purists may scoff, but that’s fine.  More for me.

One Year Ago:  What do you know?  Another frittata!  Frittata with Cheese, Sun-Dried Tomatoes and Basil

Grits Frittata
With many thanks to Food and Wine
Serves 8-10

This frittata bakes for a long time in the oven so be sure to plan accordingly.

3 tbsp. butter, divided
1 bunch scallions, sliced
2 large poblano chiles, stems, seeds and membranes removed, diced
1/2 tsp. ground cumin
1 large bunch spinach, washed well and spun dry, leaves torn into 2 inch pieces
1 small bunch cilantro, chopped
1 1/2 cups instant grits
6 cups water
Salt
6 eggs, lightly beaten
1 8 oz package Cotija cheese, crumbled (or substitute equal amount of Monterey Jack, grated)
Freshly ground black pepper

Butter a 10 inch springform pan and dust with breadcrumbs so the whole surface has a light coating.  Preheat the oven to 350°F with the rack in the topmost position.

Heat a large skillet over medium heat.  Add 2 tablespoons of the butter then add the scallions and poblano chiles.  Sprinkle with salt and cook, stirring occasionally, until starting to soften, about 5 minutes.  Add the ground cumin, stir well, then add the spinach in batches, mixing it in and allowing it to wilt before adding the next bunch.  Reserve 1/4 cup of the cilantro for the tomato sauce, then add the rest to the spinach mixture.  Cook until wilted.  If the mixture is very wet, allow to cook for a few minutes longer to remove most of the moisture.  Set aside.  (This part can be made one day ahead.  Allow to cool to room temperature and then cover and refrigerate.)

Fill a large pot with the 6 cups of water and a large pinch of salt then bring to a boil.  In a slow steady stream, add the grits.  Stir well, turn the heat to medium-low, and cover the pot.  Allow to cook, stirring occasionally for 6-8 minutes.  Pour the grits out into a large bowl and allow them to cool to warm.  Stir in the spinach mixture, all but a small handful of the cheese, the eggs and a pinch of salt and freshly ground black pepper.  Stir to mix well.

Pour the grits mixture into the prepared springform pan.  Melt the remaining tablespoon of butter and brush over the surface.  Sprinkle the remaining cheese over the top and place in the oven.  Bake for an hour and 15 minutes.  If the frittata is still very jiggly in the middle, allow to bake for another 15 minutes.  Add more time as necessary so that it is just slightly jiggly.  Remove the frittata from the oven and allow to sit for 15 minutes.  Carefully remove springform ring.  Cut into slices and serve with the warmed tomato salsa.

Warm Tomato Salsa
Makes enough for Grits Frittata

2 tbsp. butter
1 large onion, diced
2 garlic cloves, minced
2 14-ounce cans petite diced tomatoes
1 tsp. chile powder
1/4 cup chopped cilantro

Melt the butter in a medium saucepan over medium heat.  Add the onions.  Cook until softened, about 5 minutes.  Add the garlic and cook for another 2 minutes.  Add the chile powder and then the tomatoes with their juices.  Cover and cook for 15 minutes with the heat turned to low.  Add the cilantro and stir well to combine.  (Can be made one day ahead.  Allow to cool to room temperature, then cover and refrigerate.)


Thai Yellow Curry, A Wedding, and a Coffeecake

June 4, 2009

img_2536

I’ve mentioned my fabulous babysitter Erika here before.  I feel more and more that she is a member of our family.  One of the wonderful things about her (and there are many wonderful things) is that she has introduced us to some of her friends.  When she is unable to sit for us, she will work hard to find someone who can.  I am one of the luckiest moms I know because we have a small stable of wonderful young women who watch our boys from time to time.

One of these lovely young women is getting married this summer.  After having some problems with caterers, she approached me and asked if I would be interested in taking the job.

It’s a wedding for 50, the location is a ferry ride away, and they want to do an Asian theme.  All significant challenges for me.  So of course I said yes!  Kirsten and her fiancé are incredibly sweet and accommodating and, most importantly, flexible.  She is about as opposite from a bridezilla as you can imagine.

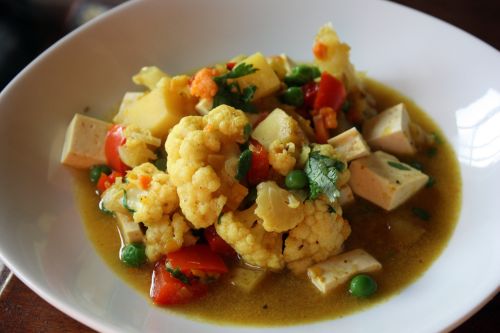
Because they have never eaten my food (just looked at this here blog), I invited them over for dinner last night.  We had a lot to discuss and I wanted to make sure they liked my ideas and my food.  I decided to make Vietnamese Yellow Curry because I seemed to remember the last time I made it that it was delicious.  I thought it might be something I would make for the wedding, mostly because I know much of it can be made in advance.

img_2543

Truth be told, it’s pretty tasty, but not worth the amount of work involved.  There are four distinct steps in making this dish and a ton of chopping.  If I counted up the number of pots I dirtied in making this humble curry, you would be appalled.   I don’t know all my readers well, but I would guess that no one would actually make this labor intensive curry if I spent the time to post the recipe – especially I told you it wasn’t worth the effort.  So instead I give you cake.

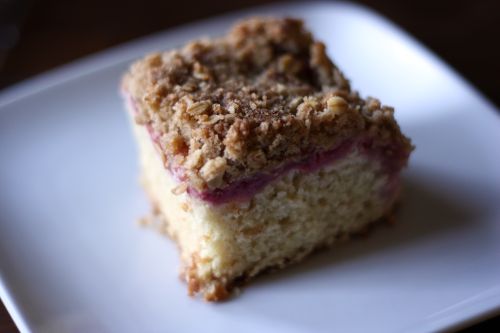
I expect you must be tired of my yammering on about Holly B and her amazing bakery on Lopez Island.  But this cake is exactly why I love her, her bakery, and her book.  When I walk into a bakery, I don’t want a treat that defies the laws of gravity.  I want something homemade, homey, and delicious.  Not exquisite, just exquisitely delicious.  As I pulled this cake out of the oven, I imagined it in my perfect restaurant/bakery – the one I will open someday (the one with good sandwiches).  Nothing earth shattering here, just a simple cake on the bottom, a fruit compote in the middle, and a crumble topping.  But somehow it all tasted perfect.

img_2553

One Year Ago:  Gazpacho (I highly recommend you make this asap.)

Strawberry Rhubarb Coffee Cake
Adapted from With Love & Butter
Makes one-8 inch cake

In the introduction to this recipe, Holly mentions that you can make this same cake with any fresh or thawed (and drained) frozen fruit.  If you do use another combination (favorites include Raspberry-Peach, Blackberry-Nectarine, and Cherry-Apple), there is no need to cook the fruit.  Just lay it over the cake batter.

Filling
1 1/2 cups thinly sliced rhubarb
2 cups whole strawberries
2 1/4 tsp. lemon juice
5 tbsp. sugar
3 3/4 tsp. cornstarch
1/4 tsp. nutmeg

Streusel Topping
1/2 cup flour
1/3 cup brown sugar, firmly packed
1/4 tsp. cinnamon
Pinch of salt
1/4 cup cold butter (1/2 stick), sliced
3 tbsp. old fashioned oats (not quick or instant)

Cake
1 1/2 cups flour
1/2 cup sugar
1/2 tsp. baking soda
1/2 tsp. baking powder
1/4 tsp. salt
1/2 cup (1 stick) cold butter, sliced
1/2 cup buttermilk
1 egg
1/2 tsp. vanilla

Make the filling: Combine the rhubarb and strawberries in a saucepan and cook for 5 minutes over medium heat.  Sprinkle with the lemon juice.  Stir together the sugar, cornstarch, and nutmeg.  Distribute over the fruit, stir and reduce the heat to medium-low.  Cook, stirring often to prevent sticking, until the rhubarb is tender and the liquid has thickened.  Set aside.  The filling can be used immediately or stored in the refrigerator for up to 2 weeks.

Make the streusel topping: Place the flour, brown sugar, cinnamon, salt, and butter in a food processor fitted with the steel knife blade.  Pulse to cut in the butter and make a nice sandy-textured topping.  Don’t over-process.  Stir in the oats by hand and set aside.  Reassemble the food processor without washing.

Preheat the oven to 375°F with the rack in the center position.  Butter an 8-inch square baking dish.

Make the cake layer: Place the flour, sugar, baking soda, baking powder, salt, and butter in the food processor bowl.  Pulse until the butter is reduced to BB-sized bits and the mixture is dry and crumbly.  Scrape into a bowl  Whisk the buttermilk, egg, and vanilla in a small bowl and add to the dry mix.  Stir just until a dough forms.

Assemble the cake:  Spread the batter evenly in the pan and cover with the strawberry rhubarb filling.  Distribute the streusel topping over the fruit.  Bake the coffee cake for 50-60 minutes, or until no gooey batter shows when you probe into the cake.  Cool the cake for at least an hour before serving.


« Older Posts Newer Posts »