Archive for September, 2008

Saturation Point

September 15, 2008

It takes a lot to get me to this place, but I am totally done with food. I don’t want to think about it, eat it, or cook it anymore. It has been a hell of a weekend. I cooked for Randy’s work team on Friday night – 20 people. But, this being Seattle and people being on the sort of flaky side, only about 12 of them actually stayed for dinner. So what do you do with all that extra food? You have friends and family over on Saturday night and, me being me, you make one extra thing because you are always afraid there isn’t going to be enough food.

Next up, one of my client’s had her vegetarian daughter in town and asked me to cook them two additional meals this week. I opted to do those dinners for Sunday and Monday so I could have Saturday to prep. It was important to me to get both of those dinners done and delivered today (Sunday) so I could start preparing for the new week tomorrow. So, in case you aren’t following along, in the past 4 days I have cooked one dinner for 20, one dinner for 7 (mostly leftovers), and two dinners for four. I’m telling you – I can’t even go in my kitchen. The worst of it is, it was all such a frenzy that I took no photographs so I can’t really even blog about any of it.

But tomorrow is a new day and I will approach the week with my usual sense of excitement about the food I am going to make and the dread I feel as I wonder how I am going to get it all done. This time I will take photos.


What to do with Zucchini?

September 12, 2008


Oh how I wish I was a gardener. I like to say that I am a cook, not a gardener although I know there are people out there who are both. And those people likely save a fortune on groceries, especially if they are vegetarian and are buying a ton of produce a week. I admire people who can get totally Zen out there in the sun, weeding and helping their lovely vegetables and flowers to grow. I’m sorry, there are lots of bugs out there and I just can’t do bugs. Plus, at this point in my life, even if I were a gardener, I would have to choose each day whether to cook or garden, since my window of time without my baby boys is very small. I would choose cooking every time.

One summer while I was still in high school, I got it in my head that I wanted to grow a vegetable garden. There was a little plot in our yard where a climbing structure had been and it seemed perfect to my teenage mind. I had no idea what I was doing although I got a little advice from the nursery where I bought my seeds. I don’t even think the soil was soil – it might have been sand – but I was determined.

As with all good teenagers, soon after I planted everything and didn’t get immediate gratification, I kind of lost interest. Sometimes I would water my little garden, sometimes I wouldn’t. I never weeded. I hadn’t paid any attention to what kind of light this little plot got. And not surprisingly, nothing really grew. Except zucchini. I got, as everyone who has ever planted zucchini in this Pacific Northwest climate knows, a lot of zucchini. So much that I just stopped picking it and then it grew to obscene proportions.

When we moved into this house, I loved the idea of having a vegetable garden, but I was 7 months pregnant at the time and just knew that it was doomed for failure. Instead, we planted lots of herbs and I have absolutely loved having mint, oregano, 4 different kinds of sage, chives, and 3 different kinds of thyme just out there for the picking. I was sort of at peace with just getting my produce at the Farmer’s Markets and the grocery store until I went over to my new client’s house to bring them their first dinner. In their backyard, they have the most amazing array of vegetables, all in lovely wood boxes, all growing beautifully. There was fennel, chard, English peas, winter squash, zucchini, tons of tomatoes, and more. All in the backyard of a very urban area. I immediately started picturing our yard and where we could start our vegetable garden, but then the memories of my sad little garden 20 years ago came flooding back and I resigned myself to just being a cook.

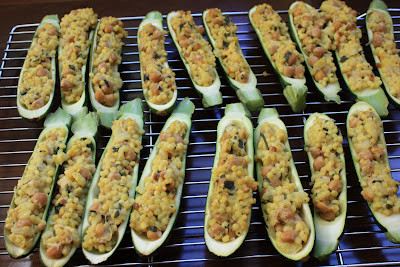
Zucchini Stuffed with Chickpeas and Israeli Couscous
Adapted from Martha Stewart’s
The New Classics
Serves 6

6 small zucchini (6-7 inches long), halved lenthwise
2 tbsp. olive oil

1 shallot, very thinly sliced into rings

2 tsp. minced peeled fresh ginger

1 medium jalapeno pepper, seeded and finely chopped

1/2
tsp. ground cumin
1/2
tsp. ground coriander
Pinch of ground cinnamon

Pinch of saffron

1 cup canned chickpeas, drained

3/4
cup Israeli couscous
2 tbsp. finely chopped flat-leaf parsley

1. Preheat the oven to 400 degrees. Set a wire rack on a rimmed baking sheet. Pour 1 cup of water onto sheet; set aside. Using a small spoon or melon baller, scoop out pulp from center of each zucchini, leaving a 1/4 inch thick shell. Transer pulp to a kitchen towel, and squeeze out excess liquid. Coarsely chop pulp; set aside. Sprinkle zucchini shells with 1 tsp. salt. Place shells, cut side down, on paper towels to drain.

2. Heat a medium saucepan over medium-high heat. Add olive oil then add shallot, ginger, and jalapeno. Cook, stirring 1 minute. Stir in 1/2 tsp. salt, the cumin, coriander, cinnamon, and saffron. Cook until fragrant, about 1 minute. Add zucchini pulp and chickpeas; cook, stirring occasionally, 2 minutes.

3. Stir in 1 cup water. Bring to a boil. Add couscous, and return to a boil. Reduce to a simmer. Cover, and cook, stirring occasionally, until liquid has absorbed and couscous is tender, about 9 minutes. Remove from heat and let stand, covered, 5 mintues. Stir in parsley. Season with salt if desired.

4. Wipe zucchini shells to remove any liquid. Mound about 1/4 cup filling into each shell. Transer to prepared rack. Cover with foil, and bake until zucchini are tender and filling is heated through, 20-25 minutes.


Tomato Heaven

September 9, 2008

I kind of have to credit Molly of Orangette fame for getting me into blogging. In spite of the fact that my husband works for a software behemoth, I am a little intimidated by the computer and the internet. I read Julie and Julia, which started out as a blog, and the whole time I was reading it, I wondered where one could find a blog. Really. I mean, I knew it was somewhere out there in cyber-space but…how to find it? To be fair to myself, I have spent the last almost four years dealing with pregnancy, nursing, hormones, diapers, sleep schedules, tears (my kids’ and my own), not to mention trying to cook, so I do forgive myself for not branching out that much.

Then Molly started writing a column in Bon Appetit and I just loved it. I loved how conversational she was and her obvious love of food was infectious. I mustered up the courage to type her blog address into my browser and nothing jumped out of my monitor to bite me! I devoured her posts and started browsing sites that she had in her blogroll (listen to me! how far I have come!) Soon, I realized that this would be a great outlet for me in terms of both cooking and writing.

Four months later, I am building my blog and I have to say, I still really enjoy Molly’s column in Bon Appetit. The recipe in the September issue almost made me jump off the couch – the most incredible appetizer from Cafe Lago in Seattle. We had just been there and had shared said appetizer and I was totally blown away by the incredible concentrated flavor of those tomatoes. I am usually a salad-as-a-first-course meal kind of girl, but I know what I am getting whenever we go back to Lago, and no Randy, I won’t share.

The beauty of this recipe is that, although the tomatoes take a while in the oven, it requires very little hands-on time. Their flavor gets more and more concentrated and more and more delicious while you are free to go about your day. I was a little close on time toward the end, so I just left them in a turned off oven and they turned out beautifully. Tonight, my clients will spoon them onto crostini spread with a soft goat cheese, then tuck into a Penne with Tomatoes and (Veg) Sausage served with Green Beans, Turnips, and Peas with Herb Vinaigrette.

Pomodori Al Forno
From
Bon Appetit Magazine
Serves 6


1 cup (or more) olive oil, divided

2 pounds plum tomatoes, halved lengthwise, seeded

1
1/2 tsp. dried oregano
3/4
tsp. sugar
1/2
tsp. salt
1-2 garlic cloves, minced

2 tsp. minced fresh Italian parsley

Preheat oven to 250 degrees. Pour 1/2 cup oil into 13x9x2-inch glass or ceramic baking dish. Arrange tomatoes in dish, cut side up. Drizzle with remaining 1/2 cup oil. Sprinkle with oregano, sugar, and salt. Bake 1 hour. Using tongs, turn tomatoes over. Bake 1 hour longer. Turn tomatoes over once again. Bake until deep red and very tender transferring tomatoes to plate when soft (time will vary, depending on ripeness of tomatoes, about 15-45 minutes longer.

Layer tomatoes in medium bowl, sprinkling with garlic and parsley over each layer; reserve oil in baking dish. Drizzle tomatoes with reserved oil, adding more if necessary to cover. Let stand at room temperature 2 hours. Do Ahead: Cover; chill up to 5 days. Bring to room temperature before serving.


Mushroom Liker

September 8, 2008


Mushrooms. One of those polarizing vegetables. People either love them or hate them. My brother Alex will eat almost anything you put in front of him except, you guessed it, mushrooms.

I would have to put myself in the “like” category. I really do like most fungi but a few really put me off. Morels, for example. I can’t get over their brain-like look and texture and also don’t want to deal with eating whatever dirt and small creatures are living in the impossible-to-clean-grooves. Some of the meatier mushrooms also give me the willies – that chewy texture reminds me of meat and therefore grosses me out. I have made my peace with portabellos but others like lobster mushrooms, I just can’t eat.

Chanterelles are another story altogether. In my opinion, they are the most lovely, subtle, and delicate of the mushroom family. Their texture is soft and the flavor almost buttery. We are so lucky to live in a climate where they are plentiful. I found them at a Harvest Fair in our neighborhood for $12 a pound which seemed like an incredible bargain. They don’t weigh much, so you get a lot for your money.

Whenever I buy chanterelles, I make a risotto. I think it is the best way to showcase their soft flavor without overwhelming it with too many flavors. Every fall, I make several renditions of it and I think this version was the best so far. I have to share my favorite piece of mushroom advice which came directly from a forager. I asked him how to clean the chanterelles, which are always dirty, since I had heard that rinsing them made them absorb too much water and ruined the flavor. He looked at me like I was a total idiot and said, “Mushrooms grow in the forest. In this climate. They get rained on all the time. Just rinse them.” And so that is what I do.

Chanterelle and Corn Risotto with Fresh Thyme and Basil
Dana Treat Original
Serves 6

If you have the funds, or just really love chanterelles, feel free to use up to a pound for this amount of risotto.

1-2 tbsp. butter
1/2
lb. chanterelle mushrooms, ends trimmed and thickly sliced
3 ears corn, shucked and kernels trimmed from the cob, cobs reserved

Several stems fresh thyme, leaves stripped

salt

pepper

Olive oil

1 large leek, white and light green part only, cut in half, then thinly sliced

2 cups arborio rice

1/2
cup white wine
6-8 cups vegetable broth

1/2-1 cup freshly grated Parmesan, or to taste
1/2 cup basil, thinly sliced

For the mushrooms:
Melt the butter in a large saute pan over medium-high heat. Add the mushrooms and a pinch of salt. Sprinkle with the thyme leaves and saute until beginning to brown around the edges, about 8 minutes. Add the corn, stir and allow to cook until the corn is tender, about 3 minutes. Set aside.

For the rice: Pour broth into a large saucepan. Add the corn cobs and heat it until it is hot to the touch. Heat a large Dutch oven or saucepan over medium heat. Add just enough olive oil to coat the bottom of the pan, then add the leeks. Saute until soft but not brown, about 5 minutes. Add the rice and stir to coat. Pour in the wine and stir until it is absorbed. Begin adding ladlefuls of broth to the rice mixture, stirring until each one is absorbed. It should take about 20 minutes in all. Taste as you go and when the rice is softer, but still very al dente, add the mushroom mixture and a handful of Parmesan cheese. Continue adding broth as described above until it is the desired doneness. Stir in basil and cook for another minute. Add more Parmesan and salt and pepper to taste.


Toffee, Not Coffee

September 5, 2008

My husband Randy doesn’t drink coffee. Not only does he not drink it, he doesn’t like it. In case you are wondering, you are allowed to live in Seattle if you don’t like coffee, but you have to plead your case in front of a jury.

To add insult to injury, he doesn’t like coffee flavored things – so things like Mud Pie and Tiramisu are out. (However, we ordered a sky high slice of Mud Pie at the Pioneer Saloon in Sun Valley and I noticed that he ate his share. Hmmmmm.)

I know, between the beets and the coffee, it’s a wonder I married him. He does have many redeeming qualities, one of which being that he is very smart. I mean, really smart. Like has two master’s degrees, one of which from that school back East that starts with an “H”. So it really tickled me when I offered him some of this amazing toffee the other day. He said he didn’t like toffee. I said, “It’s basically hardened caramel, peanuts, and chocolate – what’s not to like?” After careful consideration he said, “I think I think I don’t like it because toffee rhymes with coffee.” OK, Mr. Mensa, glad we cleared that up. As my (blond) neighbor Deb said, “That is such a blond comment!”

After a taste, I was unable to keep his hand out of the bag. For you coffee haters out there, don’t discriminate against delicious things that rhyme with your hatred! This toffee is easy, decadent enough for a dinner party, and it makes a ton – and keeps well. Hup to!

Chocolate Peanut Toffee
Gourmet
Magazine
Makes about 3 pounds

I was unable to fit this pan in my freezer, so I put it in the fridge for about 2 hours. It hardened just fine.

4 sticks (1lb) unsalted butter, cut into pieces
2 cups sugar

1/4 tsp. salt

4 cups whole cocktail peanuts, plus 1 cup chopped (1 lb. 10 oz.)

8 oz. 70%-cacao bittersweet chocolate, finely chopped

Equipment: a 15 by 10 by 1 inch baking pan (also called a jelly roll pan), a candy thermometer, a metal offset spatula

Butter baking pan and put on a heatproof surface.

Bring butter, sugar, and salt to a boil in a 4-5 quart heavy pot over medium-high heat, whisking until smooth, then boil, stirring occasionally, until mixture is deep golden and registers 300 degrees on thermometer, 15-20 minutes.

Immediately stir in whole peanuts, then carefully pour hot toffee into center of baking pan. Spread with spatula, smoothing top, and let stand 1 minute, then immediately sprinkle chocolate on top. Let stand until chocolate is melted, 4-5 minutes, then spread over toffee with cleaned spatula. Sprinkle evenly with chopped peanuts, then freeze until chocolate is firm, about 30 minutes. Break into pieces.

Toffee keeps in an airtight container at room temperature for two weeks.


« Older Posts Newer Posts »