Archive for June, 2010

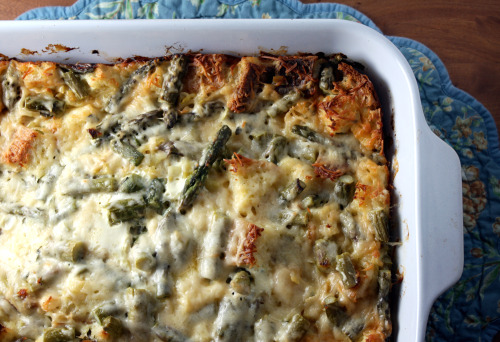
Asparagus and Leek Bread Pudding

June 26, 2010

(Hi kind reader.  Don’t hate me, but at the moment I am either in Cannes, Paris or London.  If you email me, it will take me a bit to respond.  However, don’t forget I have a contest going on right up until I come back and you could win some David Lebovitz books.  Find out how at this post.)

Bread pudding.  How do you feel about it?  On a dessert menu, it’s about the last thing I would order.  Actually, the  last thing I would order would be panna cotta but that is because it’s not vegetarian (that damn gelatin!).  I love bread but not in my dessert.  Chocolate anything would be first on my list followed by berry something, lemon something, apple something and then pear something.  Bread pudding would be my desperation dessert.

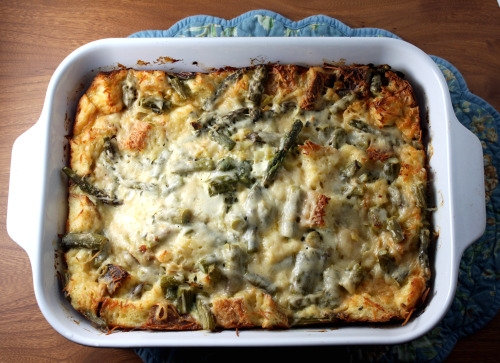
But how about in a savory side dish starring lemon thyme, asparagus, and Parmesan cheese?  Sure!  This is actually my first savory bread pudding or strata (they are not exactly the same but close enough) and wow! I thought this was terrific.  And easy.  And served a lot of people.  If I didn’t already love Ivy Manning’s From the Earth to the Table, this dish sold me once and forever.  Actually, it is to her tremendous credit that I had two dishes on our Father’s Day menu from her book.  (That rhubarb tart can’t be beat.)

So yes, I looked at the list of ingredients and thought – 8 eggs and 4 cups of half and half?  I will make this but I won’t eat it.  But oh yes, I did eat it.  Lots of it.  It did not taste heavy at all, more eggy than creamy and I mean that in a good way.  The balance was just right between the starchy bread, the creamy filling, the grassy asparagus, the sweet leek, the fragrant lemon thyme, and the bit of super salty cheese on top.  I could eat this every day and be happy.

One note – if you can get lemon thyme, buy it.  I use a lot of thyme in my cooking life and I am lucky enough to have 5 plants of it in my front yard.  Right by the stairs is a lovely bush of lemon thyme which I pick from all spring and summer.  You might not think it would taste that different, but it is a completely different herb.  Like taking something good and making it great.

One Year Ago: Feta Radish Spread
Two Years Ago:  Chocolate Dulce de Leche Bars

Asparagus and Caramelized Leek Bread Pudding
The Farm to Table Cookbook
6 to 8 servings

10 ounces (about 7 cups) French bread, cut into 1-inch cubes
1 pound asparagus, tough ends snapped off
Ice water for blanching
1 medium leek
4 tsp. olive oil
4 cups half-and-half
8 eggs
Zest of 1 lemon
1 tsp. chopped fresh lemon thyme
½ cup grated Parmesan cheese
½ cup grated Pecorino Romano cheese

1.  Spread the bread cubes on a baking sheet and let stand overnight to become stale, or quick-dry in a 200ºF oven for 40 minutes.

2.  Preheat the oven to 350ºF and butter a 13-by-9-by-2 inch baking dish.  Bring a large pot of water to boil, add the asparagus, and cook until it is bright green, about 2 minutes.  Drain and blanch immediately in the ice water; remove and set aside.

3.  Remove the dark green part of the leek and discard.  Halve the leek lengthwise, rinse well between layers, and thinly slice.  In a sauté pan, heat the oil over medium heat.  Add the leeks and sauté until they begin to brown, about 10 minutes.  Add a few tablespoons of water and continue to cook for 5 minutes, or until the leeks are caramel colored and tender; set aside.

4.  In a medium bowl, whisk the half-and-half, eggs, lemon zest, and thyme.  Put the bread cubes in the prepared baking dish and sprinkle on the leeks.  Arrange the asparagus on top and pour the egg mixture over all.  Press with a spatula to submerge the bread cubes; sprinkle the top with the cheeses.

5.  Cover the dish loosely with foil and bake until the edges are golden brown and a butter knife inserted into the center comes out clean, about 1 hour and 15 minutes.  Cool for 20 minutes, cut into squares, and serve.


My New Addition

June 22, 2010

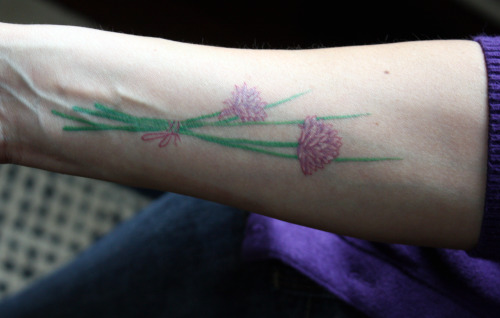
Here, at long last, is the story of my tattoo.

If you read this post, you know that this is something I have been thinking about for a long time.  Once I finally decided on what I wanted (chive blossoms) and where (forearm), I had to find an artist.  Some close friends with multiple tattoos highly recommended their artist so I decided to go with him.  I met with him to discuss my vision and then made an appointment to get the work done.  I was excited and felt really good about my decision.

As the day of the appointment got closer, I started to feel uneasy.  I still wanted the tattoo but started to think smaller would be better.  Maybe not my forearm, maybe my wrist instead.  Maybe just one blossom instead of multiple.  I sent a panicked email to the artist asking if we could go smaller and he responded that no, we couldn’t because the lines of the stalks are so small and delicate that shrinking them would make it impossible to do in this medium (i.e. needles on skin).  “Be brave.”  That was the last line of his email.  I wasn’t.  A tattoo is forever and you can’t feel unsure.  I canceled the appointment.

Almost immediately after canceling, I realized how much I wanted it.  For me, it was like trying on a dress that I wasn’t sure about.  In my shopping life, if I’m not 100% convinced I love something, I walk away from it.  If two hours go by and I don’t think of that dress once, I know I don’t really want it.  If I spend two hours scheming about how to get back to that store – even if I have to drag my boys with me – I know I have to go buy it.  With my tattoo, those two hours became a few weeks so by the time we went on vacation, I was positive I wanted to get it.

To some, it might seem impulsive that I walked into a tattoo parlor in Provincetown and ended up getting a tattoo later that same day, but it really wasn’t.  This decision was months in the making and I was just ready.  Yes, it may have been smarter to find a local artist or go back with the original guy but smarter isn’t always better.

Randy, the boys and I all walked in to a place slightly off the beaten track and got a decidedly cool look from the guy behind the counter.  Not rude but definitely “what is this soccer mom doing in my place of business?”.  (For the record, I am not a soccer mom – not that there is anything wrong with soccer moms.)  I asked him if he knew what a chive blossom looked like.  His cool look warmed slightly.  Yes, he knew what they looked like and he loved the green and purple.  He pulled up some photos online and we found a few that looked right.  He highly recommended a guest artist they had in town, a guy named DC, saying all the guys in the parlor were going to get work done by him that evening.

DC was the prototypical tattoo artist.  Bandana on his head, long beard, leather vest, tattoos covering his arms.  He too liked the idea of the chives.  We looked at the pictures, talked a bit, and then he asked me to wait a few minutes while he drew something up.  I said nothing to him about how many blossoms I wanted and I also said nothing about thinking maybe there should be a bit of string tying them together.  A few minutes later, he came out with a drawing feature two blossoms (I had two in mind to symbolize my boys) and with a dainty string tying the stems together.  I knew for sure that I had found the right guy.  Any lingering doubts I had disappeared.

Here are answers to the questions I keep getting.

1) Is that real?

Um, yes.

2) Why your forearm?

I don’t have a good answer for that one.  I just had a vision of it being there.  Originally I was going to go with my left arm and then, for no explainable reason, I changed to the right.  I have a very small Leo sign on my back which, unless I am looking in a mirror, I never see.  I like that it is there but I forget about it half the time.  And living in the climate we do, really the only time it is visible is in a yoga class.  I guess I wanted something I could show, and see, any time.

3) Did it hurt?

Oh my god, yes.  I wasn’t all that nervous about the pain because, after all, I have been through labor and 2 c-sections.  I know pain.  But I wasn’t prepared for how much it would hurt.  He started at the wrist end which is much more painful and there were moments where I honestly didn’t think I could stand it.  The only thing that kept me from stopping him is I knew I couldn’t have some random half-finished lines on my arm for the rest of my life.  As time went on (it took a little over an hour), the pain got more tolerable.  It was sore for a few days and then itchy.  Now it is almost healed and like labor, I know I will soon forget about the pain.

4) What does your husband think?

Randy has been supportive about and slightly baffled by this whole thing.  He is the one who came up with the idea of an herb and I think he liked the idea of it all along.  When we started specifically talking about chives being on my forearm until death do us part, he got a little skittish.  But never once did he suggest that I not do it.  Now I think he really likes it.  It is pretty, delicate, and it symbolizes such an important part of me.

5) Do you love it?

I almost love it.  I really really really like it.  I am happy that it is there, I love showing it off.  I am proud of it.  I think it is beautiful and I am so thrilled that DC did such a good job.  It scares me that it is there forever and I think that is what keeps me from saying I love it.  I know that it will soon become a part of me as much as the one on my back is.  I worry slightly how it will wear and fade over the years being in such a visible spot.  If a magic genie came out of a bottle and told me he could grant me the wish of removing it without a scar, I would say no thanks – I’ll keep it.  (And how about granting the wish that I could eat french fries for every meal and not gain weight?)

I know the photos make it look disembodied but I tried several different ways of taking pictures and they all looked kind of weird.  I hope you get a feel for it.


Spoiled Rotten

June 19, 2010

Six years ago, right around this time of year, Randy and I were living in London.  One day I sat in a wonderful cooking class at Leith’s – a day-long class on vegetarian food.  The teacher was swift and engaging and while I didn’t learn much in particular, it was a joy to watch such a professional work.  My eyes kept drifting up to the stacks upon stacks of copper pots on the shelves behind her.  She mentioned that the school had bought the pots and pans back in the 1950’s and they were the ones still used in the kitchens.  Dreamily I thought, “I want copper pots from Paris”.  Practically I thought, “I just got brand new stainless steel All Clad pots – there is no way I could justify buying copper”.  Dreamily I thought, “For my 40th birthday, I want to go to Paris and buy copper pots”.  The class wrapped up, I went home and told Randy about my 40th birthday plan – six years in the future – to which he said, “Got it”.

“Got it” in Randy language means many things.  Sometimes it means “please stop talking, I understand you” and other times it means “I am taking your criticism and I am moving on”.  In this instance it meant “you are making a special request of me and regardless of how frivolous it may sound, I will see that I fulfill it”.  If you know my husband, he is a get-shit-done kind of guy.  He is a tremendous problem solver, an incredibly hard worker, and he really likes to plan.  What you may not know is that he is a pretty romantic guy and he really likes to make me happy.

So, my 40th birthday is this summer (July 26th to be exact) and on Tuesday, I am flying to France.  Randy has business in Cannes so I will meet up with him there, then fly to Paris for a few days, then take the Eurostar to London for one day, and then back home.  It will be whirlwind.  I feel very lucky.  My in-laws are flying in from Atlanta to stay with my kids and I will get my husband all to myself for a whole week.  A week in Europe where I have not been in six years.

Will I buy pots?  I don’t know.  It is highly impractical.  I can’t carry them on the plane and to ship them would be ridiculously expensive.  I hope to maybe find a brand that does business online and buy them that way.  I have a list of shops to visit but our time is limited, especially since one of our two full days in Paris will be a Sunday.  Maybe I will just buy a symbolic pot (like a ½ quart butter-melter) and spend the rest of my money on chocolate.  I know that it doesn’t matter.  I will lay on the beach in Cannes.  I will have an early birthday dinner with Randy and my parents (who are joining us) in Paris.  I will get to have lunch with Ele and Hilary in London.  I get to fly on an airplane armed with stacks of books and magazines and not one single Sesame Street DVD, garbage truck, or Leap Frog game.  Parents of small children, you know what I am talking about.

Whenever I feel extra spoiled, I feel like I want to give back.  Here is where the chocolate cookies come in.  I got the recipe for these treats from David Lebovitz’s new book Ready for Dessert.  David Lebovitz, if you don’t know, is an American pastry chef and ice cream guru living in Paris.  He has written a number of cookbooks (including the only ice cream book you will ever need – The Perfect Scoop) and also a memoir about living in the city of lights called The Sweet Life in Paris.  Wouldn’t it be nice to have a contest, pick a winner, and send that person to Paris?  Unfortunately, that is not going to happen.  So, I’m going to have a contest, pick a winner, and send that person a copy of The Sweet Life in Paris and winner’s choice of one his other books.  Just tell me what your favorite spot is in Paris and if you haven’t been, tell me what would be your first stop in that beautiful city.

I will pick a winner when I return from my journey.  I will have a few posts go up while I am gone.  Until then, à bientôt!

One Year Ago: Strawberry and Sour Cream Ice Cream (from The Perfect Scoop!)
Two Years Ago: Spicy Lime and Herbed Tofu in Lettuce Cups (pardon the photo)

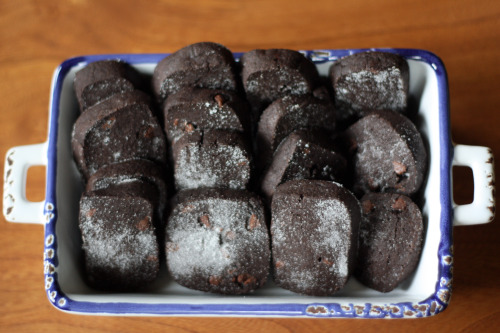
Flo’s Chocolate Snaps
Adapted from Ready for Dessert
Makes about 50 cookies

I took the liberty of adding ½ a cup of mini chocolate chips to my batter which you could, of course, leave out.  I cut my cookies a bit thicker than he recommends and next time I will just listen to him so they are thinner and snappier.

3 cups flour
¾ cup unsweetened Dutch-process cocoa powder
2½ tsp. baking powder
¼ tsp. salt
1 cup (2 sticks) unsalted butter, at room temperature
1¼ cups sugar, plus more for sprinkling
½ tsp. vanilla extract
1 large egg, at room temperature
1 large egg yolk, at room temperature
½ cup mini chocolate chips (optional)

Into a small bowl, sift together the flour, cocoa, baking powder, and salt.

In a stand mixer fitted with the paddle attachment, beat together the butter and the sugar on medium speed just until smooth.  Add the vanilla, then beat in the egg and egg yolk.

Gradually add the cocoa mixture to the butter mixture, mixing until completely incorporated and no streaks of butter remain.  If using, mix the chocolate chips in by hand using a spatula.

On a lightly floured surface, divide the dough into quarters, and shape each quarter into a log about 7 inches long and 1½ inches in diameter.  Wrap the logs in plastic wrap and refrigerate until they’re firm enough to slice, about 1 hour.

Position racks in the upper and lower thirds of the oven; preheat the oven to 350ºF.  Line two baking sheets with parchment paper or silicone baking mats.  (DT: I skipped this step and had no trouble with the cookies sticking.)

Slice the logs into disks ½-inch thick and place the disks on the prepared baking sheets, spaced about ½-inch apart.  Bake, rotating the baking sheets midway through baking, until the cookies are puffed and slightly firm, 10 to 12 minutes.  Remove from the oven and immediately sprinkle with a bit of sugar.

Let the cookies cool on the baking sheets until firm enough to handle, then use a spatula to transfer them to a wire rack.  They will continue to firm up and get “snappy” as they cool.

(The dough can be refrigerated for up to 5 days or frozen for up to 1 month.  The baked cookies can be kept in an airtight container for 2 days.)


Perfect Chocolate Chip Cookies

June 16, 2010

We food bloggers can be a bossy group.  You see a lot of “You have to try this!” and “This is the best (fill in the blank) recipe out there!  Throw away any other version!”.  We feel strongly about food and when we find something we like, we want to share.  I come by my bossiness naturally.  I am an oldest child and a Leo.  I have almost 40 years experience telling people what to do.

I like to think that I am not overly bossy on my site.  (Please let me know if you feel otherwise.)  I fully appreciate that taste is completely individual and something I love might be something you hate.  We all have different opinions about what is delicious and I respect that you might hate chocolate and french fries (although I will never never understand it).

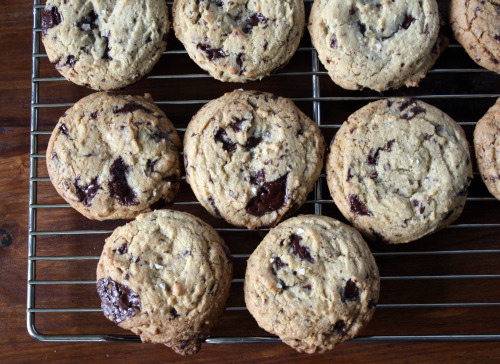
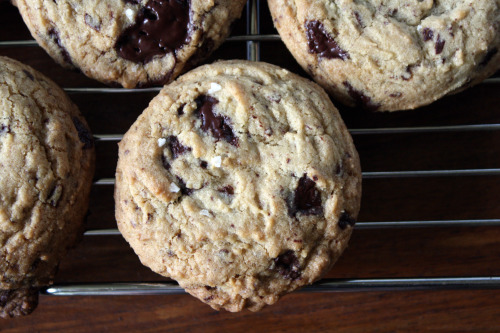
It is with restraint and respect that I tell you that I have found the last chocolate chip cookie recipe I will ever need.  What I want to do is to type in all caps and tell you that you have found the last chocolate chip cookie recipe you will ever need…but I am holding my inner boss in check.  I respect that you might have a much beloved recipe that you will never part with.  But it is my duty as a food blogger to share my treasure.

I  never really gave much thought to chocolate chip cookies until the New York Times recipe came along several years ago.  Periodically I would see recipes in books and wonder why anyone would stray from the good old Tollhouse recipe.  When all the hubbub died down, I made the NYT recipe and understood that a chocolate cookie is capable of subtlety and there was a difference when you used different kinds of flour, used chocolate disks instead of chips, and let the dough rest at least overnight.  I made them again and again and thought I had found my until-the-end-of-time cookie recipe.

And then, just a few weeks ago, Ashley’s recipe came into my life.  You know Ashley, right?  If you don’t, you should.  This very sweet very young woman is very accomplished and a very very good cook and baker.  She teaches wonderful classes that happen to take place right next door to my house.  I have taken a few and I look forward to taking more.  I am a good cook and baker but I have learned some great things from her.  Like how to make a perfect chocolate chip cookie.

What makes them so special?  Three different kinds of sugar.  A long creaming time.  A lot of chocolate.  A little trick with adding the flour and chocolate pieces to prevent over mixing.  I don’t know.  I asked her what she thought made them so special and she answered, “It’s just all those things together”.  All right whatever, cookie genius.  What I do know is that these cookies turn out perfectly round (every single one of them!), they have loads of chocolate and no nuts (a big plus for me), and they are that perfect combination of crisp exterior and chewy interior.  They also have a sprinkling of sea salt on the top of each one which makes them irresistable.

I also asked Ashley about the let-the-dough-rest theory.  She said her cookies are in fact even better (is that possible?) if you refrigerate the dough for 24 hours.  When I told her that I found refrigerated dough kind of a pain to scoop, she said that she turns the dough out and forms it into a log.  Then she slices and bakes.  Cookie genius indeed.

UPDATE 4-12-11 I have been making loads of these cookies and I think I have found the best way.  Make the dough as directed below.  Then split the dough into quarters.  Roll each quarter into a log about 10 inches long.  Wrap well in plastic wrap and refrigerate for 24 hours.  Then cut the logs into ¼-inch slices and bake.  I can get about 50 smaller cookies when made this way.

One Year Ago:  White Chocolate Almond Chunk Cookies
Two Years Ago:  Feta and Ricotta Cheese Skillet Pie

Ashley’s Salted Chocolate Chip Cookies
Not Without Salt
Makes about 2 dozen

I have made no changes to the original recipe but have clarified a bit, with Ashley’s blessing.  I used bittersweet chocolate for my cookies but semi-sweet would be great too.

2 sticks (8 oz.) unsalted butter, softened
¼ cup granulated sugar
¼ cup Turbinado sugar
1¾ cup light brown sugar, packed
2 eggs
2 tsp. vanilla
3½ cups all-purpose flour
1½ tsp. baking soda
¾ tsp. salt
12 oz. chocolate (use the best quality chocolate you can afford.  With a serrated knife, cut chocolate into roughly ½-inch chunks.)
Sea salt

Preheat the oven to 360ºF.  Set rack in the middle of the oven.

Cream the butter and the sugars on medium-high speed until light, 4-5 minutes.  Scrape down the sides of the bowl a couple of times during this process.  Continue mixing while adding the eggs one at a time.  Make sure each egg is incorporated before adding the next.  Add the vanilla.  Scrape down the bowl with a spatula.  Combine the flour, soda and salt in another bowl.  Mix with a whisk.  With the machine on low, slowly add almost all the flour.  Reserve just a bit of the mixture.  Remove the bowl from the mixer and add the last bit of flour along with the chocolate.  Stir with a spatula until just combined.

Using a large ice cream scoop, scoop out mounds of dough making sure there is about 2 inches between each cookie.  Do not crowd them and there is no need to press the dough down.  Sprinkle each mound with a bit of sea salt.

Bake sheets, one at time, until the cookies are lightly golden on the edges and a bit gooey in the center, about 12 minutes.  Do not overbake!  Remove sheet from oven and allow to sit undisturbed for two minutes.  Then carefully transfer cookies to a cooling rack.  Repeat with the remaining sheets.

(DT: I have a convection feature on my oven and was able to successfully bake three sheets at a time.  If you do not have convection, I would highly recommend just doing one sheet at a time.)


Chile-Cheese Gratin Sandwiches

June 15, 2010

I have been writing Dana Treat for a little over two years.  In that time, I have shared a lot about the food I make, the things I like and dislike, a bit about my family, a lot about Lopez Island and the special bakery that is there, and thoughts on a new tattoo (photo and story coming soon, I promise).  I’ve directed you to other blogs I like and have sung the praises of chickpeas and chocolate.  Hopefully I have goaded you into giving tofu a chance and maybe even into trying tempeh.  I also hope I have shown you what vegetarian food can be, given the chance.  Here is something I’ve never discussed.

I’m not really a cheese person.

{pause}

I hesitate to even mention it because I almost feel like I lose some foodie credibility.  How can you love food and not love cheese?  You don’t eat meat and you don’t like cheese?  Who the hell are you anyway??

It’s not that I don’t like cheese.  I do like it.  I have recipes here that feature cheese – 21 of them as a matter of fact.  I guess I should say that I don’t like it much by itself and I tend to use less of it in recipes where it is called for.  If there is a cheese platter at your next party, you might see me hovering near it, but I promise you – what I am admiring is the crackers.  The cheese plate in a French restaurant?  Lost on me.

On the opposite end of the spectrum is my friend Michelle.  I have known Michelle since I was a lowly promotions intern at a radio station in 1994.  As our friendship has grown, we have shared meals together all over Seattle and in Vancouver, Whistler, London, Rome, and Paris.  She is a lusty and enthusiastic eater.  She often says things like, “This is the best (fill in the blank) I have ever tasted”.  As you can imagine, she is fun to cook for.  I haven’t asked her about her desert island food, but my hunch if would be cheese.  The woman is passionate about cheese.

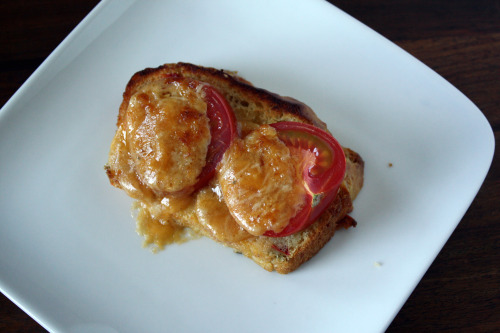
Michelle came to stay with us this past weekend and I knew immediately what I had to make for Sunday lunch.  I have a sweet little book called Savory Baking, and in there is a recipe for Chile Cheese Gratin Sandwiches  Basically, you bake a chile and cheese filled bread in a loaf pan.  Once it is cool, you cut slices of the bread, top it with sliced tomatoes and then top the whole thing with a  cheese and butter concoction.  Under the broiler it goes for a few minutes and then what you have is basically cheese heaven.

Before I tell you how much I liked this recipe, allow me to tell you how much I liked making lunch.  Whenever we have friends over on Sunday, it is almost always for brunch.  I make some kind of egg dish (like this one or this one), I always make roasted potatoes, and I make some kind of baked good (like cinnamon rolls or coffee cake or petits pains au chocolat).  The dishes change, the formula remains the same.  This time I thought I would change it up and make lunch instead.  This cheese bread, soup, salad.  It was a nice change of pace.

So, if you set up your tent in the cheese lovers’ camp, this is a good recipe for you.  I loved it because the flavors were interesting – not all one note as cheesy things can sometimes be for me.  There were canned chiles, red pepper, and jalapeño peppers in the bread so while it was rich, there was also a lot of spice to cut the richness.  I was thinking ahead and just doubled the recipe and put the other loaf in the freezer.  The next time I serve a hearty soup, I know what I am serving along side.

One Year Ago: Grilled Vegetable Quesadillas
Two Years Ago: Curried Red Lentil Stew with Vegetables

Chile Cheese Gratin Sandwiches
Adapted from Savory Baking
Serves 8

Two notes.  Worcestershire sauce is not vegetarian – it contains anchovies.  If you care, you can find a vegan sauce at Whole Foods or just omit it.  I sprayed my pans with non-stick spray and some of the bread stuck to the bottom, so be sure to grease your pans well.

Chile-Cheese Bread
2 cups flour
2 tsp. sugar
1 tbsp. baking powder
1 tsp. freshly ground black pepper
1 tsp. salt
4 ounces (1 cup) sharp cheddar cheese, shredded
1 cup whole milk
1/3 cup vegetable oil
1 egg
1 4-ounce can peeled mild green chiles, drained
1 jalapeño pepper, seeds and membranes removed, finely diced
½ cup red bell pepper, finely diced

Cheddar Topping
4 ounces (1 stick) unsalted butter, room temperature
4 ounces (1 cup) sharp cheddar cheese, shredded
1 ounce (¼ cup) Romano cheese, shredded
½ tsp. Worcestershire sauce
½ tsp. garlic powder
Pinch of salt
8 tomato slices

To prepare the bread:
Preheat the oven to 375ºF and butter or spray an 8-by-3-inch loaf pan.  Stir the flour, sugar, baking powder, pepper, and salt together in a medium bowl.  Add the cheese and gently toss until the cheese is evenly distributed throughout the mixture.

Whisk the milk, oil, egg. green chiles, chopped jalapeño, and red bell pepper in another bowl.  Pour the milk mixture over the flour mixture and briefly blend with a spatula.  The batter will look moist.  Pour the batter into the prepared pan and place it in the oven.  Bake until the top is golden brown and springs back gently when touched in the center, about 45 minutes.  Put the loaf on a cooking rack for 10 minutes and then remove the bread from the pan to completely cool.

To Prepare the Topping:
Put the butter, Cheddar and Romano cheese, Worcestershire sauce, garlic powder, and a little salt in the bowl of a stand mixer fitted with a whip attachment.  Whip for 2 minutes on medium speed.

Set the oven to broil.  Cut the loaf into 8 slices and lay the slices on a baking sheet.  Place a tomato slice on each piece of bread.  Spoon about 2 heaping tablespoons of the cheese topping over each tomato slice.  Put the baking sheet into the oven about 4 inches away from the flame and broil until the cheese is bubbly and golden, 3 to 5 minutes.  Serve immediately.

(Wrap cooled bread in plastic wrap at room temperature for up to 1 week, or freeze for up to 1 month.  Remove the loaf from the freezer and thaw at room temperature for a couple of hours.  The Cheddar topping can be made ahead and stored in the refrigerator for up to 2 weeks.)


« Older Posts