Archive for March, 2011

Giving Apples Their Due

March 31, 2011


I want to thank those of you who left such thoughtful comments on my last post.  I truly appreciate you sharing your own struggles and ideas with me.  I love having such thoughtful, interesting, and intelligent readers!

I have started to feel a bit like June Cleaver lately.  At 3:45 each day, Graham comes off the school bus from kindergarten and most of those days I open the door for him fresh off some baking project.  I (sometimes) have an apron on and there is some kind of treat cooling on the kitchen counter.  Graham (bless him) always takes a deep breath and says, “It smells so good Mommy!”  I differ from good old June in that I have flour in my hair and my kitchen looks like a train just went through it at high speed.

My sweet Graham has a sense that I make special things.  That maybe not everyone else’s mommy keeps a cookie jar full of homemade treats or has things like apple cakes lying around the house.  He will tell me, unprompted, “You are a good cooker Mommy.”  He is eager to try whatever I have out on the cooling rack and is heartbroken when I tell him it is for “friends” – students in my classes, Randy’s office mates, or catering clients.  I do a lot of that type of baking, baking for “friends”, but I often just like to have a treat on hand for my husband, kids, and whoever happens to come over during the week.

I’ve been seeing a lot of apple cakes around the blogosphere lately as we prepare to say goodbye to them for a season or two.  This has made me realize that I haven’t been seeing a lot of apple cakes coming out of my kitchen lately.  I figured I had better remedy that while the weather is still fall/winter-esque.  Truthfully, I love apple desserts and would have no problem serving them all year, but once the berries come start in June, apples start to look a little, um, homely.

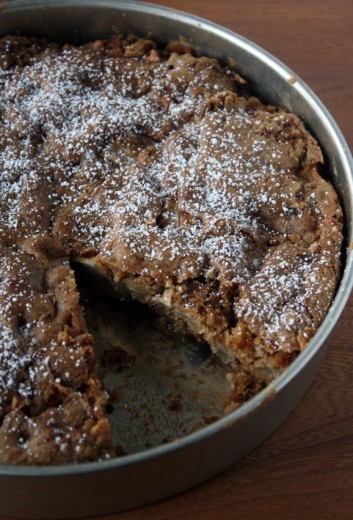
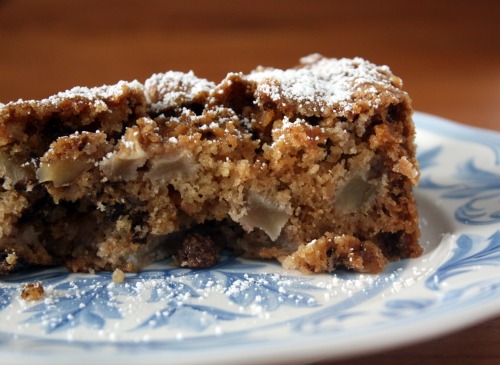
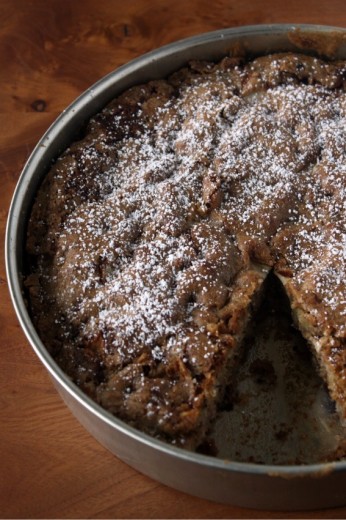
I think of this cake as “have a little cake with your apples”.  Actually, I hate that type of expression.  Like when someone says, “Have a little french fries with your ketchup!”  Who are they to say how much ketchup is the right amount for a french fry? In my world, it’s a lot.  So who am I to say how much batter should be mixed together to hold all these apples?  I quite like this proportion.  Big chunks of apple and walnuts (I didn’t mind the nuts here) with a spicy cake batter keeping it honest.

The name of this cake is Apple Snacking Spice Cake which suits it perfectly.  Not fancy, not really all that sweet.  It would be great for a brunch or just for a special after-kindergarten treat.

One Year Ago: Fideos with Pasilla Chiles, Avocado, and Crema
Two Years Ago: Mediterranean Roasted Vegetable Salad

Apple Snacking Spice Cake
Flour
Makes one 10-inch round cake

I am including Chang’s instructions for turning the cake out onto a platter, but it was very clear to me that this cake was not going to leave my pan in one piece.  I opted to forgo the heartbreak that is a broken cake and just serve this out of the pan.

1 cup all-purpose flour
¾ cup cake flour
1½ tsp. baking soda
½ kosher salt
¼ tsp. ground cinnamon
¼ tsp. ground ginger
1/8 tsp. ground cloves
1½ cups granulated sugar
¾ cup (1½ sticks) unsalted butter, at room temperature
2 eggs
4 cups peeled, cored, and chopped Granny Smith apples (2 to 3 apples)
½ cup raisins
1 cup pecan halves, toasted and chopped (I used walnuts)
Confectioners’ sugar for dusting

Position a rack in the center of the oven, and heat the oven to 350 degrees F.  Butter and flour a 10-inch round cake pan.

In the bowl of a standing mixer, sift together the all-purpose flour, cake flour, baking soda, salt, cinnamon, ginger, and cloves.  (Or, sift together into a medium bowl if using a hand-held mixer.)  Fit the mixer with the paddle attachment.  Add the granulated sugar and butter to the flour mixture and beat on medium speed for about 1 minute, or until the butter is fully incorporated into the dry ingredients.  Stop the mixer several times to scrape the paddle and the sides of the bowl to make sure all of the butter is mixed in.  Add the eggs and mix on low speed for 10 to 15 seconds, or until fully incorporated.  Then turn the mixer to medium-high speed and beat for about 1 minute, or until the batter is light and fluffy.

Using a rubber spatula, fold in the apples, raisins, and pecans.  The batter will be very stiff and thick.  It will look like too many apples and not enough batter, but that’s okay.  Scrape all of the batter into the prepared pan, then spread it evenly to fill the pan.

Bake for about 1 hour and 20 minutes, or until the cake feels firm when you press it int he middle and the top is dark golden brown.  (DT: Mine was done at 1 hour.  Be sure to check!) Let the cake cool completely in the pan on a wire rack.

Invert the cake onto a serving plate, lifting away the pan, and then invert the cake again so it is right-side up.  Slice and plate, then dust the slices with confectioners’ sugar.

The cake can be stored in an airtight container at room temperature for up to 3 days.  Or, it can be well wrapped in plastic wrap and frozen for up to 2 weeks.  Thaw overnight at room temperature before serving.


This Vegetarian’s Dilemma

March 29, 2011

With apologies to Michael Pollan, of course.

Do not be afraid.  I am not climbing up on a soap box here.  I have never, nor will I ever, tell you how or what to eat.  The only people who get that from me are my children and that is another story for another post.  I sincerely hope this does not come off as a rant.  I have been thinking about writing a post like this ever since I started this blog and I guess it is just time.  Bear with me.

People often ask me why I am a vegetarian.  There are a lot of reasons – environmental, ethical, health – but I would have to say that the main one is that I just am.  Even as a child I never liked meat and so giving it up has never been a struggle for me.  I did so at an early age and have not looked back.  I never “wish” I could have the steak in a restaurant.  Being vegetarian comes naturally to me and it is as much as part of my makeup as being right-handed.

Having said that, I do struggle with the foodie side of things.  Most of the time, I am a glass is half-full vegetarian.  I celebrate the bazillion things I do choose to eat rather than focus on the four things I don’t.  But those four things (red meat, white meat, poultry, fish) make up a very large percentage of what is thought of as food – in this country at any rate.  I get several food magazines and only about one-quarter of the recipes are things I can make.  The summer grilling issues usually just get tossed in the trash.  Restaurants that I read about sound tantalizing to me, until I realize that I would mostly likely have a sub-par plate of pasta and that I am better off eating at home.  Imagine me on Top Chef – what would my “protein” be?

Again, it’s not that I want to eat meat and am just not letting myself.  I spend a lot of time eating food, thinking about food, photographing food, writing about food, but this huge chunk of that world is not available to me.  I struggle with that.  I struggle with feeling left out.  I struggle with not being taken seriously.  I was inadvertently sent an email the other day in which I was referred to as a “veg-head”.  Really?  In 2011?

I fight against the stereotype of the hippy dippy vegetarian who makes nut loaf and grows her own wheat grass.  I endure jokes from acquaintances, even friends, even my own family about whether I am making hamburgers for the next dinner party.  I nod and smile when someone says that they didn’t “miss the meat!” after eating a meal that took me hours to prepare.  Or when they say that my food is really good – for vegetarian food.

From what I read, more and more Americans are trying to eat less and less meat.  Meatless Mondays and all that.  I’m glad.  I’m excited.  I want to teach people what to cook and eat on those days they choose not to eat meat.  This is precisely the reason that I decided to start teaching regular and ongoing classes in my kitchen.  But why does it feel like the perception of vegetarianism is stuck in the 1970’s?  You know, the nut loaf and the wheat grass.  My husband is fond of telling people that I have been cooking for him for over ten years and that there have only been a handful of repeat dinners, and those are usually at his request.  That is not much of an exaggeration.  Our diet is incredibly interesting and diverse.  We eat really well.  Plus we are healthy and thriving.  Most of the time, I am very happy to say just that.  But sometimes, I feel left out.


Ten Years Later

March 28, 2011

Do you have a best friend?  If so, what does that mean to you?  Is it someone who has seen you through a rough patch?  The friend you have known the longest?  A person you talk to each and every day?  What makes your best friend best?

I was always the person with a few close friends, not lots and lots of acquaintances.  I preferred it that way.  I would rather spend an evening with someone I really know than the first-date feeling of a casual acquaintance.  But somehow, I have found myself with many amazing friends – real true friends.  All of whom I really know, all of whom I would love to spend an evening with.  They come from different parts of my life – high school, camp, college, previous jobs, PEPS groups, preschool co-op, kids’ friends, etc.  It is a big circle.  But, if pressed, I do have to say that there is one “best” in there.

Lauren and I don’t talk everyday and I don’t see her nearly as often as I would like, but we have a strong and special bond.  We have been friends for 15 years.  She is a talented, creative, beautiful, smart, funny woman.  She is a straight-shooter and also very compassionate.  She is extremely loyal and supportive.  Just about everything you would want from a best friend.  I have been lucky enough to share many meals with her and her amazing husband John over the years.  Because I have an incredible memory for food (but not for, say, where I left my keys), I remember so many of the dishes we have made for one another.  She made this soup for me a long time ago and I have been meaning to make it ever since.

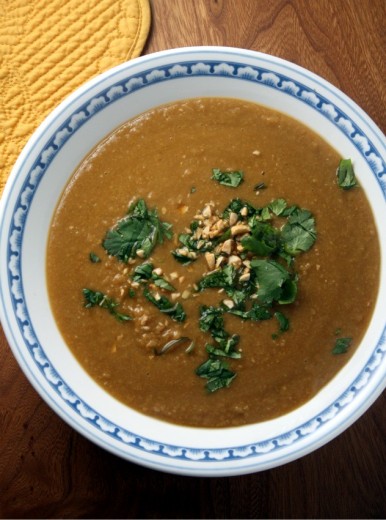
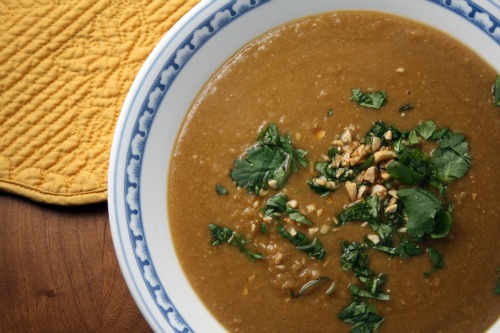
When I tasted this soup, it was a revelation.  How could something that took next to no effort and with so few ingredients taste so complex and delicious?  I asked her for the recipe, she made a copy for me, and then it sat in my soup notebook for oh, about ten years.  No exaggeration.  I would notice it from time to time and think to myself, “I’ve really got to make that soup”, but it never seemed to fit into a menu I was planning.  Now that I have made it, I will be planning menus around it.

I tweaked this recipe a bit.  The original calls for 2 tablespoon of soy sauce giving low-sodium as an option.  I use tamari in my cooking and WOW! did it make the soup salty.  And brown.  Fortunately, as the beans cooked, I had to keep adding more and more water so by the time I puréed it, the savory balance was just right.  I will suggest you use one tablespoon and add more to the finished soup if it needs it.  If you don’t want to garnish with peanuts, roasted sliced almonds would be nice.  You will want a bit of crunch in there.

One Year Ago: Blueberry Sour Cream Torte
Two Years Ago: Individual Coconut Blueberry Pound Cakes

Spicy Chickpea Soup with Cilantro and Peanuts
Adapted from Self
Serves 4-6

The cooking time for this soup will depend on how fresh your dried beans are.  Start with 8 cups of stock or water, you might need to add more if the soup gets too thick.

1½ cups dried chickpeas
1 tbsp. olive oil
3 cloves garlic, minced
1 large onion, finely diced
8 cups vegetable stock, or water
1 tbsp. hot sauce (I used Tabasco)
1 tbsp. Tamari or other soy sauce
¼ cup chopped roasted peanuts
¼ cup chopped fresh cilantro

Soak dried chickpeas in water to cover overnight.

Drain the chickpeas and rinse well.  Heat the oil in a large soup pot over medium heat.  Add the onion and sauté until starting to soften, about 4 minutes.  Add garlic and cook for another 2 minutes.  Add chickpeas, vegetable stock, hot pepper sauce, and soy sauce.  Cover loosely and simmer until chickpeas are tender, anywhere from 1-3 hours.  Purée soup either using an immersion blender or a conventional blender (be careful when blending hot liquids).  Sprinkle each portion with chopped peanuts and cilantro.


Broccoli and Sweet Sesame Salad

March 24, 2011

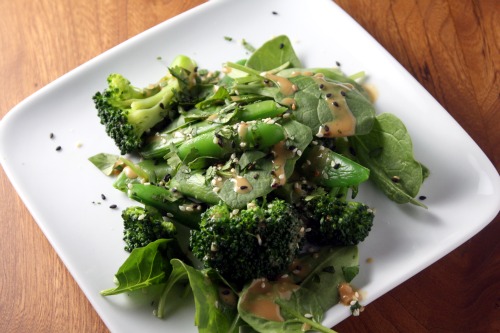
Even though I fight against the stereotype of vegetarians eating salad all the time, I eat salad all the time.  At almost every dinner and sometimes for lunch too.  Not just because it is “healthy” – I really like salad.  I forget how many vegetables the food pyramid tells us we should eat these days, but I’m sure I eat double the suggestion each day.

When I was working as a personal chef, I got very creative with salads.  I am happy to eat the same one over and over at my dinner table but I assumed my clients needed a little more variety.  So, I made all different kinds with all different dressings.  Recently, I was reading on the Kitchn about things to throw in a salad.  All were good suggestions but I stopped at broccoli.  I love broccoli, why do I never put it in salad?  And then, as I was looking for a side dish to serve with the brussels sprouts dish, this lovely ensemble spoke to me.

Now I have to be honest.  There are days when I can sit and wait for words to come to me.  Words that would potentially describe how delicious this was, how I wanted to drink the dressing, how clean (and yet satisfying!) it felt to eat this salad, but this is not one of those days.  Rather than delay and stall, I figured that I would just offer the recipe up to all of you and tell you simply that if you love broccoli and if snap peas are starting to make an appearance in your markets, get right on this.

One Year Ago: Zucchini, Tomato, and Swiss Cheese Pie
Two Years Ago: Chocolate Chip Coffee Cake

Broccoli and Sweet Sesame Salad
Adapted from Plenty
Serves 4

Ottolenghi calls for string beans in this salad as well, but I left them out.  You can bulk this salad up by adding a couple of handfuls of spinach.  I had a seed mixture called Gomasio in my spice cabinet which I used here.  It is a mixture of white and black sesame seeds mixed with Japanese sea salt and it was extra delicious in this recipe.  You can find it here.

1 pound broccoli, cut into small florets
½ pound snap peas, strings removed
¼ cup cilantro leaves, chopped
3 tbsp. sesame seeds
1 tsp. nigella seeds

Dressing
4 tbsp. tahini paste
¼ cup water
1 small garlic clove, pressed
1 tsp. tamari
1 tsp. honey
1 tsp. rice wine vinegar
1 tbsp. mirin
2 tbsp. hazelnut or other nut oil

Make the dressing
Place all the ingredients in a bowl and whisk together.  The dressing should be smooth and thick but with a pourable consistency, adjust the water as necessary.  Taste and add more salt if you like.  (This will most likely be more dressing than you need for the salad.  Cover and refrigerate the leftovers.)

Bring a large pot of water to boil.  Add the broccoli and snap peas and cook for 2-3 minutes.  Drain and immediately rinse with very cold water.  Drain again and then dry with a kitchen towel.

Place the vegetables in a large bowl.  Scatter the cilantro leaves and the seeds over top.  Drizzle with dressing and serve.


Date Bars Gone Bad, Or Maybe Not

March 22, 2011

You know what I hate?  Poorly written recipes.  You know what else I hate?  Wasting quality ingredients.  Which is why I will never make these bars again.*

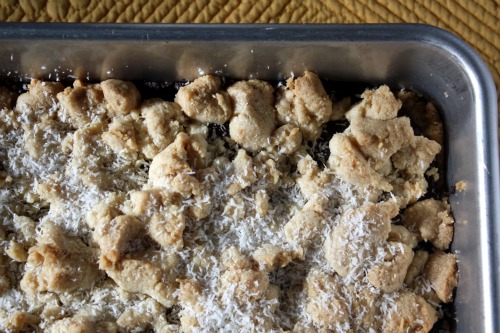
In searching fora different book, I came across my copy of Sticky, Chewy, Messy, Gooey.  I wondered, “Why haven’t I been using this book more?”  Now I know.  First there was the unclear directions about refrigerating the dough and then there was the fact that there was a full third too much of that dough.  I essentially threw out 10 tablespoons of butter.  Add to that the fact that the final baking time was off.  Way off.  Like the recipe said the bars would be done at 30 minutes.  Mine were done at 60.  I understand accommodating for oven differences and add 10 minutes here and there.  But double the amount of time?  Did anyone test this recipe?

This was the weekly treat and I’m sure the crew will enjoy them and might even request the recipe.  But my math skills would need to be much better in order to tell you how to either successfully cut the recipe for the dough by a third, or to increase the amount of date filling for an additional set of bars in a smaller pan to accommodate the leftover dough.  Ahem.  Too. Much. Trouble.

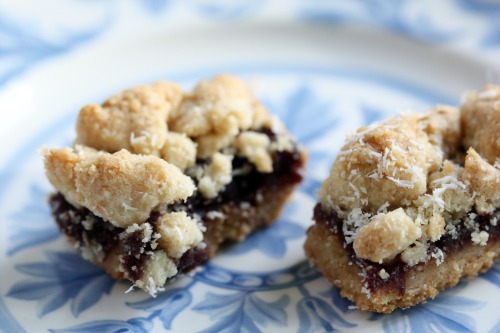
*But here is the thing.  I wrote the above paragraphs as I was checking the pan in the oven and while I was waiting for the bars to cool.  I was fully prepared to hate them.  I sheepishly have to tell you they are delicious.  A totally wonky, poorly written, proportionately-off delicious recipe.  What do you do with that?

I’m going to give you the recipe as written.  If one of you out there in Internet land can figure out a better way to make these bars, of if one of you makes them successfully using this recipe as written, will you let me know?  Please and thank you.

(UPDATE: I just want to clarify that the book in question is Sticky, Chewy, Messy, Gooey by Jill O’Connor – NOT Chewy, Gooey, Crispy, Crunchy.  The latter is the most recent book by Alice Medrich and has been celebrated by everyone who has used it.  Note to self: do not use a four adjective title for any future cookbooks.)

One Year Ago: Baked Pasta with Tomatoes and Mozzarella
Two Years Ago: Pasta with Roasted Cauliflower and Parsley Pesto

Chewy Date Bars
Sticky, Chewy, Messy, Gooey
Makes 24 bars

A couple of hints.  I was not clear on whether I was supposed to refrigerate the dough pressed into the pan as well as the topping dough.  I did just to be safe.  You will need a stand mixer for the dough.  I have the “professional” size Kitchen Aid and it struggled.  Do not attempt to mix it on medium.

1 pound (4 sticks) unsalted butter, at room temperature
1 cup granulated sugar
1½ cups confectioners’ sugar
2 tsp. vanilla extract
1½ tsp. salt
4 cups all-purpose flour
2 tsp. baking powder
1 1/3 cups desiccated coconut

For the date filling
1 pound dates, preferably Medjool, pitted and coarsely chopped
1½ cups water
¼ cup granulated sugar

Combine the butter and sugars in a large bowl.  With an electric mixer set at medium speed, beat the butter and sugars together until creamy.  Add the vanilla and salt and beat to combine.  Beat in the flour, baking powder, and 1 cup of the coconut just until a soft dough forms.

Spray a 9-by-13-inch pan with nonstick cooking spray.  Press one-third of the dough into the pan to form a bottom crust.  Wrap the remaining dough in plastic wrap and refrigerate until firm, at least 30 minutes.

Meanwhile, make the filling.  Combine the dates, water, and granulated sugar in a heavy-bottomed saucepan over medium heat.  Cover the pan and cook the dates, stirring occasionally, until they are very soft and have turned into a glossy brown mass, 10 to 15 minutes.  There still may be chunks of dates in the mixture.  Remove from the heat and let cool slightly.  Transfer the date mixture to a food processor fitted with a metal blade and, using short pulses, grind the dates to a fine paste.

Position a rack in the middle of the oven and preheat to 325ºF.  Bake the bottom crust until firm and just beginning to turn golden around the edges of the pan, 20 to 25 minutes.  Let cool slightly.  Spread the date filling evenly over the crust.  Crumble the remaining dough over the date filling to form a pebbly, crumbled topping.

Return the pan to the oven and continue baking until the topping is firm and crisp and just beginning to color, about 30 minutes.  Remove the pan from the oven and sprinkle with the remaining 1/3 cup coconut.  Let cool to room temperature on a wire rack.  Using a sharp knife, cut into 24 bars.


« Older Posts