Category: Cookies

Buckeyes

October 20, 2010

One of the most wonderful things about our truly amazing babysitter Erika, is the friends she has brought into our lives.  Basically every single person who has every babysat for my kids is a friend of Erika’s.  Catherine is our other regular and our boys love her as much as Randy and I do.  She is a southern girl making a fulfilling life for herself in Seattle.

Catherine brings her sweet spirit, cute accent, and beautiful smile to our house about every other Friday for a date night.  She is a very enthusiastic eater of my food so I love having little things hidden away for her in the refrigerator or in the cookie jar.  When Catherine turned 30 last fall, she asked me to cater a dinner for her.  I was very touched that she asked and had a lot of fun deciding on a menu.  Graham loved sharing his house with 20 beautiful women dressed in their best party clothes.  After the holidays, Catherine brought me two huge bags of pecans from her parents’ tree.  Yes, we love her.

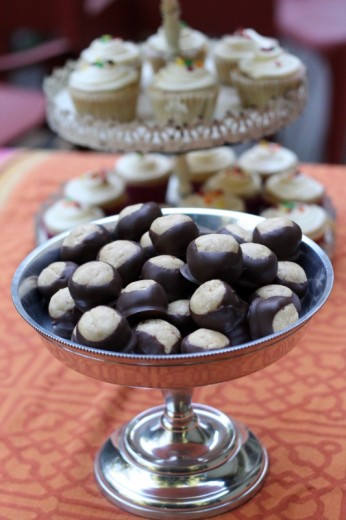
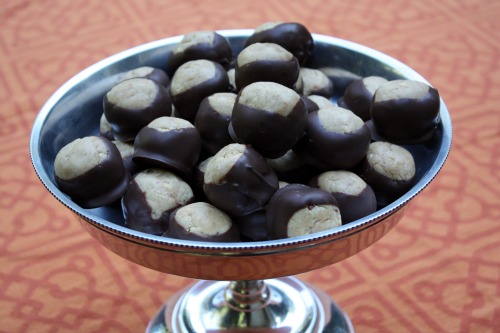
I made these crack-like concoctions the other day for our yoga retreat and, since Catherine babysat on Friday night, I saved her a few.  She walked in and really, before saying hello to me or the boys said with wide eyes, “Are those Buckeyes?”  A Southern girl who knows her treats.

Being an almost lifelong Pacific Northwesterner, I had never heard of Buckeyes.  My loss!  These over-the-top treats are a mixture of cream cheese, graham crackers, butter, and peanut butter dipped in chocolate.  It may not surprise you to know that I got the recipe from the new Baked cookbook.  It may also not surprise you to know that the other treat I made for the retreat also came from that cookbook.  And if neither of those things surprise you, then you probably know that I want to make every single thing in that book, like, tomorrow.  I think it may even surpass the first one in terms of decadence and all around yuminess.

One Year Ago: Fettucine with Oil-Cured Olives, Tomatoes and Goat Cheese
Two Years Ago: Gnocchi with Winter Squash and Seared Radicchio

Buckeyes
Baked Explorations
Makes 36 to 42 buckeyes

¼ cup cream cheese, softened
1½ cups peanut butter
1 cup graham cracker crumbs (about 9 full graham crackers)
3 cups confectioners’ sugar
10 tbsp. (1¼ sticks) unsalted butter, melted and cooled
12 ounces good quality dark chocolate, coarsely chopped

Make the candy
In the bowl of a standing mixer fitted with the paddle attachment, beat the cream cheese and peanut butter until combined.  Add the graham cracker crumbs and beat on medium speed for 10 seconds.  Add the confectioners’ sugar and butter.  Beat at low speed for 20 seconds to prevent the sugar from spilling over, then gradually increase the speed until the mixture is completely combined.  Scrape down the sides and bottom of the bowl and beat again.  The mixture will feel slightly dry.  Set the peanut butter filling aside while you melt the chocolate.

In the top of a double boiler set over hot water, melt the chocolate, stirring frequently until it is completely smooth.  Pour the chocolate into a small, deep bowl.  Let cool to tepid (about 100ºF, body temperature) while you shape the peanut butter centers.

Assemble the Buckeyes
Line a sheet pan with parchment paper.  Scoop out slightly more than 1 tablespoon’s worth of filling and use your hands to form it into a ball.  Place the ball on the prepared sheet pan and repeat the process until all the filling has been shaped.  The balls can sit fairly close to each other, just make sure they are not touching.

One by one, using a fork or large skewer, dip each ball into the chocolate.  Roll the ball around from side to side to cover almost the entire peanut butter center, leaving a small amount uncovered.  Manipulate the buckeye so that the dripping chocolate covers the holes made by the fork.  Let the excess chocolate drip back into the bowl and return each chocolate-covered buckeye to the pan.  Refrigerate the entire sheet pan for about 30 minutes to set the chocolate before serving.

(Buckeyes will keep for up to 3 days, tightly covered, in the refrigerator.)


Spoiled Rotten

June 19, 2010

Six years ago, right around this time of year, Randy and I were living in London.  One day I sat in a wonderful cooking class at Leith’s – a day-long class on vegetarian food.  The teacher was swift and engaging and while I didn’t learn much in particular, it was a joy to watch such a professional work.  My eyes kept drifting up to the stacks upon stacks of copper pots on the shelves behind her.  She mentioned that the school had bought the pots and pans back in the 1950’s and they were the ones still used in the kitchens.  Dreamily I thought, “I want copper pots from Paris”.  Practically I thought, “I just got brand new stainless steel All Clad pots – there is no way I could justify buying copper”.  Dreamily I thought, “For my 40th birthday, I want to go to Paris and buy copper pots”.  The class wrapped up, I went home and told Randy about my 40th birthday plan – six years in the future – to which he said, “Got it”.

“Got it” in Randy language means many things.  Sometimes it means “please stop talking, I understand you” and other times it means “I am taking your criticism and I am moving on”.  In this instance it meant “you are making a special request of me and regardless of how frivolous it may sound, I will see that I fulfill it”.  If you know my husband, he is a get-shit-done kind of guy.  He is a tremendous problem solver, an incredibly hard worker, and he really likes to plan.  What you may not know is that he is a pretty romantic guy and he really likes to make me happy.

So, my 40th birthday is this summer (July 26th to be exact) and on Tuesday, I am flying to France.  Randy has business in Cannes so I will meet up with him there, then fly to Paris for a few days, then take the Eurostar to London for one day, and then back home.  It will be whirlwind.  I feel very lucky.  My in-laws are flying in from Atlanta to stay with my kids and I will get my husband all to myself for a whole week.  A week in Europe where I have not been in six years.

Will I buy pots?  I don’t know.  It is highly impractical.  I can’t carry them on the plane and to ship them would be ridiculously expensive.  I hope to maybe find a brand that does business online and buy them that way.  I have a list of shops to visit but our time is limited, especially since one of our two full days in Paris will be a Sunday.  Maybe I will just buy a symbolic pot (like a ½ quart butter-melter) and spend the rest of my money on chocolate.  I know that it doesn’t matter.  I will lay on the beach in Cannes.  I will have an early birthday dinner with Randy and my parents (who are joining us) in Paris.  I will get to have lunch with Ele and Hilary in London.  I get to fly on an airplane armed with stacks of books and magazines and not one single Sesame Street DVD, garbage truck, or Leap Frog game.  Parents of small children, you know what I am talking about.

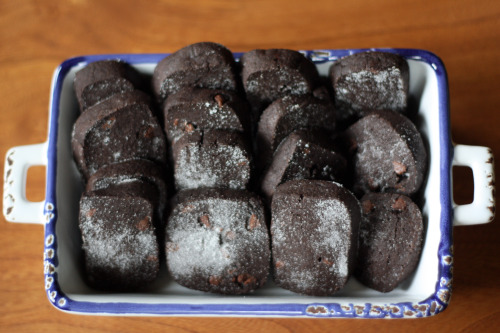
Whenever I feel extra spoiled, I feel like I want to give back.  Here is where the chocolate cookies come in.  I got the recipe for these treats from David Lebovitz’s new book Ready for Dessert.  David Lebovitz, if you don’t know, is an American pastry chef and ice cream guru living in Paris.  He has written a number of cookbooks (including the only ice cream book you will ever need – The Perfect Scoop) and also a memoir about living in the city of lights called The Sweet Life in Paris.  Wouldn’t it be nice to have a contest, pick a winner, and send that person to Paris?  Unfortunately, that is not going to happen.  So, I’m going to have a contest, pick a winner, and send that person a copy of The Sweet Life in Paris and winner’s choice of one his other books.  Just tell me what your favorite spot is in Paris and if you haven’t been, tell me what would be your first stop in that beautiful city.

I will pick a winner when I return from my journey.  I will have a few posts go up while I am gone.  Until then, à bientôt!

One Year Ago: Strawberry and Sour Cream Ice Cream (from The Perfect Scoop!)
Two Years Ago: Spicy Lime and Herbed Tofu in Lettuce Cups (pardon the photo)

Flo’s Chocolate Snaps
Adapted from Ready for Dessert
Makes about 50 cookies

I took the liberty of adding ½ a cup of mini chocolate chips to my batter which you could, of course, leave out.  I cut my cookies a bit thicker than he recommends and next time I will just listen to him so they are thinner and snappier.

3 cups flour
¾ cup unsweetened Dutch-process cocoa powder
2½ tsp. baking powder
¼ tsp. salt
1 cup (2 sticks) unsalted butter, at room temperature
1¼ cups sugar, plus more for sprinkling
½ tsp. vanilla extract
1 large egg, at room temperature
1 large egg yolk, at room temperature
½ cup mini chocolate chips (optional)

Into a small bowl, sift together the flour, cocoa, baking powder, and salt.

In a stand mixer fitted with the paddle attachment, beat together the butter and the sugar on medium speed just until smooth.  Add the vanilla, then beat in the egg and egg yolk.

Gradually add the cocoa mixture to the butter mixture, mixing until completely incorporated and no streaks of butter remain.  If using, mix the chocolate chips in by hand using a spatula.

On a lightly floured surface, divide the dough into quarters, and shape each quarter into a log about 7 inches long and 1½ inches in diameter.  Wrap the logs in plastic wrap and refrigerate until they’re firm enough to slice, about 1 hour.

Position racks in the upper and lower thirds of the oven; preheat the oven to 350ºF.  Line two baking sheets with parchment paper or silicone baking mats.  (DT: I skipped this step and had no trouble with the cookies sticking.)

Slice the logs into disks ½-inch thick and place the disks on the prepared baking sheets, spaced about ½-inch apart.  Bake, rotating the baking sheets midway through baking, until the cookies are puffed and slightly firm, 10 to 12 minutes.  Remove from the oven and immediately sprinkle with a bit of sugar.

Let the cookies cool on the baking sheets until firm enough to handle, then use a spatula to transfer them to a wire rack.  They will continue to firm up and get “snappy” as they cool.

(The dough can be refrigerated for up to 5 days or frozen for up to 1 month.  The baked cookies can be kept in an airtight container for 2 days.)


Perfect Chocolate Chip Cookies

June 16, 2010

We food bloggers can be a bossy group.  You see a lot of “You have to try this!” and “This is the best (fill in the blank) recipe out there!  Throw away any other version!”.  We feel strongly about food and when we find something we like, we want to share.  I come by my bossiness naturally.  I am an oldest child and a Leo.  I have almost 40 years experience telling people what to do.

I like to think that I am not overly bossy on my site.  (Please let me know if you feel otherwise.)  I fully appreciate that taste is completely individual and something I love might be something you hate.  We all have different opinions about what is delicious and I respect that you might hate chocolate and french fries (although I will never never understand it).

It is with restraint and respect that I tell you that I have found the last chocolate chip cookie recipe I will ever need.  What I want to do is to type in all caps and tell you that you have found the last chocolate chip cookie recipe you will ever need…but I am holding my inner boss in check.  I respect that you might have a much beloved recipe that you will never part with.  But it is my duty as a food blogger to share my treasure.

I  never really gave much thought to chocolate chip cookies until the New York Times recipe came along several years ago.  Periodically I would see recipes in books and wonder why anyone would stray from the good old Tollhouse recipe.  When all the hubbub died down, I made the NYT recipe and understood that a chocolate cookie is capable of subtlety and there was a difference when you used different kinds of flour, used chocolate disks instead of chips, and let the dough rest at least overnight.  I made them again and again and thought I had found my until-the-end-of-time cookie recipe.

And then, just a few weeks ago, Ashley’s recipe came into my life.  You know Ashley, right?  If you don’t, you should.  This very sweet very young woman is very accomplished and a very very good cook and baker.  She teaches wonderful classes that happen to take place right next door to my house.  I have taken a few and I look forward to taking more.  I am a good cook and baker but I have learned some great things from her.  Like how to make a perfect chocolate chip cookie.

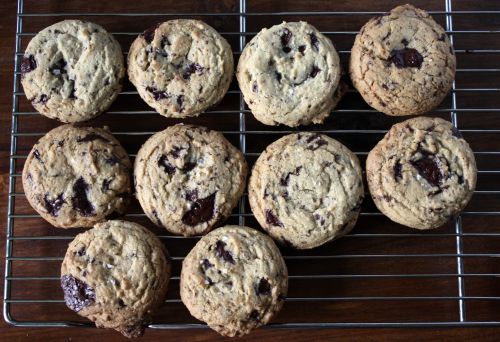
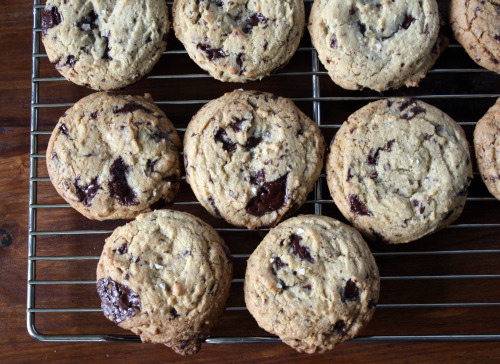
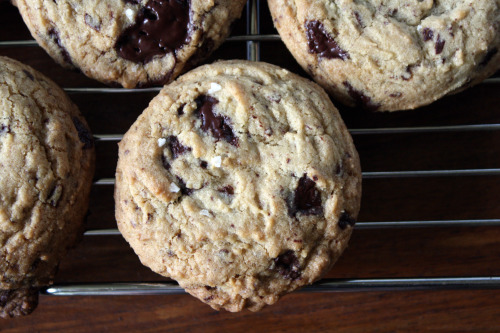
What makes them so special?  Three different kinds of sugar.  A long creaming time.  A lot of chocolate.  A little trick with adding the flour and chocolate pieces to prevent over mixing.  I don’t know.  I asked her what she thought made them so special and she answered, “It’s just all those things together”.  All right whatever, cookie genius.  What I do know is that these cookies turn out perfectly round (every single one of them!), they have loads of chocolate and no nuts (a big plus for me), and they are that perfect combination of crisp exterior and chewy interior.  They also have a sprinkling of sea salt on the top of each one which makes them irresistable.

I also asked Ashley about the let-the-dough-rest theory.  She said her cookies are in fact even better (is that possible?) if you refrigerate the dough for 24 hours.  When I told her that I found refrigerated dough kind of a pain to scoop, she said that she turns the dough out and forms it into a log.  Then she slices and bakes.  Cookie genius indeed.

UPDATE 4-12-11 I have been making loads of these cookies and I think I have found the best way.  Make the dough as directed below.  Then split the dough into quarters.  Roll each quarter into a log about 10 inches long.  Wrap well in plastic wrap and refrigerate for 24 hours.  Then cut the logs into ¼-inch slices and bake.  I can get about 50 smaller cookies when made this way.

One Year Ago:  White Chocolate Almond Chunk Cookies
Two Years Ago:  Feta and Ricotta Cheese Skillet Pie

Ashley’s Salted Chocolate Chip Cookies
Not Without Salt
Makes about 2 dozen

I have made no changes to the original recipe but have clarified a bit, with Ashley’s blessing.  I used bittersweet chocolate for my cookies but semi-sweet would be great too.

2 sticks (8 oz.) unsalted butter, softened
¼ cup granulated sugar
¼ cup Turbinado sugar
1¾ cup light brown sugar, packed
2 eggs
2 tsp. vanilla
3½ cups all-purpose flour
1½ tsp. baking soda
¾ tsp. salt
12 oz. chocolate (use the best quality chocolate you can afford.  With a serrated knife, cut chocolate into roughly ½-inch chunks.)
Sea salt

Preheat the oven to 360ºF.  Set rack in the middle of the oven.

Cream the butter and the sugars on medium-high speed until light, 4-5 minutes.  Scrape down the sides of the bowl a couple of times during this process.  Continue mixing while adding the eggs one at a time.  Make sure each egg is incorporated before adding the next.  Add the vanilla.  Scrape down the bowl with a spatula.  Combine the flour, soda and salt in another bowl.  Mix with a whisk.  With the machine on low, slowly add almost all the flour.  Reserve just a bit of the mixture.  Remove the bowl from the mixer and add the last bit of flour along with the chocolate.  Stir with a spatula until just combined.

Using a large ice cream scoop, scoop out mounds of dough making sure there is about 2 inches between each cookie.  Do not crowd them and there is no need to press the dough down.  Sprinkle each mound with a bit of sea salt.

Bake sheets, one at time, until the cookies are lightly golden on the edges and a bit gooey in the center, about 12 minutes.  Do not overbake!  Remove sheet from oven and allow to sit undisturbed for two minutes.  Then carefully transfer cookies to a cooling rack.  Repeat with the remaining sheets.

(DT: I have a convection feature on my oven and was able to successfully bake three sheets at a time.  If you do not have convection, I would highly recommend just doing one sheet at a time.)


Coming Full Circle

April 24, 2010

Every so often, I like to talk about my son Graham.  He has some special needs which I have written about here, and again here, and finally here.  Our very first venture into getting help for him started with his first speech assessment at about 22 months old.  Our pediatrician recommended a certain clinic and, because she had never steered us wrong, I took him there without hesitation.  We did not have a good experience and as I contemplated weekly visits for him, I knew we needed another option.

A friend told me about a place that helped children from birth through age 3, an amazing place called The Boyer Children’s Clinic.  I knew it sounded familiar and when I told my mom about it, she reminded me that she had brought my brother there over 30 years ago.  Dim memories of reading in a waiting room while eating a snack came back to me.

From the moment we stepped through the door at Boyer and continuing on to this day, our experience with those amazing people has been nothing short of incredible.  We started off just doing speech therapy but gradually joined in the preschool program that serves both typically developing and special needs children.

One day not long after we started, we rode up in the elevator with a little girl and her nanny.  The little girl was in Graham’s class and I had noticed how loving and sweet her nanny was with her.  I asked how long she had been working for the family and was surprised to hear that she was just filling in temporarily.  Because I had next to no childcare at that point with a toddler and a baby, I pounced.  Was she looking for more hours?  Yes, she was and that is how we got Erika, the most amazing babysitter on the planet.

Now that we have been working together for 2½ years, I can tell you that she is really just an amazing woman.  Babysitter is not the right term for her.  She has spent eight hours a week with my boys for all this time and their lives are richer because of it.  She is helpful to me in a million ways (she loves to fold laundry!  she is much neater than I am!) but the bottom line is that she adores my children and they adore her right back.  They do Dance Party USA in our basement, she takes them on walks to see the ducks and get doughnuts, she solves their squabbles kindly and firmly.  She has also introduced us to Jenna, Catherine, Steena, and Autumn – all lovely young women who have watched the boys on numerous occasions.  Erika is a treasure.  I am thankful to Boyer for all they have done for Graham, but I might just be most thankful to them for giving us Erika.

Graham left Boyer just after his third birthday (as all their children do) but we have stayed involved with them.  We go to their auction every year and, just recently, Randy was elected to their board.  They had a fundraiser last night and, when Randy told them that I cater occasionally, they asked me to do the food.  This party has been in the works for weeks as I planned the menu, got the shopping done, and cooked as far advance as I could.  The day before and day of were a little hectic, but I was so happy to be cooking for a place I believe in so deeply.

Early last week, I glanced at my calendar – my real one where the birthdays are written down in my handwriting, not my iPhone – and realized that today, Saturday, is Erika’s birthday.  Friday night I cater an event for Boyer and Saturday is the birthday of one of our favorite people, the woman we never would have met if it weren’t for Boyer.  Life is funny sometimes.

I took some of the batter I was using for cupcakes and made her a little cake.  I would have taken a photo along with the cupcakes but I had a frosting malfunction and therefore wouldn’t recommend the recipe.  She and the boys decorated it and she took the rest home.  I hope her celebration lasts for the next 24 hours straight.

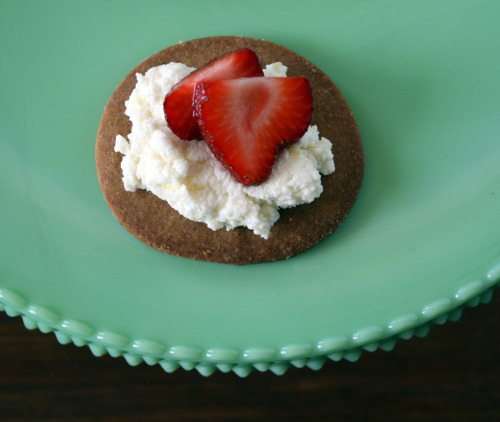
I got my April issue of Food & Wine right around the time I agreed to do the food.  The dessert on the last page jumped out at me as something I wanted to make without question.  Lovely cookies with just a bit of spice and a lot of crunch topped with sweetened lemon ricotta and strawberries.  It is such a nice combination and so pretty for spring.  I brought some mint as garnish but a giant slug had taken up residence in the package.  Next time.  I am always apprehensive about working with cookie dough that needs to be rolled out but I found this dough dreamy to work with.

One more note.  The party last night was at a place called GlassyBaby.  This is a store that sells the most beautiful hand-blown small glass cups, usually used as candle holders.  They come in about 70 different colors and make a wonderful gift.  They have certain lines where they donate 10% of the proceeds to different charities or non-profits.  For the next three months, they will be donating to Boyer as long as you mention them.  This is about how many I want.

Oh yes, the food!

One Year Ago:  Miso Soup

Strawberry-Ricotta Tartlets
Adapted from Food & Wine
Makes 16 tartlets

This recipe calls for an oval cookie cutter which I was not able to find.  I bought a cheap 3-inch round one and squished it into an oval.

1 cup plus 2 tbsp. flour, plus more for dusting
¼ cup graham flour
1 tsp. cinnamon
½ tsp. salt
Pinch of ground cloves
1 stick unsalted butter, softened
2 tbsp. light brown sugar
1/3 cup plus 2 tbsp. granulated sugar
2 tbsp. honey
1½ tsp. honey
¾  pound strawberries, thinly sliced
1½ tbsp. fresh lemon juice
1¼ cup fresh ricotta (10 ounces)
2 tbsp. confectioners’ sugar
1 tsp. finely grated lemon zest

1.  In a bowl, whisk together both flours with the cinnamon, salt, and cloves.  In a standing mixer, beat the butter, light brown sugar and 2 tablespoons of the granulated sugar at medium speed until fluffy, about 1 minute.  Beat in the honey and molasses, about 30 seconds.  Scrape down the side of the bowl and beat in the flour at low speed, just until incorporated.  Pat the dough into a disk, cover with plastic wrap, and refrigerate until firm, about 1 hour.  (DT: I refrigerated my dough overnight.  It took quite a while for it to warm up enough to roll, but suffered no ill effects.)

2.  Preheat oven to 350ºF.  On a lightly floured work surface, roll out the dough 1/8-inch thick.  Using a 3-inch oval cookie cutter, stamp out 16 ovals; reroll the dough scraps if necessary.  (DT: There is no need to re-chill the dough.)  Transfer the ovals to the baking sheets and bake for about 12 minutes, rotating the pans halfway through until lightly golden around the edges.  Let cool on the pans for 5 minutes, then transfer the ovals to racks to cool completely.

3.  In a bowl, toss the strawberries with the remaining 1/3 cup of sugar and the lemon juice.  Let stand until syrupy, about 20 minutes.

4.  In a medium bowl, mix the ricotta, confectioners’ sugar, and lemon zest.  Spread about 1 tablespoon of the ricotta mixture on each oval.  Arrange the strawberries over the ricotta and if there is syrup from the strawberries, drizzle over.


Not Mrs. Field’s Cookies

March 19, 2010

Remember Mrs. Field’s?  I know she is still around, I just passed one of her dated looking store-fronts in a mall the other day.  But does anyone still eat those cookies?

The first time I had one (and the second, third, fourth, fifth, etc.), I thought it was the most delicious thing I had ever tasted.  My mom is a good baker and we often had cookies in our house, but her cookies didn’t taste like Mrs. Field’s.  Maybe because Mrs. Field’s cookies are usually warm?  Maybe because of a high chocolate to cookie ratio?  Maybe because there was a “no nut” option for this no-nut-lover?  Maybe because there are things in those cookies that I don’t want to know about?  I think the real reason is because they are so incredibly sweet.  When you are a kid, sweet = good.  Now that my palate is a little more sophisticated, I like a better balance of flavor.  Even in my cookies.

I have to give the woman credit for introducing us all to the white chocolate and macadamia nut combination.  I’m sure someone made it before her, but my 10-year old self had never tried it.  Yes, I have gone on and on about how I don’t like nuts in my baked goods, but super salty macadamia nuts are another story.  Especially when combined with white chocolate which is so sweet.

I made these cookies as a potential peace offering to my husband.  I don’t usually push things he doesn’t like on him but I was dying to try that Golden Split Pea Soup.  So, I made a big salad, bought one of his favorite breads, and baked with white chocolate which, if you ask him, is the only chocolate he likes.  (Randy lives in a bit of a dream world where he thinks he doesn’t like chocolate but inhales anything chocolate that is put in front of him.  And while I am “taking the piss out of him” as he is fond of saying, I must tell you that he also inhaled this pasta salad and asked me what made it so good.  BEETS!  One of his most hated things!)

Anyway, fortunately the soup was a hit and so were the cookies.  My boys liked them too.  A cookbook note.  If you are a cookie baker and are looking for a good and comprehensive book, I have to recommend Nancy Baggett’s The All-American Cookie Book.  I always turn to this book when I need inspiration and it never disappoints.  Great photographs and well-researched and charming recipes.  Everything is clear, right down to the table of contents – something I can’t say about many of my baking books.

One Year Ago: Garlic Ciabatta Bread and Roasted Tomato Caprese Salad

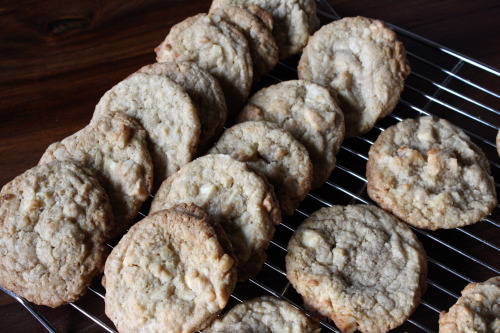
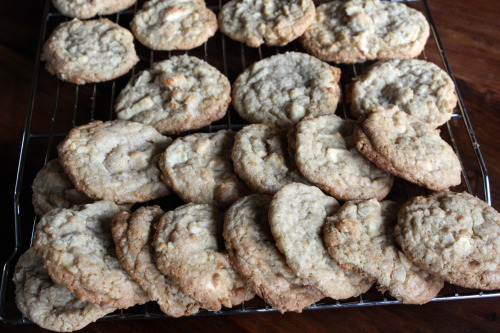
White Chocolate – Macadamia Nut Cookies
The All-American Cookie Book
Makes 25-30 cookies

Baggett suggests you wipe off the nuts if they are salted.  Because I love to taste salt in my baked goods, I opted not to take that step.  They were not overly salty.  She also recommends greasing the baking sheets or lining them with parchment – neither of which I did.  The cookies came off just fine.

1½ cups old-fashioned rolled oats
1 1/3 cups all-purpose white flour
¾ tsp. baking soda
¼ tsp. salt
1 cup minus 2 tablespoons (1¾ sticks) unsalted butter, slightly softened
1 cup sugar
1/3 cup packed dark brown sugar
1 large egg
1½ tbsp. milk
2½ tsp. vanilla extract
1/8 tsp. almond extract
8 ounces top-quality white chocolate, coarsely chopped, or 1 1/3 cups top-quality white chocolate morsels
1 1/3 cups (about 6 ounces) coarsely chopped macadamia nuts

Preheat the oven to 325°F.

In a food processor, process the oats in on/off pulses until ground to a powder.  In a medium bowl, thoroughly stir together the ground oats, flour, baking soda, and salt; set aside.  In a large bowl, with an electric mixer on medium speed, beat the butter until lightened, about 1 minute.  Add the sugar and brown sugar and beat until very fluffy and smooth.  Add the egg, milk, vanilla and almond extracts and beat until incorporated.  Beat or stir in the flour mixture until evenly incorporated.  Stir in the white chocolate and macadamia nuts until evenly incorporated.

Using an ice cream scoop or spoons, drop the dough onto the baking sheets in generous golf-ball-sized mounds, spacing about 3 inches apart.  Pat the mounds down slightly.

Bake the cookies, one sheet at a time, in the middle of the oven for 12 to 17 minutes, or until the tops are pale golden and the edges are just lightly browned; be very careful not to overbake.  Reverse the sheet half way through to ensure even browning.  Transfer the sheet to a wire rack and let stand until the cookies firm up slightly, 2 to 3 minutes.  Using a spatula, transfer cookies to wire racks.  Let stand until completely cooled.

Store in an airtight container for up to 1 week or freeze for up to 1 month.


« Older Posts Newer Posts »