Archive for October, 2009

Holly B’s Cappucino Bars

October 14, 2009

IMG_3521

(Thank you to all of you who have entered my giveaway!  I will announce a winner tomorrow.)

Have you heard that expression “small but mighty”?  When I hear it, the first thing I think of is my younger son.  He is actually quite big for his age but considering that age is only 2 1/2 he is still small, all things considered.  But oh, is he mighty.  I wouldn’t say he has the terrible two’s though.  I would just say that he is a force to be reckoned with.  Most of the time he is very agreeable, cheerful and funny.  But if he doesn’t get, say, a lollipop like his brother because he didn’t finish his lunch…watch out.  He threw such a fit that I had to take him outside and even then people were staring across the street.  Small but mighty.

On a visit to Holly B’s Bakery, you will find lots of large treats.  The slices of pizza are huge, the cinnamon rolls are generous, even the cookies are big.  These Cappucino Bars are not.  They are slender and delicate looking but they pack a flavor punch.  The combination of coffee, chocolate, and just a bit of cinnamon here is intoxicating.  In spite of the title, the coffee flavor here is fairly subtle so even my coffee hating husband thinks they are delicious.

IMG_3520

To buy the Holly B’s cookbook, please visit this site.

One Year Ago:  Quick Olive and Cheese Bread and White Beans with Tomatoes and Sage

Cappucino Bars
With Love & Butter
32 bars

To get really flat bars, I find it works best to smooth them over with an offset spatula, using gentle pressure, just after they come out of the oven and before you apply the glaze.

1 cup (2 sticks) butter, at room temperature
1 cup brown sugar, firmly packed
1 tbsp. instant coffee or espresso powder (not granules)
1 tsp. vanilla extract
2 1/4 cups flour
1/2 tsp. baking powder
1/2 tsp. salt
2 cups semisweet chocolate chips

Glaze
2 tbsp. milk
1 tbsp. butter
3/4 cup powdered sugar
1/4 tsp. cinnamon

Preheat the oven to 375 F with the rack at the middle level.  Line a 10×15 inch pan with baking parchment or grease lightly.  (DT: This is also called a jelly roll pan.)

Cream together the butter, brown sugar, instant coffee, and vanilla.  Blend in the flour, baking poser, and salt.  Last, stir in the chocolate chips by hand.  The mixture will be very crumbly, with barely enough dough to hold together the chocolate chips.

Use your fingers, palms, and heels of your hands to press the dough evenly into the pan.  If necessary, cover the dough with wax or parchment paper and use a small rolling pin to flatten the lumps.  Bake 5 minutes, rotate the pan, and  bake 5 to 10 minutes more or until the edges are just starting to brown (watch carefully).  Cool in the pan 5 minutes before spreading with glaze.

Put all the ingredients for the glaze in a small saucepan on medium heat.  Don’t leave this stuff!  Find a whisk and stir until smooth and barely bubbly.  Drizzle the glaze evenly over the bars and smooth out to the edges and corners with a rubber spatula.

Cool until the pan is just warm to the touch and cut into bars with a sharp knife.  (Holly recommends cutting 8 on the 10-inch side and 4 on the 15-inch side, equaling 32 candy-bar sized cookies.  You can halve them too.)


Blue Cheese Dressing and a Giveaway

October 9, 2009

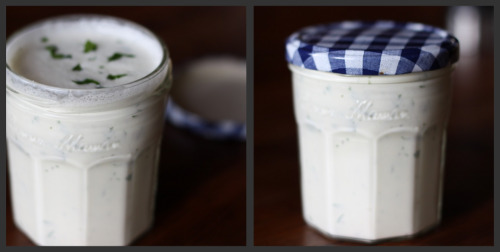
Dressing Collage

You know the moment.  You are in a restaurant.  You’ve placed your order.  Your order comes with a salad and the waitperson asks you what kind  of dressing you want.  What do you answer?

For me, it’s honey mustard.  For my mom, it’s blue cheese.  As a child, I could never understand this.  Why would you want something so stinky on your salad?  As I got older, I grew to appreciate blue cheese and even came to like crumbles of it in my salad.  But I could never get past the gloppy texture of the actual dressing.

IMG_3498

Annie Sommerville has a perfect recipe for blue cheese dressing in her classic book Everyday Greens and like so many things, blue cheese dressing is a totally different animal when you make it yourself.  The first time I made this recipe years ago I couldn’t believe the flavor or the texture.  I also couldn’t believe how good it tasted over summer’s heirloom tomatoes and spicy arugula which is how Sommerville recommends you serve it.  Last weekend I found myself with some wonderful tomatoes but just regular ordinary lettuce and an avocado that needed to be used.  It was perfect that way too.

If you read other food blogs, you may have heard about the swag bag that some of us got at the BlogHer conference a few weeks ago.  There was the bag that everyone got which contained cans of soup and a box of cereal (I’m not kidding) among other ho hum things, and then there was the after party bag that contained the good stuff.  I left some of it in the hotel room (I have no need for a meat tenderizer) but I brought the rest home with me.  I keep looking at the beautiful Japanese knife and the kitchen shears and paring knife – all still in their packages – and wondering what to do with them.  Should I open them?  Should I give them away?

Of course the answer is give them away.  I have wonderful knives and I have shears and two paring knives.  I was lucky enough to go to BlogHer (and now am in New York) and I truly feel like I should share the bounty.  I’d like to send someone the knife, the shears and paring knife combo, and the $25 gift card to Chefscatalog.com where all this wonderful stuff came from.  As long it is legal to ship knives internationally, I will send it anywhere.  Just leave me a comment and tell me what kitchen tool you can’t live without.  You have until Tuesday, October 13th at 7pm PDT to enter.  I’ll pick a winner using a highly scientific method.

(UPDATE:  The contest is now closed!)

IMG_3503

One Year Ago:  Mediterranean Five Lentil and Chard Soup with Walnut Gremolata

Creamy Blue Cheese Dressing
Adapted from Everyday Greens
Makes about 3/4 cup

1/4 cup buttermilk
2 tbsp. heavy cream
1 ounce tangy blue cheese, crumbled
1 tbsp. Champagne vinegar
1 tbsp. olive oil
Salt and pepper
1 tbsp. chopped flat-leaf parsley

Puree the buttermilk, cream, the cheese, vinegar, oil, 1/4 tsp. salt, and a pinch of pepper in a blender until smooth, about 1 minute.  Transfer to a small bowl and stir in the parsley.


Guilty, Lucky, and Thankful

October 7, 2009

Friends, I’m feeling a little guilty.  And lucky.  And thankful.

I’m heading to New York on the red-eye flight tonight.  I’m meeting my husband who is there (again) for work.  I am leaving my sweet boys in the care of our most trusted and loved babysitter Erika.  When Randy took this most recent job, he thought that the travel would be minimal when it fact it has been maximal.  (I know that’s not a word, but shouldn’t it be?)  As the trips began piling up in the calendar, he asked me when I would like to go to New York with him.  He knows I love it there and I haven’t been in six years.  My favorite time of year anywhere is the fall, so we settled on October.

I am reminded that six years ago, Randy and I were just settling in to our year in London.  His sister planned an October wedding in Richmond, VA and we were scheduled to fly in for it.  She was kind enough to invite my parents and we decided to meet up first in New York so that I could have a little more time with them instead of just the wedding weekend.  My parents are both from New York – Dad from the Lower East Side and Mom from Long Island – so I have lots of memories of time spent in the City with them.

Just a month before we were set to meet, I got an unthinkable phone call from my dad.  He was having some strange symptoms and when he went to get checked out, they found that he had a tumor on his bladder.  Subsequent appointments showed that it would not be possible to remove the tumor safely and they would have to actually remove his bladder, hope that they got all the cancer, and construct a new bladder for him out of a part of his own intestine.  He decided to schedule the surgery for after the trip to the East coast – he was so looking forward to the trip and his doctors didn’t think waiting a few weeks would matter.  I made the decision to return to Seattle for a few weeks after the wedding to help him and my mom out.

Those days we spent in New York were wonderful.  The weather was perfect, we ate well, we shopped, we walked, we sat in the park, we saw a show.  We could forget for moments the scary thing that awaited all of us after the fun was over.  It was the most bittersweet vacation of my life.  As we traveled south to Richmond and the surgery loomed closer, it was harder to pretend that we weren’t nervous.

I’ll cut to the chase and tell you that this story has a happy ending.  My dad had a rough recovery initially but recover he did, and he has been cancer free these six years.  He is as incredibly active as he was before the surgery and has continued to work as an oncologist helping people with their own cancer diagnoses and treatments in the warmest and most human way possible.

Ironically, as I am about to get on a plane to New York, I got word that my college roommate and friend Victoria has just had surgery for invasive breast cancer.  I haven’t seen her in years and have only been in touch with her via Facebook.  She lives in New York and she has a baby girl and she has an unfathomably tough road ahead of her.  The first thing I did when I talked to her yesterday (after telling her how sorry I am) was to offer up a conversation with my dad.  He has walked along the breast cancer road with countless patients, some even younger than the 39 years of my dear friend, and I so hope that he can be a resource, or even just a comfort to her.  I hope that I can see her and hug her and meet her baby.  I wish I could cook for her.

So, I’m feeling guilty.  Guilty that less than two weeks ago I was in San Francisco and tonight I head off to another world class city.  I’m feeling lucky that I live a life where travel like this is possible.  I feel thankful for my health, my family, my family’s health, and all the other things that make my life blessed.


Holly B’s Almond Praline Scones

October 6, 2009

IMG_3435

Put me in a bakery and probably the last thing I would get is a scone.  In spite of how it might seem here with all the baked goods on this site, I really do have to be careful about what I eat.  If I am going to splurge, it’s not going to be on a scone.  Chocolate yes, scone no.  I can even “kind of” convince myself that I don’t like scones just like I have “kind of” convinced myself that I don’t like butter on my bread or that I don’t like pie – none of which are true,  but for some reason I usually believe myself.

When I actually taste a scone – a good scone, or butter on my bread, or…all right pie for that matter – all that “kind of” convincing goes out the window.  The Holly B’s cookbook has several scone recipes so I am going to need to up that willpower a bit.  This one features a homemade almond praline and it is that perfect balance of sweet, nutty and buttery that all good scones aspire to.  These are very easy to make and they freeze beautifully.  Holly says in her book that the extra almond praline tastes great over ice cream and I’m here to tell you that it does.  Especially when that ice cream is homemade and is sitting on top of a brownie.  Recipe coming soon.

IMG_3436

To order Holly B’s cookbook, please visit this site.

Almond Praline Scones
With Love and Butter
12 Scones

2 1/2 cups Almond Praline (recipe follows)
3 3/8 cups (3 1/4 cups plus 2 tablespoons) flour
3/4 cup brown sugar, firmly packed
1 tbsp. baking powder
1/2 tsp. salt
1/2 cup (1 stick) cold butter
3 eggs
6 tbsp. milk
1 tbsp. rum

Preheat the oven to 375°F and place the rack in the center position.  Line a large cookie sheet with baking parchment or grease lightly.

In a food processor, rough-chop enough Almond Praline to make 2 1/2 cups and transfer to a large bowl.  Return the food processor to the stand without washing and dump in the flour, brown sugar, baking powder, and salt.  Pulse once or twice to blend, then slice in the butter.  Pulse until the butter is cut into the dry ingredients and the size of pearls or smaller.  Scrape the mixture into the bowl with the praline and toss to combine.

Now place the eggs, milk, and rum in the food processor and blend well.  Drizzle the wet stuff over the dry stuff in the bowl and stir gently.  Toss this mixture lightly with your fingertips to gauge the consistency.  If the dough seems too dry and crumbly (won’t hold together when you squeeze some lightly in your hand), add a  bit more milk.  Mix until fully combined.

Turn the dough onto a lightly floured surface and divide into 2 equal parts.  Pat each lump of dough into a disk 1 inch thick, dusting with flour if sticky.  Cut each disk into 6 wedges.

Space the scones on the baking sheet at least 1 inch apart.  Bake 10 minutes, rotate the pan and bake 5 more minutes or until barely brown on top and golden on bottom (check with a metal spatula).  Repeat with the remaining scones.  Serve with butter.

Almond Praline
Makes 3 1/2 cups

2 1/2 cups whole natural almonds
1/2 cup water
1 cup sugar

Caution:  Please take care when making praline.  Molten sugar will give you a bad burn.

Oil a large heatproof bowl and a large cookie sheet with flavorless oil.  Put the almonds in the bowl.

Boil the water and sugar in a shallow saucepan over medium-high heat, scraping down the sides with a wooden spoon, until the mixture turns golden-amber, 10-12 minutes.  Don’t worry if the mixture looks white and crunchy at first, just keep going.  Once the process starts the mixture will darken rapidly, so watch carefully.

Pour the molten sugar over the almonds and immediuately stir with a woodend spoon (plastic will melt) to coat them thoroughly.  Spread the mixture in a thin layer on the oiled cookie sheet and cool completely.  Break the praline into pieces and store in a covered container.


Do You Really Need a Recipe?

October 5, 2009

IMG_3431

I don’t know when I first tasted arugula.  Maybe it was in the early 90’s when fancy lettuces starting making appearances in restaurant salads.  Whenever it was, it was a revelation for me.  How could something so green taste so peppery?  How could lettuce have so much flavor?

In the years since, I have learned to use arugula as much as possible in as many ways as possible.  I love it in salads of course, but I also love it in pasta and on top of pizza.  These days it seems that arugula comes in two varieties – baby leaves in a bag or large leaves in a bunch.  I find the large leaves almost too peppery for a salad (unless it was paired with something sweet like beets) and the small leaves are too delicate for cooked dishes.  If anyone out there knows of a medium arugula leaf, I’d sure like to hear about it.

IMG_3428

I made this pasta dish the other night with some arugula that came in our CSA box.  As I was making it, I wondered whether I would post about it.  Is this the kind of thing that you really need a recipe for?  Doesn’t it seem kind of obvious?  I visit so many sites where the food is incredible and original and I wasn’t sure my humble pasta could keep up.  But then I realized that sometimes we food  bloggers can kind of live in a bubble.  Just a few years ago, I would have needed a written recipe to make something this good.  I couldn’t have come up with it on my own.  The years I spent being a personal chef have made me a better, more adventurous, and creative cook.  And having this CSA box come each week has been a big challenge.  So here you go.

Pasta with Tomato Sauce and Arugula

Dana Treat Original
Serves 3-4

If you like your pasta saucy, use the 12 ounces of dried pasta suggested here.  If you like it a little drier (or you have big eaters in your family), use a full pound.

Olive oil
2 large garlic cloves, minced
28 oz. can crushed Italian tomatoes
Salt and freshly ground black pepper
1/2 cup fresh basil leaves, thinly sliced
Half a bunch of large arugula leaves, stems discarded and torn into roughly 2-inch pieces
2 small handfuls grated mozzarella cheese
12 oz. short pasta, such as rigatoni
Parmesan cheese, for garnish

Put a large skillet on the stove over medium heat.  Add just enough olive oil to coat the bottom and then add the garlic.  Stir constantly until starting to brown, then add the tomatoes (they will splatter a bit).  Sprinkle with a pinch of salt and a few turns of pepper.  Turn the heat down to medium-low and cook, stirring occasionally, until thickened, about 20 minutes.  Add the basil about halfway through the cooking time.

Meanwhile, bring a large pot of salted water to a boil.  Add the pasta and cook until al dente.  Using a large slotted spoon, transfer the cooked pasta to the skillet with the sauce.  Add the arugula and mozzarella cheese then toss carefully toss everything together.  You will want the noodles coated with sauce, the arugula to wilt, and the cheese to melt slightly.  Serve in shallow bowls with a sprinkling of Parmesan cheese.


« Older Posts Newer Posts »