Category: Tart

Over-the-Top Mushroom Quiche

December 15, 2010

One of the very trickiest things about cooking is the timing.  Getting dishes to come out around the same time or having food on the table when you want it to be ready can be very tricky.   I truly believe the timing piece only comes with practice.  Someone can have a naturally good palate but kitchen timing does not seem to be a genetic trait.

I remember struggling with timing when I was first learning to cook.  Learning that you really need to read a recipe thoroughly before you start cooking helped.  But truly I got better from sheer practice.  These days, I’m pretty good at getting everything to come out at once.  I’m also good at judging how long things will take start to finish.  But once in a while, I get tripped up.

This recipe for a mammoth quiche has been sitting quietly in my notebook for years now.  It is a recipe that is never far from my mind.  With all the cooking I do, it is hard for me to believe that it took me all this time to make it.  I guess it’s not really weeknight cooking because it is a little fussy and it is also huge.  It’s not really dinner party cooking because, I don’t know – quiche seems a little brunchy for a dinner party.  We have people over often for brunch – so why didn’t I make it one of those times?  I wondered all of this as I was preparing to make it.  And then, when all was said and done, I realized why.

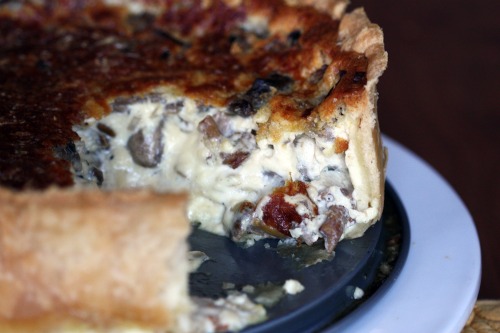
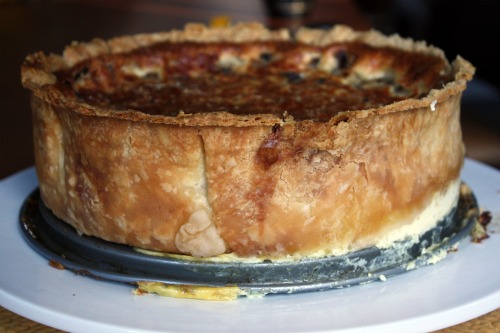
This is a Thomas Keller recipe that comes from the Bouchon cookbook, but I have it because it appeared in Food & Wine.  I remember Keller writing that, for him, quiche needed to be large.  And boy, is this large.  Rather than a tart pan or a pie plate, this baby is made in a springform pan.  The crust itself is several inches high.  The filling has 2 cups of milk, 2 cups of cream, 6 eggs, 2 pounds of mushrooms, and just a smattering of cheese.  It is gorgeous.  It is awe-inspiring.  And if you ever make it, please remember to read the part where I tell you it takes about 5 hours to make, start to finish.

Yep.  I had some good friends over today for a late morning get together.  I put out pumpkin bread and granola and thought I would serve the quiche as it got closer to lunch time.  But, because I had a momentary being-good-at-timing lapse, all my friends left and the quiche wasn’t even out of the oven.  I left it in there for a full two hours and, as you can see from the photos, it still wasn’t completely cooked.  Regardless of runniness, we will be eating this quiche for days for several reasons.

1)  Anything that takes me 5 hours to make will be consumed without question.
2)  This is one of the tastiest things I have ever made.
3)  I used a pound of button mushrooms and a pound of chanterelles (some regular and some yellow foot) which cost me $16.

So, Over the Top Mushroom Quiche it is until Sunday!

One of my readers made a terrific suggestion – how about creating a “My Favorites” category.  I went back through my old posts and tagged the recipes that I like the very best.  You can scroll down to it on the sidebar to your right.  In spite of this being truly delicious and a recipe I will no doubt make again – I’m not sure I can call a five hour egg and crust dish a favorite.  Not yet anyway.

One Year Ago: Frittata with Caramelized Onions, Goat Cheese, and Sage
Two Years Ago: Fennel and Brie Risotto Wedges

Over-the-Top Mushroom Quiche
Adapted from Food & Wine
Serves 12

Keller recommends oyster mushrooms but that type creeps me out.  And I live in a part of the country where we get incredible (and relatively affordable) wild mushrooms.  Use what you like.  I had Manchego in my cheese drawer so I used that but his recommendation is Comté or Emmental.  Finally, as stated above, it took my quiche a LOT longer to bake than the time specified below, but every oven is different!)

1 tbsp. vegetable oil
1 pound exotic mushrooms
1 pound white mushrooms, quartered
Salt and freshly ground black pepper
1 tbsp. unsalted butter
2 small shallots, minced
1 tbsp. fresh thyme, chopped
¾ cup shredded Manchego cheese
Buttery Pastry Shell (recipe follows)
2 cups milk
2 cups heavy cream
6 large eggs, lightly beaten

Preheat oven to 325º.  In a very large skillet, heat the oil.  Add all the mushrooms, season with salt and pepper, and cook over high heat, stirring until starting to soften, about 5 minutes.  Reduce the heat to moderate.  Add the butter, shallots, and thyme and cook, stirring often, until the mushrooms are tender, about 12 minutes longer.  Season with salt and pepper and let cool.

Scatter ¼ cup of the cheese and half of the mushrooms evenly over the bottom of the Buttery Pastry Shell.  In a blender, mix half each of the milk, cream, and eggs and season with 1½ teaspoons salt and 1/8 teaspoon of pepper.  Blend at high speed until frothy, about 1 minute.  Pour the custard into the pastry shell.  Top with another ¼ cup of cheese and the remaining mushrooms.  Make a second batch of custard with the remaining milk, cream and eggs plus the same amount of salt and pepper, and pour into the shell.  Scatter the remaining ¼ cup of cheese on top.

Bake the quiche for about 1½ hours, or until richly browned on top and the custard is barely set in the center.  Let cool in the pan until very warm.

Using a serrated knife, cut the pastry shell flush with the top of the pan.  Carefully lift the springform pan ring off the quiche.  Cut the mushroom quiche into wedges and serve warm.  (The unmolded quiche can be cooled completely, then refrigerated overnight.  To serve, carefully cut the quiche into wedges, arrange on a baking sheet and bake in a 350ºoven until warm, about 10 minutes.)

Buttery Pastry Shell
Makes one 9-inch shell

Since I love to make savory tarts and galettes, I have a lot of experience with tart dough.  I have learned to sacrifice flakiness for flavor when using all butter.  This crust is almost impossibly flaky in spite of having no shortening and the flavor is terrific.

2 cups all-purpose flour, plus more for dusting
1 tsp. kosher salt
2 sticks chilled unsalted butter, cut into ¼-inch dice
¼ cup ice water
Canola oil, for brushing

In the bowl of a standing mixer fitted with the paddle attachment, mix 1 cup fo the flour with the salt.  At low speed, add the butter pieces, a handful at a time.  When all of the butter has been added, increase the speed to medium and mix until the butter is completely incorporated.  Reduce the speed to low and add the remaining 1 cup of flour just until blended.  Mix in the water just until thoroughly incorporated.  Flatten the pastry into an 8-inch disk, wrap in plastic and refrigerate until chilled, at least 1 hour or overnight.

Set the ring of a 9-inch springform pan on a rimmed baking sheet lined with parchment paper, leaving the hinge open. Brush the inside of the ring with oil.

Dust the pastry on both sides with flour.  On a lightly floured work surface, roll out the pastry to a 16-inch round, about 3/16-inch thick.  Carefully roll the pastry around the rolling pin and transfer to the prepared ring, pressing it into the corners.  Trim the overhanging pastry to 1 inch and press it firmly against the outside of the ring.  Use the trimming to fill any cracks.  Refrigerate the shell for 20 minutes.

Preheat the oven to 375º.  Line the pastry shell with a 14-inch round of parchment paper; fill the shell with dried beans or rice.  Bake for about 40 minutes, or until the edge f the dough is lightly browned.  Remove the parchment and beans and continue baking the pastry shell for about 15 minutes longer, or until richly browned on the bottom .  Transfer the baking sheet  to a rack and let the pastry cool.  Fill any cracks with the reserved pastry dough.  (The uncooked pastry can be frozen for up to 1 month.  The Baked pastry shell can be wrapped in plastic and kept at room temperature overnight.)


Chard and Saffron Tart

August 25, 2010

My husband calls my big dinners “Dana Meals”.  A big dinner is a meal to enjoy primarily but it also is a meal to impress.  Kind of the opposite of a weeknight meal.  Mine tend to include multiple courses and multiple components.  The ice cream usually matches the dessert.  You know.  Dana Meals usually happen on weekends spent with friends and/or family.  Sometimes, when someone special is in town, I cook one during the week.

Here is the problem.  Let’s say you cook a really nice meal for a very cool and very appreciative person thoughtful enough to bring along his beautiful wife and adorable baby daughter.  Let’s say that same person brings his whole work team over for dinner on another weeknight and you make an even more impressive and complicated meal.  Now what if that person comes for dinner all by himself?  On a Monday?  You can’t exactly serve cold pizza, right?  So a Dana Meal on a Monday it was.

Now a couple of weeks ago, Randy informed me that there would need to be a Dana Meal on a Wednesday for a philosophy group he is a part of.  Please don’t send me an email saying that if Randy needs a dinner for his club, he should make it.  Theoretically that is correct.  Philosophically even.  But I know my husband and if the dinner was left up to him, cold pizza it would be.  Randy is very good at lots of things but he does not cook.

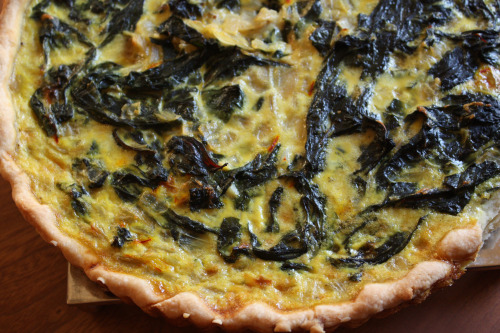
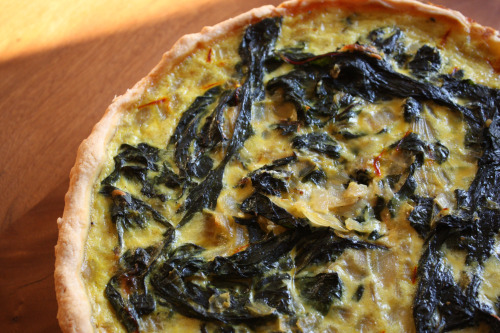
Just before that Wednesday night I had just found my perfect crust, so I opted to make two savory tarts for the philosophers.  One contained corn and white cheddar, the other had chard spiced up with saffron.  I expected the corn tart to be the runaway hit but the chard tart was so good it definitely took first place.  I loved it and couldn’t wait to make it again.  A sunny end-of-summer Monday evening with a visiting friend with high expectations seemed just right.  (I’m kidding about the high expectations.  Kind of.)

Truth be told.  Everything in the markets right now is so amazing that food can taste really exceptional with just a bit of coaxing.  Alongside the tart, I made a corn pudding that I loved and need to make as many times as possible before our fleeting corn season is over.  I sautéed some zucchini in just a bit of olive oil and then tossed the coins with strips of basil, lemon juice, and Pecorino Romano.  (This is my new favorite way to eat zucchini).  I made that tomato and burrata salad that I know I will cry remembering in November.  Not a ton of work and really delicious results.

So let’s talk about the tart.  If you happen to have tart dough in the freezer, this comes together very quickly.  After a blind bake for the crust, onions are sautéed, chard is wilted, eggs and milk are whisked together, saffron and lemon zest are added, everything stirs together and goes into the tart shell, and 40 minutes later you have a tart.  I happen to prefer my savory tarts warm and not hot, so this is a perfect dish for a dinner party.  It can sit and cool while you attend to other details.

One Year Ago: Tortellini Skewers with Parmesan Lemon Dip
Good Chard on Dana Treat: Chickpeas and Chard with Cilantro and Cumin

Chard and Saffron Tart
Adapted from The Greens Cookbook
Serves 4-6

1 recipe Tart Dough (recipe follows)
1 large bunch of chard, leaves only, roughly chopped
1 tbsp. butter
1 large yellow onion, chopped
2 cloves garlic, minced
Kosher salt and freshly ground black pepper
3 eggs
1½ cup whole milk
Large pinch saffron threads, soaked in 1 tablespoon hot water
Zest of 1 small lemon
3 tbsp. freshly grated Parmesan
Nutmeg
3 tbsp. pine nuts, toasted

Preheat the oven to 375ºF.  Roll out one disk of dough to a 14-inch circle.  Carefully transfer the dough to a 10-inch fluted tart pan.  Fold the edges over on themselves to create a thick crust.  Pierce the bottom of the dough with a fork in several places, then place in the freezer for 15 minutes.

Line the pan with foil and fill with pie weights or beans.  Bake in the oven until the edges of the crust are starting to brown and the bottom no longer looks doughy, about 25 minutes.  Remove from the oven and set aside to cool.

Heat the butter in a wide skillet; add the onion and cook it over medium heat until it is translucent and soft.  Add the garlic, and the chard leaves by handfuls, if necessary, until they all fit.  Sprinkle in a large pinch of salt.  Turn the leaves over repeatedly with a pair of tongs so that they are all exposed to the heat of the pan, and cook until they are tender, 5 minutes or more.

Make the custard.  Beat the eggs; then stir in the milk, infused saffron, lemon peel, grated Parmesan, and a few scrapings of nutmeg.  Stir in the chard and onion mixture.  Taste and season with salt and a few grinds of pepper.  Pour the filling into the prepared tart shell and bake until the top is golden and firm, about 40 minutes.  Scatter the pine nuts over top before serving.

Olaiya Land’s Tender Tart Dough

Note:  You will need only 1 disk of this dough for the tart so keep the other one in your freezer for next time!

3 cups all-purpose flour
2 tbsp. sugar
1¾ tsp. salt
1 cup plus 2 tbsp. (2¼ sticks) chilled unsalted butter, cut into ½-inch cubes
8 tbsp. (or more) ice water
1½ tsp. apple cider vinegar

Blend flour, sugar, and salt in a food processor.  Add butter; using on/off turns, process until coarse meal forms.  Add 8 tablespoons ice water and cider vinegar; blend until moist clumps form, adding more ice water by the teaspoon if dough is dry.

Gather dough together.  Turn out onto work surface; divide dough in half.  Form each half into ball and flatten into disk.  Wrap disks separately in plastic and refrigerate 1 hour.  (Can be made ahead.  Keep dough refrigerated up to 2 days, or enclose in a resealable plastic bag and freeze up to 1 month.  Thaw in the refrigerator overnight.)  Soften slightly at room temperature before rolling out.


Tender Tart Dough

July 20, 2010

“You can’t teach an old dog new tricks.”

We are all familiar with that saying, right?  I have to say that I don’t agree.  Especially when it comes to cooking.  I have spent a lot of years in the kitchen working as a personal chef for three years, catering parties, teaching a few classes along the way, and I still feel like I have things to learn.  I love taking a cooking class here and there.  Besides getting great food to eat, I usually learn a thing or two.  (And sometimes I walk away with the best chocolate chip cookie recipe ever.)

A few weeks ago, I took a class at Delancey.  You know about Delancey, right?  If you read Molly’s blog, then you surely do.  Molly and Brandon have a friend named Olaiya who is a talented chef and caterer.  She teaches cooking classes all around town and a few Mondays a month, she teaches there when the restaurant is closed.  I took a sweet and savory tart making class partly because the timing worked for me, and partly because I could always use some pointers when it comes to tart dough.

If you look at recipes for either pie or tart dough, they often come across as overly finicky and sometimes even alarmist.  Like if you overwork the dough, or allow it to become too warm, or add too much water the sun will suddenly start rising in the West and setting in the East.  At least, that is how I always read them.  Consequently, I have always been nervous working with tart and pie dough.  I do it, but I don’t like it.  After years of practice, my dough almost always comes out fine but I dread the process.  Watching Olaiya handle her dough with such confidence boosted mine a bit.  She also sent around samples of the dough at its “ready” point and it was much wetter than I have every allowed my dough to become.  I don’t know if you have ever tried to roll out dough that was too dry, but let me tell you that having dough crack all over your board and not hold together is not a pleasant experience.

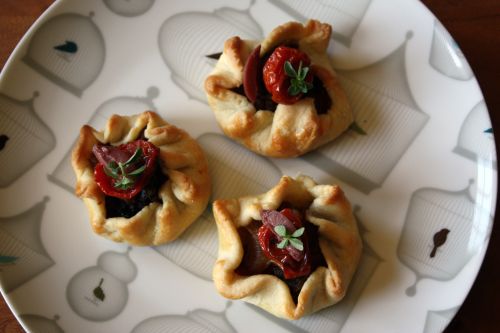
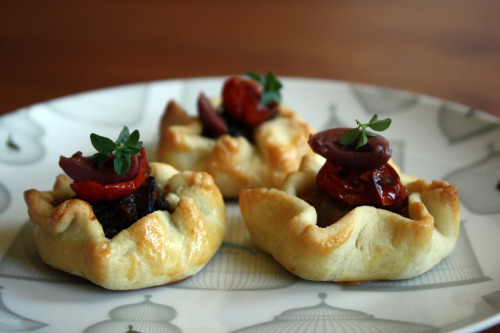
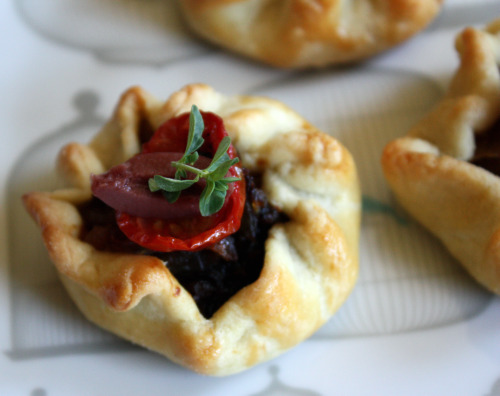
For last Friday’s party, I wanted to make Pissaladière but I wanted to use dough rather than the puff pastry I have used in the past.  I wanted to make bite-size tarts and, while I could have made something work with my old method, I was eager to try out my new-found dough confidence.  Forgetting that I just bought adorable tartlet molds in Paris, I opted for mini-galettes.  The dough was as dreamy to work with as I hoped and these tarts came together quickly.  The next day, I made a double batch, wrapped the four disks of dough well, and put them in the freezer to have at the ready for next time(s).

I have to admit – I didn’t taste these bad boys.  Brooke sent me an email about two hours before the party was set to begin saying that their numbers jumped from 20 to 30.  (Maybe because their studio is air-conditioned and it was 94 degrees that day.)  She understood that there was nothing I could do but if I had anything extra to please bring it.  I had 28 galettes and I brought all of them.  But I feel pretty confident that these were good.

One Year Ago: Asparagus Ragout

Mini Pissaladiere
Dana Treat Original
Makes 24-28 mini tarts

You can easily cut this recipe or you can opt to make one large tart rather than the small ones.

Olive Oil
24-28 cherry tomatoes
Kosher salt and freshly ground black pepper
8 large yellow onions, peeled, cut in half, and thinly sliced
2 tbsp. fresh lemon thyme (or regular thyme), plus more for garnish
About 20 Kalamata olives
1 recipe Olaiya’s Tender Tart Dough
1 egg beaten together with 1 tsp. water

Preheat the oven to 400ºF.  Place the cherry tomatoes on a baking sheet and drizzle them with olive oil, then give them a sprinkle of salt and a few grinds of pepper.  Using your hands, toss well.  Place the sheet in the oven until the tomatoes are very soft and starting to brown, about 20 minutes.  Turn the heat down to 375ºF and set the tomatoes aside.

Meanwhile, heat two large skillets over medium heat.  Add about 2 tablespoons of olive oil to each one, then add the onions – splitting them between the two skillets.  Give each one a healthy sprinkle of salt and cook, stirring occasionally, until the onions soften.  Turn the heat down to medium-low, add the thyme, and continue to cook, stirring occasionally and scraping up any brown bits, until the onions are very soft and a deep brown, about 45 minutes.  (If you have a cast iron skillet, use it!)  If the onions seem very wet, allow them to drain.  Set aside.

Remove your dough from the refrigerator.  Working with one half at a time, and on a lightly floured surface, pat the dough into a slightly larger and flatter disk.  Cut the circle in half and then each half into either 6 or 7 pieces.  Using your hands, coax each piece into a circle, then roll it out to about 1/8-inch thick using a rolling pin.  Repeat with the other dough pieces.  Brush each piece with some of the egg wash and place on a parchment paper-lined baking sheet.

Spoon about 2 tbsp. of onions into the middle of each circle, leaving a 1½-inch border.  (You will need to continually eyeball your onions to make sure you have enough for all the dough.)  Pull one side of the dough up, then turn it a bit and pleat the dough all the way around the circle.  This will happen quite naturally, just go with it.  Once you have finished with all the dough, brush each tart with a bit more of the egg was and then place in the freezer for 10 minutes.  Repeat with the other half of the dough, and then with the other disk of dough and the remaining onions.

Bake the Pissaladiere, one sheet at time in the oven until the pastry is a nice golden brown, about 20-25 minutes.  Remove and allow them to cool on a rack.  Before serving, top each one with a tomato and a couple of olive pieces.  Garnish with thyme if desired.

Olaiya Land’s Tender Tart Dough

3 cups all-purpose flour
2 tbsp. sugar
1¾ tsp. salt
1 cup plus 2 tbsp. (2¼ sticks) chilled unsalted butter, cut into ½-inch cubes
8 tbsp. (or more) ice water
1½ tsp. apple cider vinegar

Blend flour, sugar, and salt in a food processor.  Add butter; using on/off turns, process until coarse meal forms.  Add 8 tablespoons ice water and cider vinegar; blend until moist clumps form, adding more ice water by the teaspoon if dough is dry.

Gather dough together.  Turn out onto work surface; divide dough in half.  Form each half into ball and flatten into disk.  Wrap disks separately in plastic and refrigerate 1 hour.  (Can be made ahead.  Keep dough refrigerated up to 2 days, or enclose in a resealable plastic bag and freeze up to 1 month.  Thaw in the refrigerator overnight.)  Soften slightly at room temperature before rolling out.


Making Monday Meatless

April 5, 2010

Can someone tell me when Meatless Monday started?  I feel like I saw a couple of bloggers mention it and before I knew it, it was everywhere.  (Kind of like those chocolate chip cookies and that no-knead bread.)

Anyway, since every Monday is a meatless one around here, I will try and post something savory and dinner-like on Mondays.

I actually made this delicious tart last week for Randy and my parents.  Typically, my mom and dad come for dinner either once a week or once every other week.  They love seeing the boys, the boys love seeing them, and it gives us something to look forward to, especially on these long afternoons where the rain keeps us inside.  About a month ago, my dad was skiing in Sun Valley when he fell and broke his leg in two places.  He was taken down the mountain by the ski patrol where an ambulance was waiting to take him to the hospital.  He ended up being in surgery for four hours to place a rod in his leg and has been in a cast ever since.

All this to say that this was the first time my parents had been over in a while and I wanted to make something really good for dinner.  When I am wanting or willing to spend a little more time on dinner, one of the cookbooks that I turn to is Suzanne Goin’s Sunday Suppers at Lucques.  I know it is a favorite of many food bloggers out there and deservedly so.  The food is truly amazing.  Complex – sometimes maddeningly so – but if you want to make something special, you are practically guaranteed success.

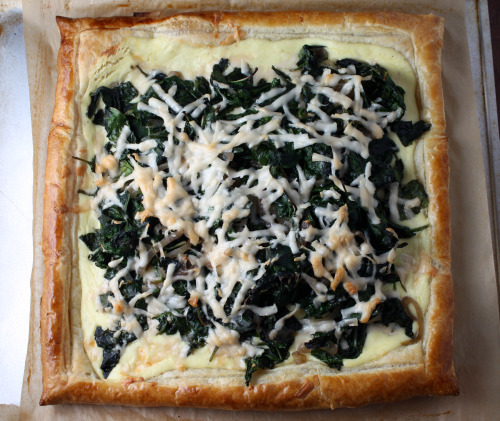
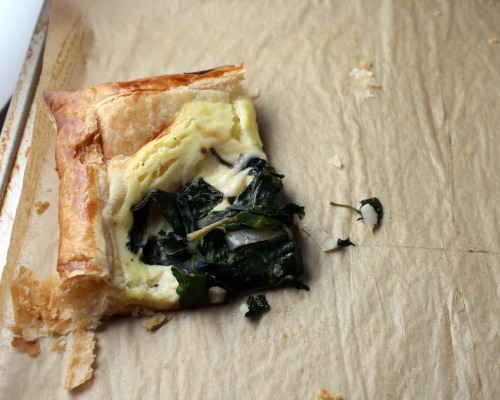
I am pleased to say to say that not only was this tart delicious, it wasn’t all that much effort.  Truly not any more so than a slightly-nicer-than-usual weeknight dinner in our house but it looks and tastes much more time consuming than that.  I made the Currant-Pine Nut Relish the day before and promptly forgot to serve it with the tart which made me want to just whip up another one the next night.  If I had had more chard, I would certainly have done so.

I made a lot of little changes to this recipe.  I used one sheet of Pepperidge Farms puff pastry which I rolled out to 1/8-inch thickness.  My bunch of chard was a little on the skimpy side, so I added a bunch of gorgeous baby spinach that I found at the farmer’s market.  I used low fat sour cream rather than crème fraîche because I had some in my refrigerator, but I did follow the recipe’s suggestion to use an aged goat cheese (I used a Bûcheron).  You could certainly use a soft one though.  Finally, I ignored Goin’s suggestion to blend the ricotta mixture with a food processor and just did it by hand with a whisk.

One Year Ago:  Spicy Sweet Potatoes with Lime

Swiss Chard Tart with Goat Cheese, Currants, and Pine Nuts
Adapted from Sunday Suppers at Lucques
Serves 4-6

I think the best way to defrost puff pastry is to put it in the refrigerator overnight.

1 sheet frozen puff pastry, defrosted
2 large egg yolks
1 large bunch of Swiss chard, cleaned, center ribs removed
Olive oil
¼ cup sliced shallots
1 tsp. thyme leaves
½ cup whole milk ricotta
¼ cup crème fraîche
6 oz. semi-aged goat cheese
Currant Pine Nut Relish (recipe follows)
Kosher salt and freshly ground black pepper

Preheat the oven to 400ºF.

Unroll the puff pastry on a lightly floured surface and lightly roll in each direction to for a neat rectangle, approximately 1/8-inch thick.  Carefully transfer the puff pastry to a parchment-lined baking sheet.  Use a paring knife to score a ¼-inch border around the edge of the pastry.  (DT: “Score” means lightly cutting into the pastry but not all the way through.  This will form your crust.)  Make an egg wash by whisking one egg yolk with ½ teaspoon of water, and brush the egg wash along the border.  (You will not need all of the egg wash.)  Chill the puff pastry in the freezer until ready to use.

Tear the chard into large pieces.  Heat a large sauté pan over medium-high heat and add just enough olive oil to coat the bottom.  Add the shallots and the thyme.  Sauté a few minutes and then add half the Swiss chard.  Cook a minute or two, tossing the greens in the oil to help them wilt.  Add the second half of the greens, and season with a heaping ¼ teaspoon of salt and a pinch of black pepper.  Cook for a few minutes, stirring frequently, until the greens are tender.

Spread the greens on a baking sheet or platter to cool.  When they are cooled, squeeze the excess water out with your hands.

Place the ricotta, remaining egg yolk and one tablespoon of olive oil in a bowl.  Whisk until smooth, then gently fold in the crème fraîche and season with a healthy pinch of salt and black pepper.

Spread the ricotta mixture on the puff pastry inside the scored border.  Crumble half the goat cheese over the ricotta, arrange the greens on top, and sprinkle the remaining goat cheese over the tart.  If you aren’t ready to bake, cover the tart with plastic wrap and chill.  (DT: Goin says you can make the tart in the morning and bake it in the evening, but I’m afraid the tart would be too soggy.  I put mine in the fridge for an hour or so and it was fine.)

Bake the tart for 20 to 25 minutes, rotating the baking sheet halfway through, until the cheese is bubbling and the crust is golden brown.  Check underneath the tart to make sure the crust is really cooked through.

Cool for a few minutes and then transfer the tart to a cutting board.  Cut into pieces and serve with the Currant-Pine Nut Relish.

Currant-Pine Nut Relish

½ cup pine nuts
1/3 cup olive oil
½ sprig rosemary
1 chile de àrbol, or any small dried chile
¾ cup finely diced red onion
1/3 cup dried currants
¼ cup balsamic vinegar
2 tbsp. chopped flat-leaf parsley
Kosher salt and freshly ground black pepper

Preheat the oven to 375°F.  Toast the pine nuts for 5-8 minutes, stirring once or twice, until they are golden brown and smell nutty.

Heat a small sauté pan over high heat for 2 minutes.  Turn the heat down to medium, and add the olive oil, rosemary, and chile.  When the rosemary and chile start to sizzle, add the onion and season with a good pinch of salt.  Turn the heat down to low and let the onions stew gently for about 10 minutes, until tender.  Transfer to a small bowl to cool.  Discard the rosemary and the chile.

While the onion is cooking, place the currants in a small bowl and cover with hot water.  Let the currants soak for 10 minutes, then drain well.

Add the balsamic vinegar to the pan the onions were in, and reduce it over medium-high heat to a scant 1 tablespoon.  stir the reduced vinegar into the onion mixture.

Add the toasted pine nuts, currants, and parsley to the onion mixture, and stir to combine.  Taste for balance and seasoning.


For People Who Fear Crust

March 24, 2010

Some people are afraid of yeast so they don’t make bread.  Some people are afraid of crusts so they don’t make tarts or pies.  (I myself am afraid of frosting layer cakes but I don’t let it stop me.)  So, If I say “tart”, are you one of those people who gets scared?   Truth be told, I find crusts can be tricky even thought I have made a lot of them.  Every time I make a pie, I say a little prayer to the crust gods to make things go smoothly.  My only advice is that it helps to have a good recipe and lots of practice.

If you do suffer from a crust phobia, please make this pie.  I would say it’s like a crust-less quiche, but it does in fact have a crust.  It is nothing more than some breadcrumbs sprinkled into a buttered pie plate, but somehow just that little bit of attention makes it more elegant, interesting, and also helps hold the slices together.  The lack of a butter and/or shortening  crust also makes a slice much lighter and healthier – so you can be a little more heavy-handed with the cheese.

This is one of many Jeanne Lemlin tarts that I have made – all easy, all delicious.  It is totally adaptable and great for lunch, brunch, or dinner.  Although she says it is important to use Swiss cheese in this one to help keep it all together, I bet you could substitute another firm cheese and have it turn out fabulously well.

One Year Ago: Chocolate Chip Coffee Cake

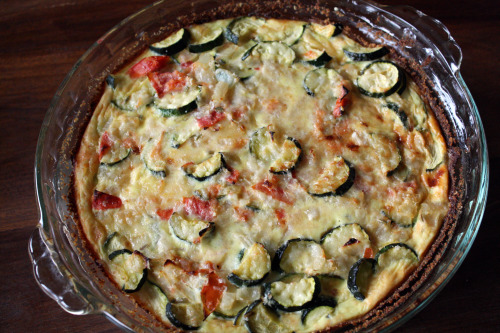
Zucchini, Tomato, and Swiss Cheese Pie
Adapted from Quick Vegetarian Pleasures
Serves 4

1 tbsp. unsalted butter, room temperature
¼ cup bread crumbs
Olive oil
1 medium onion, diced
2 garlic cloves, minced
2 medium tomatoes, seeded and diced
3 medium zucchini, quartered lengthwise and thinly sliced
1 tsp. fennel seed
¼ tsp. salt
Freshly ground black pepper to taste
3 large eggs
1/3 cup milk
¼ pound grated Swiss cheese
3 tbsp. grated fresh Parmesan cheese

1.  Preheat oven to 375º F.  Butter a 9 inch pie plate, then sprinkle the bread crumbs all over the sides and bottom.  Allow whatever loose crumbs are there to just sit on the bottom.

2.  Heat a large skillet over medium heat.  Add enough olive oil to just coat the bottom, then add the onion.  Sauté until translucent, then add the garlic and sauté for another 3 minutes.  Stir in the diced tomatoes and sauté another 5 minutes.  Raise the heat to high.  Mix in the zucchini, fennel seed, salt and pepper.  Cook until the zucchini is barely tender, about 5 minutes.  Remove the pan from the heat and cool 5 minutes.  (The recipe may be prepared in a dvance to this point an dchilled up to 24 hours.  Bring to room temperature before proceeding.)

3.  Beat the eggs in a large bowl.  Stir in the milk, then mix in the zucchini mixture.  Pour half into the prepared pie plate, top with the Swiss cheese, then pour on the remaining vegetable mixture.  Sprinkle the Parmesan cheese all over the top.

4.  Bake 30 minutes, or until a knife inserted in the center comes out clean and the top is golden brown.  Let sit 10 minutes before cutting.


« Older Posts Newer Posts »