Category: My Favorites

Worth Another Mention

September 7, 2010

Long ago, back when the only people who were reading this blog were my husband and my brother, I posted the recipe for these squash.  Because I make them all summer long, because I have streamlined the recipe since the last post, and because, unless you are my husband or my brother, you didn’t read about them the first time, I decided to talk about them again.  (That is 5 commas!)  Also, the original post has a truly terrible photograph and you, the Dana Treat reader, deserve better.

I have made these little guys more than almost anything else in my cooking life.  I used to follow the recipe to the letter but in the past year or so, I haven’t bothered looking at the book and I like how mine have turned out.  A lot.  So does everyone I make them for.  I have made them for gatherings large and small and they always get a lot of attention.  They are adorable of course, but the flavor is surprisingly sophisticated.  A little bit of curry powder is the thing that makes you go hmmmm.

The recipe originally called for a more-complex-than-necessary layering within each squash and also suggested that you bake the filled and finished product.  This summer I decided to do away with the baking step and just serve them room temperature.  They are delicious both ways.  The original recipe also instructed you to cook the “hats” along with the bodies and replace them before serving.  Cute but too much trouble.  And if you are making 30 of them, as I have done for parties, I can’t be bothered to keep track of which hat goes with which body.

I have made these with larger (think tennis ball) squash and with these little ones which are closer to golf balls.  I’ve served them standing upright as you see here and I’ve also served them on their sides with the filling nestled on top.  Are you sensing a theme here?  Make these.  They are good.

One Year Ago:  Thai Green Curry

Summer Squash Stuffed with Goat Cheese and Mint
Inspired by The Paris Cookbook
Serves about 8

If presentation is important to you and you want all the squash standing upright, slice a thin layer off the bottom of each one.

2 lbs. small round zucchini or other summer squash
Olive oil
1 small yellow onion, cut into very small dice
Kosher salt
1 tsp. curry powder
About 5 ounces soft goat cheese such as Montrachet
4 tbsp. fresh mint, cut into fine ribbons plus extra for garnish

Cut the tops off the zucchini.  Using a small melon baller, carefully scoop out the insides of the squashes.  Finely chop the pulp and set aside.  Bring a large pot of water to a boil and place the squash shells (and their tops if you want) in the water.  Cook for about 3 minutes and then drain.  Finely chop the pulp from the squash and set aside.

Heat a large sauté pan over medium heat.  Drizzle in just enough olive oil to coat the bottom and then add the onions and a large pinch of salt.  Sauté until just soft and not brown, then add the squash pulp and the curry powder.  Cook until the pulp is soft and the whole mixture is very fragrant, about 5 minutes.  Stir in the mint.  Allow to cool slightly.

Line the squashes up on a serving platter.  Spoon about a teaspoon of goat cheese into each one.  (The amount will depend on the size of your squashes.)  Top with enough of the curry mixture to fill the squash shell.  If you would like, top with another dot of goat cheese and garnish with the mint.



A Great Cause

August 23, 2010

This is an amazing and super simple appetizer.  The recipe is at the end of this post.  Please allow me to tell you why I made them.  But first a question.  What would it take to get you to shave your head?

I can imagine that for most of her life, my friend Kelly would have said nothing could get her to shave her head.  She is a woman with a beautiful head of hair.  It is her most striking feature and she has always had it cut to perfection.  Kelly is not a high-maintenance woman but her haircut is always beautiful.  She has that enviable hair that is straight but with enough texture to give it lots of body.  In spite of this, Kelly is going to shave off her beloved hair.  And she is doing it in celebration.

Kelly has a son named Jackson and he is about six months older than my oldest son Graham.  Five years ago, Kelly found blood in Jackson’s diaper.  He was about 16 months old at the time.  Visits to doctors’ offices and the hospital and tests revealed the unthinkable.  Jackson had an aggressive tumor on his kidney.  Immediately the ball started rolling – surgery to remove the kidney, chemo, radiation.  His doctors were very frank with Kelly and her husband Gregg.  This was a very nasty cancer and his road was going to be difficult.  His outlook was pretty grim.  Kelly remembers the pediatric oncologist saying that he would not be considered cured until he was 5 years past his diagnosis.  At the time, with Jackson incredibly ill, five years must have sounded like beyond forever.

Jackson’s treatment was very rough.  He spent 69 nights in the hospital in six months.  I remember Kelly calling me and talking about how difficult it was to get him to nap in a room with IVs in his arms and another very sick child sharing the same room.  At the time I was struggling with my own napper and felt incredibly guilty for having such an easy problem.

Once Jackson was stable, the family came over to our house for dinner.  Jackson was pale, bald, and had a feeding tube.  He had difficulty walking and not in the sweet way that a toddler should.  It was absolutely heartbreaking and I sobbed as soon as they left.  I had complete admiration for his parents.  They were incredibly involved, on top of the doctors, and getting support from their community.

Somewhere along the way in that very difficult first year, Kelly heard about an organization called St. Baldrick’s, a non-profit devoted to pediatric cancer.  It started out as a couple of friends shaving their heads to support children bald from chemo, and has blossomed into the world’s largest volunteer-driven fundraising event for childhood cancer research.  The only organization that funds more research is the U.S. government.  All this money is raised by people who are willing to lose their hair in solidarity with a child stricken by cancer.

Every year Gregg has shaved his head in Jackon’s name for St. Baldrick’s.  Like other volunteers, he asks for sponsors, raises as much money as possible, and then goes under the clippers.  Gregg is, ahem, follicly challenged so he does it to support the cause, but for him it is essentially a free haircut.  Kelly is another story.  She and her team of 45 other moms are going to shave their beautiful heads to create awareness for the good work St. Baldrick’s is doing and for pediatcric cancer in general.  This is a big deal for a beautiful woman.  It is an even bigger deal because she is doing to celebrate five years of Jackson being cancer-free.  He has officially graduated from the Children’s Hospital program and no longer needs to go back for scans or tests.  His story is an incredible one of beating the odds.

Kelly and Gregg had a special party on Saturday night to celebrate and to offer thanks to friends and family who have supported them throughout this time.  Also in attendance was one of Jackson’s pediatric oncologists, who is also benefitting from St. Baldrick’s.  He is getting grant funding through St. Baldrick’s to fund research that he is doing at the Fred Hutchinson cancer reserach center in Seattle.

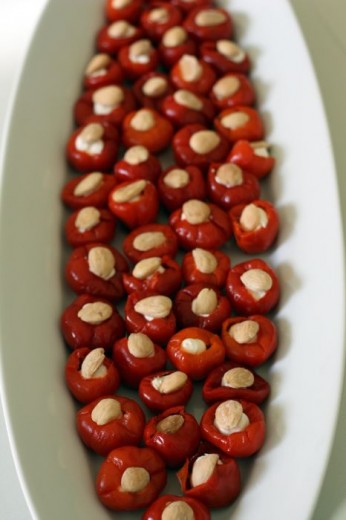
When this party was first in its planning stages, Kelly asked if I could help with the food.  Of course I said yes.  I made lots of different easy-to-pick-up appetizers including these stuffed peppadew peppers.  Gregg tasted them at our summer party and they were first on his list of requests.  This is such an easy recipe but it packs a powerful punch.  Each bite is a perfect combination of heat, savory, creamy and sweet.

Sometimes when I read posts about people who are doing great work in our world, especially work involving children, I immediately want to help.  If you feel this way, I invite you to visit Kelly’s fundraising page.  She has a personal goal of raising $15,000.  To date she has raised $10,270.  And one more thing about this amazing woman.  She plans to not wear a hat or a scarf during her bald phase and also plans to wear a button that says, “Ask me why I am bald”.  I love her.

D’Lish Peppadew Peppers
Sipps and Apps
Makes 45 to 50

Each time I make this recipe, I make the cheese mixture and fill the pastry bag ahead of time and put it in the refrigerator.  Then, before serving, I allow the cheese to come back to room temperature before piping.

1 14-ounce jar Peppadew piquanté peppers
3 ounces fresh goat cheese, at room temperature
3 ounces cream cheese, at room temperature
45 to 50 whole Marcona fried almonds

Drain the peppers thoroughly.  Meanwhile, in a food processor or mixing bowl, combine the cheeses and mix until smooth.  Fit a pastry bag with a plain tip, fill with the cheese mixture, and pipe into the peppers.  Insert an almond into each pepper.

(If you can’t find jars of these peppers, check in the bulk olives section of a high-end grocery store or fresh-pack Peppadew peppers.  For this recipe, you should purchase about a pound.)


New Favorite Noodles

August 4, 2010

Several months ago, I had lunch with a friend at a relatively new local restaurant called Nettletown.  It has been getting a lot of buzz lately and I took precious babysitting time to go check it out.  I am not a restaurant reviewer but I can tell you that within a very modest space, very exciting über-local and sustainable food is happening.  If you want more information, Tea wrote a great post about Nettletown here.

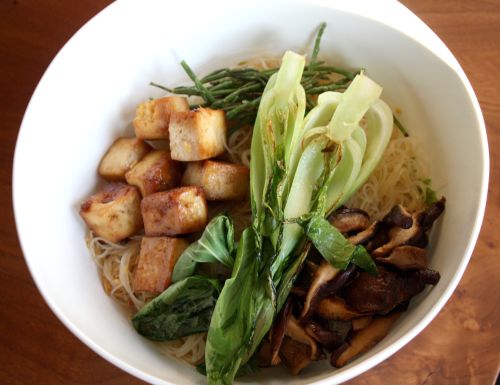
From the specials list, I chose a dish that turned out to be one of the most interesting and delicious dishes I have eaten in a long time.  I don’t remember everything exactly but I know for sure that my shallow but well-filled bowl contained fresh rice noodles, very firm and perfectly flavored tofu, sea beans, mizuna, and shiitake mushrooms.  There may or may not have been other delicacies in there.  I was pretty hungry that day and I still only made it through about half of my dish.  I dislike leftovers but I loved my noodles so much that I took my unfinished portion home with me and ate them later that night.

Since then, the dish has haunted me.  I have been back to Nettletown twice and have been dismayed to find it absent from the specials menu.  So, I have attempted to re-create the dish.  Three times.  The first two times I was so hungry and distracted by the time the dish was done that I didn’t have the energy or patience to take a photo.  (Fellow food bloggers, can I get an amen?)  I just figured I would make it again.  These are flavors and ingredients I love so why not use “no photo” as an excuse to repeat?  Each time I refined the dish a little more.  Some things stayed constant, others changed.  All three times I hoped to use fresh rice noodles and was never able to make that happen in spite of looking for them at my local Asian market.

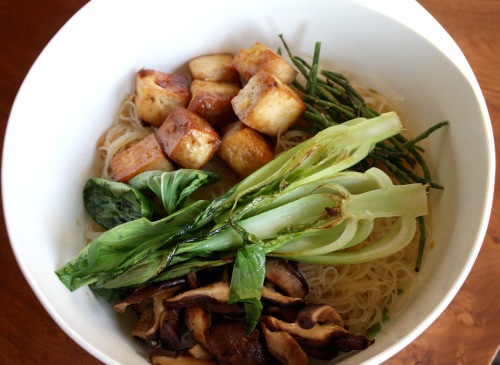
So what is going on here?  First I made a marinade/sauce.  I cut the tofu into pieces, put them in a small baking pan, and poured about half the marinade over top.  I sautéed up some shiitake mushrooms until they started to brown and added just a touch of soy sauce at the end.  I rinsed sea beans, pre-cooked and then rinsed the rice noodles, and I allowed the tofu to bake long enough to absorb the marinade and develop a bit of a crust.  I assembled the whole dish together, poured the remaining sauce over top, and quickly seared bok choy halves to put on top.

This is not exactly the dish I had at Nettletown.  I’m still going to keep tweaking it and I am going on a fresh rice noodle quest.  But I’m getting close.

One Year Ago:  Zesty Tofu Wraps

Rice Noodles with Marinated Tofu and Shiitake Mushrooms

Dana Treat Original
Serves 4

I tried both the angel hair thickness rice noodles and the more fettucine thickness and preferred the latter.

For the marinade:
2 inch pieces of fresh ginger, peeled and grated
1 garlic clove, minced
2 stalks lemongrass, outer leaves removed, minced
6 tbsp. soy sauce
3 tbsp. honey
3 tbsp. rice wine vinegar
1½ tbsp. mirin
Zest and juice of 1 lime
1 tbsp. sesame oil
2 tbsp. canola oil
2 tbsp. water
½-1 tsp. red pepper flakes

12 ounces extra-firm tofu, blotted dry and cut into 1-inch cubes
8 ounces shiitake mushrooms, stems trimmed and cut into thick slices
4 baby bok choy, sliced in half
Large handful of sea beans, rinsed and drained
Mizuna leaves (you can substitute spinach)
1 pound rice noodles

To make the marinade/sauce, mix together all the ingredients in a medium size bowl.  Taste for flavor balance and add more soy, honey, or lime juice to taste.  Put the tofu in a shallow baking dish (an 8×8-inch pan is perfect) and pour about 1/3 of the marinade over top.  Allow the tofu to sit for at least half an hour, turning the pieces periodically.  You can also refrigerate the pan, covered, for up to one day.  Reserve the rest of the marinade.

Preheat the oven to 375ºF.  Place the baking pan in the oven and bake until the marinade is absorbed and the tofu is developing a bit of outer crunch, 30 to 40 minutes.  Turn the tofu once during baking.  Set aside.

Heat a medium non-stick pan over medium heat.  Add just a bit of canola oil and then the mushrooms.  Allow to cook with out turning too much so that they get a bit browned.  Once they are soft and have released all of their liquid, add about a tablespoon of soy sauce.  Stir until the soy sauce is absorbed and set the mushrooms aside.

Bring a large pot of water to boil.  Add the rice noodles and cook until just tender.  Check the package for how long they need to cook and be sure to taste them to make sure they are done.  Drain and immediately rinse them with cold water until they are cool.

Heat a bit more oil in the same skillet in which you cooked the mushrooms.  Add the bok choy halves and cook just until softened a bit, about 3 minutes.

To assemble the bowls, place a small handful of mizuna at the bottom of a wide shallow bowl.  Top with ¼ of the noodles.  Pour ¼ of the marinade/sauce over the noodles.  Top with some tofu, sea  beans, mushrooms, and a couple bok choy halves.


Perfect Chocolate Chip Cookies

June 16, 2010

We food bloggers can be a bossy group.  You see a lot of “You have to try this!” and “This is the best (fill in the blank) recipe out there!  Throw away any other version!”.  We feel strongly about food and when we find something we like, we want to share.  I come by my bossiness naturally.  I am an oldest child and a Leo.  I have almost 40 years experience telling people what to do.

I like to think that I am not overly bossy on my site.  (Please let me know if you feel otherwise.)  I fully appreciate that taste is completely individual and something I love might be something you hate.  We all have different opinions about what is delicious and I respect that you might hate chocolate and french fries (although I will never never understand it).

It is with restraint and respect that I tell you that I have found the last chocolate chip cookie recipe I will ever need.  What I want to do is to type in all caps and tell you that you have found the last chocolate chip cookie recipe you will ever need…but I am holding my inner boss in check.  I respect that you might have a much beloved recipe that you will never part with.  But it is my duty as a food blogger to share my treasure.

I  never really gave much thought to chocolate chip cookies until the New York Times recipe came along several years ago.  Periodically I would see recipes in books and wonder why anyone would stray from the good old Tollhouse recipe.  When all the hubbub died down, I made the NYT recipe and understood that a chocolate cookie is capable of subtlety and there was a difference when you used different kinds of flour, used chocolate disks instead of chips, and let the dough rest at least overnight.  I made them again and again and thought I had found my until-the-end-of-time cookie recipe.

And then, just a few weeks ago, Ashley’s recipe came into my life.  You know Ashley, right?  If you don’t, you should.  This very sweet very young woman is very accomplished and a very very good cook and baker.  She teaches wonderful classes that happen to take place right next door to my house.  I have taken a few and I look forward to taking more.  I am a good cook and baker but I have learned some great things from her.  Like how to make a perfect chocolate chip cookie.

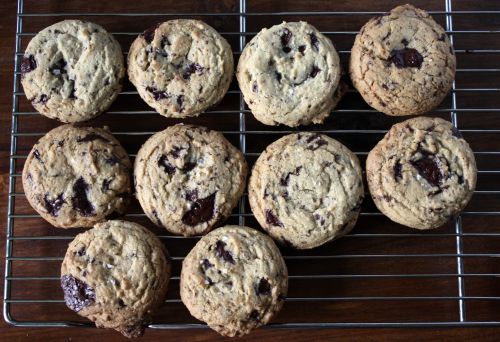
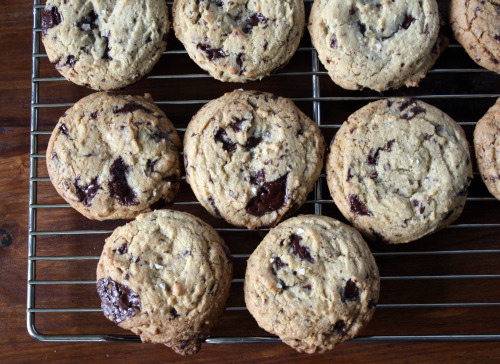
What makes them so special?  Three different kinds of sugar.  A long creaming time.  A lot of chocolate.  A little trick with adding the flour and chocolate pieces to prevent over mixing.  I don’t know.  I asked her what she thought made them so special and she answered, “It’s just all those things together”.  All right whatever, cookie genius.  What I do know is that these cookies turn out perfectly round (every single one of them!), they have loads of chocolate and no nuts (a big plus for me), and they are that perfect combination of crisp exterior and chewy interior.  They also have a sprinkling of sea salt on the top of each one which makes them irresistable.

I also asked Ashley about the let-the-dough-rest theory.  She said her cookies are in fact even better (is that possible?) if you refrigerate the dough for 24 hours.  When I told her that I found refrigerated dough kind of a pain to scoop, she said that she turns the dough out and forms it into a log.  Then she slices and bakes.  Cookie genius indeed.

UPDATE 4-12-11 I have been making loads of these cookies and I think I have found the best way.  Make the dough as directed below.  Then split the dough into quarters.  Roll each quarter into a log about 10 inches long.  Wrap well in plastic wrap and refrigerate for 24 hours.  Then cut the logs into ¼-inch slices and bake.  I can get about 50 smaller cookies when made this way.

One Year Ago:  White Chocolate Almond Chunk Cookies
Two Years Ago:  Feta and Ricotta Cheese Skillet Pie

Ashley’s Salted Chocolate Chip Cookies
Not Without Salt
Makes about 2 dozen

I have made no changes to the original recipe but have clarified a bit, with Ashley’s blessing.  I used bittersweet chocolate for my cookies but semi-sweet would be great too.

2 sticks (8 oz.) unsalted butter, softened
¼ cup granulated sugar
¼ cup Turbinado sugar
1¾ cup light brown sugar, packed
2 eggs
2 tsp. vanilla
3½ cups all-purpose flour
1½ tsp. baking soda
¾ tsp. salt
12 oz. chocolate (use the best quality chocolate you can afford.  With a serrated knife, cut chocolate into roughly ½-inch chunks.)
Sea salt

Preheat the oven to 360ºF.  Set rack in the middle of the oven.

Cream the butter and the sugars on medium-high speed until light, 4-5 minutes.  Scrape down the sides of the bowl a couple of times during this process.  Continue mixing while adding the eggs one at a time.  Make sure each egg is incorporated before adding the next.  Add the vanilla.  Scrape down the bowl with a spatula.  Combine the flour, soda and salt in another bowl.  Mix with a whisk.  With the machine on low, slowly add almost all the flour.  Reserve just a bit of the mixture.  Remove the bowl from the mixer and add the last bit of flour along with the chocolate.  Stir with a spatula until just combined.

Using a large ice cream scoop, scoop out mounds of dough making sure there is about 2 inches between each cookie.  Do not crowd them and there is no need to press the dough down.  Sprinkle each mound with a bit of sea salt.

Bake sheets, one at time, until the cookies are lightly golden on the edges and a bit gooey in the center, about 12 minutes.  Do not overbake!  Remove sheet from oven and allow to sit undisturbed for two minutes.  Then carefully transfer cookies to a cooling rack.  Repeat with the remaining sheets.

(DT: I have a convection feature on my oven and was able to successfully bake three sheets at a time.  If you do not have convection, I would highly recommend just doing one sheet at a time.)


The Short List

June 13, 2010

Most people who cook have some kind of short list.  Those go-to recipes that require very little thought, contain ingredients you either have on hand or that can be easily procured from any grocery store, and that taste delicious.  Those are precious recipes indeed and I need a few more in my arsenal.

For now, this Jamie Oliver dish is at the top of my short list which, if I haven’t made it clear, is very short.  No matter – I love this recipe.  I always have onions and garlic plus many cans of chickpeas, almost always have celery, and I have rosemary growing in my yard.  Give me half an hour and I will give you something healthy, appealing to most people, satisfying, and very tasty.  It is also a very forgiving dish so you can either eat it right away or allow it to sit for a bit with the flavor only improving.

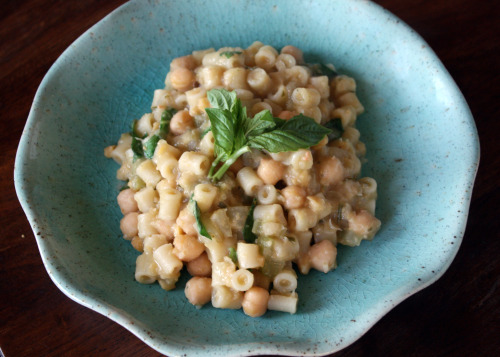
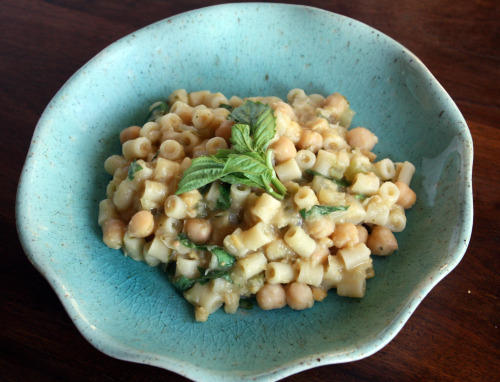
The method is simple.  The onions and garlic get sautéed together in a bit of olive oil along with the rosemary, which immediately makes your kitchen smell wonderful.  The chickpeas are next in the pot along with the broth and after those have cooked for a bit, half of the chickpeas are scooped out and reserved while the goodness in the pot gets a quick purée with an immersion blender.  After everything is reunited in the pot, in goes the pasta.  As soon it is tender, you are ready for dinner.  Add some fresh herbs on top (which I always seem to have some remnant of in my crisper drawer) and you have a rich and creamy tasting (but very healthy) meal.

I change this up a bit from the original recipe by adding some red pepper flakes for a bit of heat, and I also add more pasta and broth.  I always seem to need even more broth as the cooking process happens and you can add even more than that if you want the dish to be more saucy.  I don’t think it is possible to screw up this dish, so do what you like.  You will see my changes in the recipe below.  If you don’t have an immersion blender, you can use a food processor instead – just be careful with the hot stuff!

What is on your short list?

One Year Ago: Chilled Avocado Soup
Two Years Ago: Ina Garten’s Outrageous Brownies

Pasta e Ceci (Pasta with Chickpeas)
Adapted from Jamie’s Italy
Serves 4

1 small onion, peeled and finely chopped
1 stick of celery, trimmed and finely chopped
1 clove of garlic, peeled and minced
½ tsp. red pepper flakes
Olive oil
1 sprig of rosemary, leaves picked and finely chopped
2 14-oz. cans of chickpeas, rinsed and drained
3 cups vegetable stock
5 ounces ditalini or other small pasta (such as orzo)
Sea salt and freshly ground black pepper
Small handful of fresh basil or parsley leaves, picked and torn

Place a large skillet over medium heat and then pour in just enough olive oil to coat the bottom.  Add the onion and celery and sauté just until tender, about 6 minutes.  Add the garlic, rosemary, and red pepper flakes.  Sauté for 2 minutes, then add the chickpeas and the stock.  Bring to a boil, then lower heat to simmer and allow to cook just until the chickpeas are heated through, about 5 minutes.  Using a slotted spoon, remove half of the chickpeas and set them aside.

Purée the soup in the pan with a handheld immersion blender.  Add the reserved whole chickpeas and the pasta, season the soup with salt and pepper, and simmer gently until the chickpeas are very tender and the pasta is cooked, about 10  minutes.  Add more liquid as necessary.

Season to taste with salt and pepper and sprinkle with torn basil or parsley.


« Older Posts Newer Posts »