Category: Mexican

Soft Tacos

July 28, 2010

The time – mid-1980’s.  The place – Camp Nor’wester, Lopez Island, WA.  The meal – tacos.

Dinner was always family style at our camp and on taco night, each table of eight got a bowl with ground beef in it, slightly-stale taco shells, and a platter filled with cheese, tomatoes, and lettuce.  Maybe there was a sour cream – I don’t remember because I’ve never been a big sour cream person.  Taco night was big at camp because the food was so filling – just what we needed after a long day of being outside in the sunshine.  I will never forget that sensation of having taco meat grease run down my chin and the disappointment I would feel when the kitchen ran out of taco fixings.  No matter how much they made, there was never enough.  Somehow however, there were an almost infinite number of taco shells and we would try and content ourselves by licking them and then sprinkling them with salt to eat as chips.

I’m not sure how this is possible but I have not had a taco since then.  I’ve had plenty of enchiladas and quesadillas.  I’ve probably eaten my weight several times over in guacamole.  But no tacos.

Until now!

I’ve always loved the idea of a soft corn tortilla filled with grilled vegetables and cheese.  It seems like precisely the time that I get a craving for them is on a dark and stormy winter night and it just feels all wrong to eat something summery.  Of course, I could fill a soft taco with lots of things but for my first go around, grilled vegetables sounded right.

I turned to Annie Sommerville’s Fields of Greens and a recipe I have looked at longingly on many a winter night.  As with many of the recipes in this book, she kind of overcomplicates something that is actually quite simple.  So I have streamlined in the recipe that you see below.  The good news about these tacos is that a) they are delicious, b) you can make a lot of tacos, c) the filling keeps really well for a couple of days so you can make them again if you have leftovers, and d) both my boys devoured them.  When I made them using the leftovers, I also threw in some refried beans for the boys.  Graham ( 5½ )ate two whole ones and Spencer (3) finished his, albeit having picked out every last vegetable.


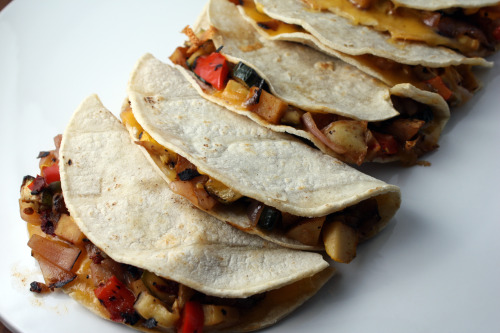
Grilled Summer Vegetable Soft Tacos
Inspired by Fields of Greens
Serves 6-8

The diced potato in here does give the dish more body but it’s also an extra step and more dishes to wash.  You can omit it if you like.  Substitute cotija cheese for the Cheddar if you prefer.

1 jalapeño chile, sliced in half and de-seeded
1 red bell pepper, cut lengthwise into thick strips
1 yellow pepper, cut lengthwise into thick strips
1 red onion, peeled and cut into ½-inch thick rings
1 zucchini, cut in half lengthwise and scored
1 yellow summer squash, cut in half lengthwise and scored
Olive oil
Kosher salt and freshly ground black pepper
1 chipotle pepper, minced, plus 2 tsp. of the sauce
1 medium Yukon Gold potato, cut into ½-inch cubes
¼ cup water
¼ cup chopped cilantro
12 thick corn tortillas
About 1½ cups grated Cheddar cheese

Prepare the grill.

Place the onions, peppers, and squashes on a large sheet pan.  Drizzle with olive oil and liberally sprinke with salt and pepper.  Place the vegetables on the grill and cook, turning as needed, until completely tender.  Remove from the grill and set aside.

Heat a bit of olive oil in a medium-size skillet and add the potatoes.  Sprinkle with a pinch of salt and a few grinds of pepper.  Lightly brown the potatoes over medium-high heat, using a spatula to loosen them as needed.  Add the water, cover the pan, lower the heat, and simmer until completely tender, about 5 minutes.  Tranfer to a medium size bowl.

Peel and seed the jalapeño.  Finely chop and add to the potatoes.  Chop the rest of the grilled vegetables into ½-inch pieces and add to the potatoes along with the chipotle and sauce.  Stir in the cilantro.  Taste for seasoning and add more chipotle sauce if it is not spicy enough for you.

Heat a little oil in a skillet and add a tortilla.  When it is soft and heated through, flip it over and heat the other side.  Sprinkle a bit of cheese over and spread about 1/3 cup filling across the center.  Fold the tortilla in half and keep them warm in a low oven while you repeat with the rest of the tortillas.  Serve with salsa, guacamole and sour cream if desired.


Black Bean Tostadas

April 11, 2010

I’m going to be brief and to the point.  It’s Monday.  Some of you are going meatless.  I tried to get this posted in enough time for you to run to the grocery store and gather up the ingredients because it is SO good.  But if not, make it next Monday.

Why?  How about a crispy corn tortillas topped with a cumin-y black bean mixture, topped with a vinegar-y cabbage slaw, topped with an avocado-y salsa, topped with pickled onions?  If you add an extra sprinkle of queso fresco cheese, it takes this dinner from a “Top 10 of All Time” to a “Top 5 of All Time” according to my list-loving husband.  I actually opted to take all those delicious toppings and put them over this rice but Randy had no problem eating 3 tostadas on his own and rejoiced to know that there were leftovers.

A couple of notes.  If you are not familiar with epazote, it is an herb often found in Mexican cooking.  I have never tasted it fresh – dried it reminds me of a cross between oregano and dill.  I think it is delicious but it can be hard to find.  I’ve ordered it from Penzey’s but you can also just substitute dried oregano.  The cabbage slaw can be made hours ahead of time and stored, covered, in the refrigerator.  The beans can be made hours ahead too – you just may need to add a little water to loosen them up when you reheat them.  I would wait to make the salsa until right before serving because otherwise it gets a little watery.  Finally, yes, those are the same onions found on the Fideos.  Why not make a big batch and have a double meatless Mexican week?

One Year Ago:  Butterscotch Spiral Coffee Cake

Black Bean Tostadas with Slivered Cabbage, Avocado, and Pickled Onions

Adapted from Vegetarian Suppers from Deborah Madison’s Kitchen
Serves 4

Don’t let the length of this recipe or all the different parts scare you off.  Each part is fast and easy.  If you prefer, you can heat the tortillas on the stovetop in a skillet or griddle.  I prefer to use the oven method because you can use less oil (you can really use none) and you can heat more of them at once.

Pickled Onions (recipe follows)

The Beans
2 tsp. vegetable oil
1 small onion, diced
1 tsp. ground cumin
1½ tsp. dried epazote
1 garlic clove, minced
1 15-oz. can black beans, rinsed and drained
Sea salt

The Cabbage Slaw
6 cups finely sliced green cabbage
Sea salt
4 scallions, thinly sliced
2 pinches of dried oregano
2 tbsp. chopped cilantro
1/3 cup white wine vinegar or lime juice (DT: I used a combination)
1/3 cup boiling water

The Tortillas and Garnishes
8 corn tortillas
Vegetable oil
2 small avocados, peeled and sliced
Crumbled queso fresco or feta cheese
½ cup sour cream, thinned with a little milk
Salsa Cruda (recipe follows)

1.  Make the pickled onions and let them stand while you get everything else ready.  (Remember, they can be made up to 5 days in advance.)

2.  Heat the oil in a skillet and add the chopped onion, cumin, and epazote.  Cook over medium-low heat, stirring frequently, until the onion starts to brown, 3 to 4 minutes, then add the garlic and cook for 1 minutes more.

3.  Add the beans and a bit of water and cook, mashing the beans slightly until they are somewhat smooth but still have plenty of texture and are not soupy.  Season with salt and keep warm, or reheat as necessary.

4.  Toss the cabbage with a few pinches of salt and the scallions.  Add the rest of the salad ingredients, toss well, and refrigerate until ready to use.

5.  Lightly brush the tortillas with oil and bake in a 400°F oven until crisp and starting to brown, 6 to 8 minutes.

6.  Put 2 tortillas on each plate and spread the warm beans over each.  Mound the cabbage on top, add the avocado, cheese, a drizzle of sour cream, and the pickled onions.  Pass salsa at the table.

Pickled Onions

1 small red onion, thinly sliced into rounds
Sea salt
1 tsp. sugar
Apple cider vinegar or rice wine vinegar

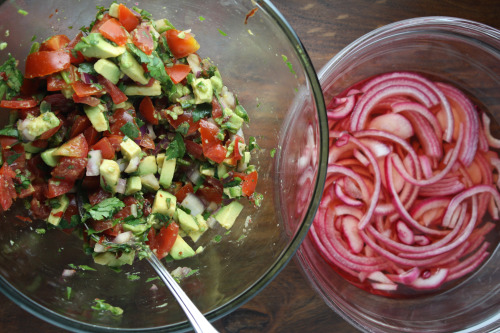
Toss the onion rounds with a pinch of salt and the sugar.  Put them in a bow with vinegar to cover; they’ll turn bright pink in about 15 minutes.  They will keep for about 5 days in the refrigerator.

Salsa Cruda with Avocado
Makes about 1 cup

5 plum tomatoes or 3 ripe medium tomatoes
¼ cup finely diced red or white onion
1 jalapeño chile, finely diced and seeded if you want less heat
12 cilantro sprigs, chopped
1 avocado, finely diced
Finely chopped chipotle chile to taste (optional)
Juice of 1 lime or splash of beer
Sea salt

Halve the tomatoes lengthwise, squeeze out the seeds, then chop the flesh into small pieces.  Put the tomato in a bowl with the onion, chile, cilantro, and avocado.  Add lime juice or a splash of beer and season with salt to taste.


Side Dish for Mexican Food

April 8, 2010

The problem with being a self-described “cookbook cook” is that it takes a little more oomph for me to step outside the assurance of my books and just create a recipe.

The other night, while making Black Bean Tostadas (recipe coming soon), I started imagining a good hearty rice dish as a side.  I almost started to go through the tedium of looking up “rice” in my cookbooks when I realized I had a very clear idea of what I wanted, why not just make it?

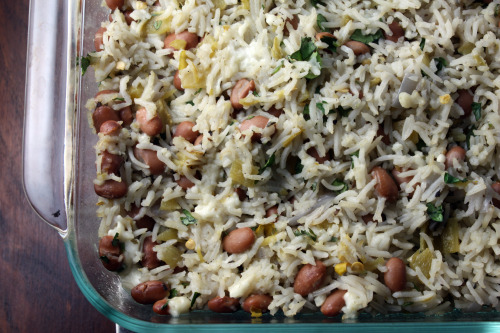
So I did.  And as with most things I have made without a recipe, I was very pleased with how it turned out.  (Note to self: cook more often without a recipe.)  I included some of my favorite flavors in here but, of course, this dish is infinitely adaptable.  I happen to love the slight punch and tang of canned green chiles, but if you like more spice, by all means add a fresh jalapeño or two.  I used queso fresco partly because I also needed it for the tostadas, but partly because I love how mild it is.  But you could certainly use Cheddar or Monterey Jack.  Like more cheese?  Add more and sprinkle some over the top before baking.

A rice note.  Unless I am making risotto or something where I specifically want brown rice (or if I am using sushi rice for this dish), I almost always use basmati rice.  I think it fluffs up beautifully and has terrific flavor.  Trader Joe’s has nice big (and affordable) bags of it.

One Year Ago:  Pasta with Broccoli Rabe and Chickpeas

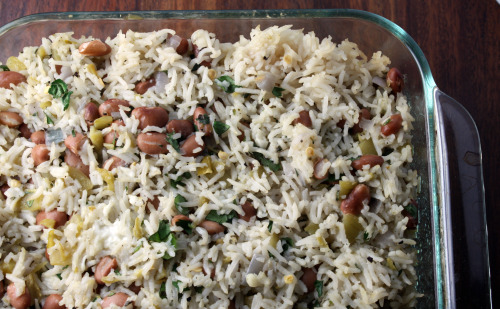
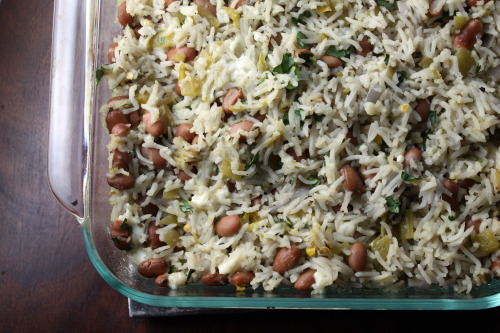
Baked Rice with Chiles and Pinto Beans
Dana Treat Original
Serves 4-6

Canola or other neutral tasting oil
Small red onion, diced
3 garlic cloves, minced
1 tsp. dried oregano
1 cup white rice
2 cups water or vegetable stock
Salt
1 15-oz. can pinto beans, rinsed and drained
1 7-oz. can diced green chiles
¼ cup chopped cilantro
¾ cup queso fresco, crumbled

Heat a medium saucepan over medium heat.  (I used a 3 quart.)  Add just enough oil to coat the bottom, then add the onion and a healthy pinch of salt.  Sauté until softened, then add the garlic.  Cook for another 3 minutes, then add the oregano.  Sauté for another minute.  Add the rice and toss to coat with the fat and herbs, then pour in the water or stock.  Bring to a boil, then turn the heat down to low, cover and cook for 20 minutes.

Preheat oven to 400ºF.  Oil an 8×8 baking dish.  Once the rice is done cooking, allow it to sit, off the heat, for 5 minutes.  Remove the lid and, using a fork, carefully fluff the rice.  Add the chiles and the beans and, without mushing the rice, carefully stir them in.  Sprinkle on the cheese and cilantro and stir them in.

Scrape the rice mixture into the prepared pan, cover with foil, then bake until the cheese is starting to melt and the dish is hot throughout, about 20 minutes.  Remove the foil and allow to sit for 5 minutes before serving.

(This is totally the kind of dish you could make a day ahead.  Prepare up through putting the finished rice in the baking dish, allow the whole thing to cool, cover with foil, then refrigerate overnight.  From there, just put it directly into the oven and you will need to add 5-10 minutes to the baking time.)


Just Good Food

March 30, 2010

Some days I have a story and some days I just need to tell you about a dish that is super yummy and maybe a little unusual.  This is one of those days.

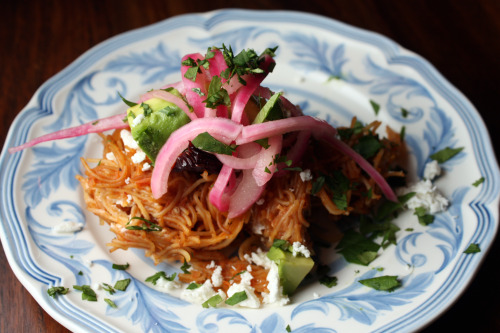
I am no expert but from what I can gather, fideo is the Spanish word for noodle.  In this dish, very thin noodles are sautéed in oil until they brown, then a smoky tomato sauce is poured over top.  The noodles then cook in the sauce until soft and until they brown on the bottom.  Throw some pasilla chiles in the mix and top the whole thing with sour cream, avocado, and pickled onions and you will probably just want to call it “yum”.

The recipe suggests making this in a cast iron skillet or a non-stick pan.  My cast iron skillet was too big for this job and my non-stick pan was too small.  I made it in a Le Crueset dutch oven, but I had to mix it more than I wanted to so that it wouldn’t stick until the end of time.  Next time, I am going to double it and just make it in my cast iron skillet (and improvise some kind of lid) because my husband could probably eat ¾ of the dish by himself and I want me some of that crust.  And leftovers would certainly be nice.

One Year Ago:  Mediterranean Roasted Vegetable Salad

Fideos with Pasilla Chiles, Avocado, and Crema

Adapted from Vegetarian Suppers from Deborah Madison’s Kitchen
Serves 3-4

The chiles will make this dish delightfully spicy – just a warning.  The original recipe calls for parsley instead of cilantro so feel free to use that if you don’t like cilantro.

3 dried pasilla, New Mexican, or guajillo chiles
4 plump garlic cloves, unpeeled
3 tbsp. canola oil
1 15-oz. can Muir Glen Fire Roasted tomatoes
Kosher salt and freshly ground black pepper
1 large shallot, coarsely chopped
½ pound short, skinny egg noodles (like spaghetti or noodle nests)
3 cilantro sprigs, plus ½ a cup chopped cilantro leaves
½ cup Mexican crema, crème fraîche, or sour cream
3 ounces feta cheese or queso fresco
1 avocado, peeled and sliced, for garnish
Pickled onions for garnish (recipe follows)

1.  Cover the dried chiles with hot water and set them aside to soften while you make the tomato sauce.  When soft, tear or cut the flesh into strips.  Discard the seeds.

2.  Moisten the unpeeled garlic cloves with a little of the oil, then cook them in a small skillet over medium-low heat, occasionally sliding the cloves around the pan, until the skins are toasted and the cloves are soft, 10 to 15 minutes.  Allow to cool, then squeeze the garlic from the skins into a blender and add the canned tomatoes, 1 teaspoon of salt, the shallot and ½ cup of water.  Purée.

3.  Heat the remaining oil in a cast iron skillet or non-stick pan over medium-high heat.  Break the noodles into pieces about 1½ inches in length.  Add the noodles to the oil and stir them around until they’re lightly browned, then add the tomato sauce and cilantro sprigs.  Add all but a few of the torn chiles, then even out the contents, and adjust the heat to a simmer.  Cover the pan and cook until the noodles are soft, 15 minutes or so.  Season with pepper.

4.  Loosen the cream with a fork, then drizzle it over the surface of the finished dish.  Crumble the cheese over the cream, scatter on the remaining chile pieces, and slice the avocado all over.  Add a little chopped cilantro and some pickled onions and serve, being sure to scrap up all that delectable crust that lurks on the bottom of the pan.

Pickled Onions

1 small red onion, thinly sliced into rounds
Sea salt
1 tsp. sugar
Apple cider vinegar or rice wine vinegar

Toss the onion rounds with a pinch of salt and the sugar.  Put them in a bow with vinegar to cover; they’ll turn bright pink in about 15 minutes.  They will keep for about 5 days in the refrigerator.


Mexican Food for Randy

January 11, 2010

IMG_4414

Ask my husband what he wants for dinner and he will, without fail, say, “Mexican”.  I don’t even know why I ask, but I do.  Maybe someday he will surprise me and ask for a Morrocan tagine with cinnamon couscous…but I’m not holding my breath.

It’s really all right with me because I really like Mexican food too.  We have a good place in our neighborhood where we go on sunny Sunday evenings.  It’s a pleasant walk there and back plus they have terrific margaritas and salsa to die for.  But usually vegetarian Mexican food means lots of cheese which just isn’t my thing.  My margarita skills are lackluster but in all honesty, I prefer “my” Mexican food to most restaurants, inauthentic as it may be.

IMG_4419

This Black Bean Chilaquile recipe came to me via Twitter.  Some friends were tweeting about good low fat cookbooks and I threw in my two cents for the Moosewood version (the cookbook is called Moosewood Restaurant Low-Fat Favorites).  Kate said that this chilaquile recipe is a standby for her.  I’ve owned that cookbook for a good ten years – how did I miss making this?  Very easy and quick to put together, healthy, hearty, and adaptable.

Let’s talk for a moment about low fat cooking.  It’s the thing to do in January after all.  I’m kind of funny about this topic.  I am a healthy eater and I am careful with regards to my weight.  I honestly don’t like food that is super rich or made with lots of oil or butter.  My tastes naturally steer toward clean food.  But I don’t get Cooking Light or own any low fat cookbooks with the exception of the Moosewood one.  I prefer to take regular recipes and just lighten them up slightly.  I sauté with the bare minimum of oil, use less cheese than is called for, steer away from recipes that use lots of cream and butter.  Not all the time of course, there is a time for indulging.  But if a recipe uses cooking spray to sauté and fat-free cheese and fat-free sour cream, I go running in the other direction.  Baked Lay’s have a place in my pantry and I usually eat frozen yogurt instead of ice cream, but the line has to be drawn somewhere.  And when it comes to baking, I am strictly of the full-fat school.  I would rather have one bite of a perfect brownie than a box of “lite” cookies.

All this is a very long-winded way of saying that, while I cringe at most low fat cooking, I really like this cookbook.  I use it all the time.  It isn’t over-zealous it’s just healthy.  It highlights a lot of different cuisines that are healthier than our own and every single thing I have made from it has been delicious.  The book also thoughtfully includes menu suggestions using other recipes in the book.  And for the pescatarians out there, there are fish recipes.

IMG_4433


Black Bean Chilaquile
Adapted from Moosewood Restaurant Low-Fat Favorites
Serves 4 very hungry people or 6 less so

The original recipe calls for fat-free Cheddar cheese.  I just can’t do it so I used the good stuff and just used a lot less of it.  If you want it cheesy, add more.  I used Guiltless Gourmet baked corn chips which do faintly taste like cardboard but become delicious in this dish.  I topped it with this guacamole.

Olive oil
1 medium onion, diced
1 15-oz. can diced tomatoes, drained well
1½ cups frozen corn
1 15-oz. can black beans, drained
2 tbsp. fresh lime juice
1 tsp. salt
½ tsp. freshly ground black pepper
5 oz. fresh spinach or Swiss chard
2 cups crushed baked tortilla chips
¾ cup grated Cheddar cheese
2 cups red salsa of your choice

Preheat the oven to 350°F.  Heat a large sauté pan over medium heat and then add just enough olive oil to coat the bottom.  Sauté the onions for about 8 minutes, until translucent.  Stir in the tomatoes, corn, black beans, lime juice, salt and pepper and continue to sauté for another 5 -10 minutes, until just heated through.

Meanwhile in another pan, cook down the spinach until it is wilted, adding it to the pan in batches if necessary.  Set aside.

Prepare an 8 x 8-inch casserole dish or baking pan with a very light coating of oil.  Spread half of the crushed tortilla chips on the bottom.  Spoon the sautéed vegetables over the tortilla chips and sprinke on about two-thirds of the grated Cheddar.  Arrange the greens evenly over the cheese and spoon on half the salsa.  Finish with the rest of the tortilla chips and top with the remaining salsa and Cheddar.  Bake for about 35 minutes, until the cheese is bubbling and beginning to brown.


« Older Posts Newer Posts »