Archive for January, 2011

Herbed and Spiced Goat Cheese Balls

January 9, 2011

I’m really late in saying this but Happy New Year!!  I’m curious – what did you all do?  We were lucky enough to have a night out this year.

I spent my 20’s feeling like New Year’s Eve was Very Important.  I had to be doing just the right thing, otherwise it was disappointing.  The problem is, I never figured out what just the right thing was so I was always disappointed.  I spent Y2K in an uncomfortable skirt, heels that were too high, at a very expensive party where they ran out of wine by 9:30, wondering why I didn’t lower my expectations a little.

Once I did, New Year’s became just another fun night out.  Or in.  Some of the best that I have spent have been with close friends in someone’s home.  Since having kids, going out has become a little trickier.  Our babysitters all have social lives and often they include big plans for the big night.  Occasionally, Randy’s parents come to town right after Christmas and we have built in babysitters.  Such was the case this year.

My friend Julie rallied a small group of us and we had a 9:30 reservation at a local favorite Cantinetta.  I like to eat late but 9:30 is pretty extreme for Americans.  We decided to have everyone come over to our house for a nibble and a glass of champagne.  Knowing a big dinner was on the horizon, I wanted to make something relatively small and light but substantial enough to hold us until dinner was served.  I also had a lot of cooking in my future and didn’t want to spend a whole lot of time on a nibble.

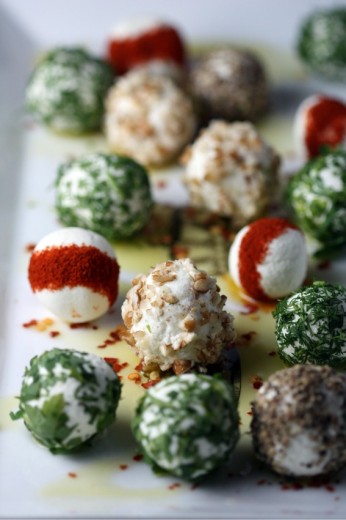
Because we entertain a lot and because I have catered several parties, I have a lot of appetizers in my back pocket.  But nothing seemed right.  In those cases, I turn to Martha Stewart and as usual, she had the perfect thing.  These little balls of goat cheese are about marble size and take no more than 10 minutes to prepare.  You can really roll them in anything.  I chose some things I had on hand – parsley, dill, pecans, black pepper, and took her advice for rolling them in paprika to get that stripe.

One Year Ago: Petites Pissladières
Two Years Ago: Poblano and Cheddar Stuffed Mushrooms

Herbed and Spiced Goat Cheese Balls
Adapted from Martha Stewart’s Hors d’Oeuvres Handbook
Makes about 3 dozen

1¼ pounds soft goat cheese
2 tbsp. finely chopped parsley
2 tbsp. finely chopped dill
2 tbsp. finely chopped pecans
1 tbsp. freshly cracked black pepper
2 tsp. paprika
2 tbsp. olive oil
1 tsp. red pepper flakes

Line a baking sheet with parchment paper.  Form 1 tablespoon of the goat cheese into a small ball.  Transfer to the baking sheet.  Continue with the remaining cheese.  Refrigerate the balls for 10 minutes to set slightly.

In separate bowls, place the parsley, dill, pecans, and pepper.  Roll several balls in each of the coatings and set aside.  To make the paprika band, sprinkle the paprika in a straight thin line on a cutting board.  Straighten the edges of the paprika with a knife.  Roll some of the balls down the line to form the paprika strip.

Pour the olive oil onto a serving platter.  Sprinkle the oil with the red pepper flakes.  Arrange the goat cheese balls on the platter and serve with toothpicks.


Hot Soup, Cold Day

January 6, 2011

We have had some cold weather here in Seattle recently.  Cold here means high 30’s during the day and well below that at night.  I know for those on the East coast and in the Midwest, this is small potatoes.  It makes me realize what a true weather wimp I am.  Rain, endless gray days, darkness at 4pm – all those things I can handle.  Extreme temperatures though?  I can’t.  Randy likes to joke that I am only comfortable if it is between 70 and 75 degrees and I think that is about right.  Too hot and I am miserable, too cold and I am miserable.  This makes it nearly impossible for me to live anywhere other than Seattle, Portland, San Francisco, and perhaps San Diego.  (I could live in London or Paris though.)

One nice thing about a relatively mild (read: rainy) climate is that, except for a few staggeringly hot days each summer, we can enjoy soup all year.  I am a big fan of soup for many of the same reasons that most people are.  It tends to be easy, you can easily feed a lot of people, it can be very healthy, and soup keeps well.  Many soups taste better a day or two (or even three) after they have been made.  Busy families need soup.

I am a sucker for any Asian soup, especially those involving rice noodles.  I love eating pho, the rock star Vietnamese rice noodle soup, at my favorite joint in any season. For how much I love this kind of soup, I don’t make it all that often.  I recently paid a pretty penny for a cookbook from Australia because I was blinded by the fact that there was a delicious sounding pho recipe in there.  The book was small and now I fear it is at the bottom of a toy box covered with trucks, trains, and construction vehicles.  So I made this soup instead.

Something I really liked about this version was how much flavor the broth brought to the bowl.  I’ve made Asian vegetable stock for various thing before but somehow this was much better.  Yes, you cheat a bit by using a small amount of pre-made veg stock, but if you use a good one (Rapunzel is the only brand I like) you end up with an incredibly flavorful base for your soup.  One that tastes like it’s been simmering for hours, not 20 minutes.

Noodle Soup Previously on Dana Treat: Asian Coconut Noodle Soup

Tofu and Shiitake Noodle Soup
Adapted from Food & Wine
Serves 3-4

There was originally one pound of eggplant in this soup as well but I have very specific ideas of where eggplant should be.  Not in Asian noodle soup for example.  I used a pad thai width noodle here but the super thin kind would be great too.  If you use those, I would do 4 ounces instead of 6 ounces.

3 cups vegetable broth
2 cups water
2 whole lemongrass stalks, thinly sliced
Six ¼-inch thick slices of fresh ginger, smashed slightly, plus 1 tbsp. very finely chopped fresh ginger
¼ cup soy sauce
Freshly ground white pepper
6 ounces rice vermicelli
Vegetable oil
¼ pound shiitake mushrooms, stemmed and caps quartered
Salt
2 garlic cloves, very finely chopped
1 pound firm flavored tofu, such as Thai, cut into 1-inch cubes
½ a Napa cabbage, thinly sliced
½ cup bean sprouts
¼ cup cilantro leaves
2 tbsp. mint leaves, torn
Lime wedges and hot sauce for serving

In a medium soup pot, combine the vegetable broth, water, lemongrass, sliced ginger, and soy sauce and season generously with white pepper.  Bring to a simmer, cover, and cook over low heat until flavorful, about 20 minutes.  Strain the broth into a heatproof bowl, pressing on the solids.  Discard the solids.

Meanwhile, bring a medium saucepan of water to a boil.  Cook the rice vermicelli until al dente, about 5 minutes.  Drain and cool under running water.

Wipe out the soup pot and heat just enough vegetable oil to coat the bottom.  Add the mushrooms, season with salt and white pepper, and cook over medium-high heat, stirring occasionally, until softened and browned, about 5 minutes.  Stir in the chopped ginger and garlic and cook until fragrant, about 1 minute.  Add the tofu along with the vegetable broth, cabbage and noodles and simmer just until the cabbage is wilted, about 2 minutes.  Stir in the bean sprouts, cilantro and mint and season the soup with salt and white pepper.  Serve the soup in deep bowl.s passing lime wedges and hot sauce at the table.


Yeasted Coffee Cake

January 4, 2011

I don’t know about you, but our December was a bit insane.  I remember looking at our calendar in November and thinking that the holidays were going to be relatively quiet around here.  We didn’t have much going on.  And then, the onslaught.  We had so many events and parties to go to which was wonderful –  I enjoyed all of it so much.  Our evenings were so busy that we ended up making a lot of brunch plans with friends.  And brunch plans mean coffee cake.

As of this moment, I have four coffee cakes I have not yet told you about.  The rule follower in me would probably post about them in chronological order, but I had mildly frenzied requests for the recipe for this cake.  I made it a couple of days ago for a brunch with high school friends and seeing as half the people asked me to write about it, this cake jumps to the top of the heap.

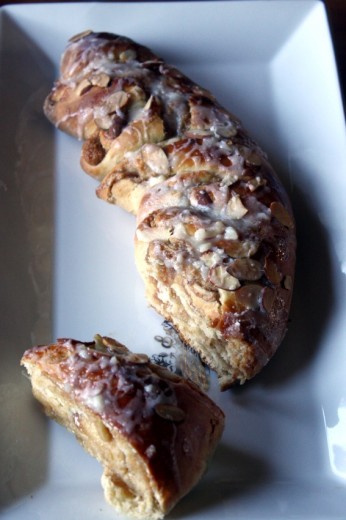
This is probably the third or fourth time I have made this coffee cake and everyone always goes crazy for it.  It is an old-fashioned yeasted coffee cake with an almond filling and one of the many wonderful things about this recipe is that it makes two of them.  You can either serve them both, or you can wrap one up (before baking) and freeze it for another time.  When just out of the oven, they are horseshoe or ring shaped.  I baked mine at our friends’ house because I misjudged the timing and I did not bring my camera – this photo shows the aftermath of the second cake.  The first was devoured.

These are not hard to make.  Take your time, follow the directions carefully and you will be thrilled with the result.  This recipe comes from Cook’s Country who are the same folks as Cook’s Illustrated so you know the recipe was tested to perfection.

One Year Ago: Pasta with Olive Sauce
Two Years Ago: Curried Red Lentil Stew

Cinnamon Almond Ring Coffee Cake
Adapted from Cook’s Country
Makes 2 rings, each serving 8-10

Filling
1 tube almond paste (7 ounces)
6 tbsp. confectioners’ sugar
2 tbsp. dark brown sugar
1½ tsp. ground cinnamon
4 ounces cream cheese, softened

Dough
1 1/3 cups warm milk (110ºF)
1/3 cup honey
1 stick (½ cup) unsalted butter, melted
3 egg yolks (reserve whites for topping)
2 tsp. vanilla extract
4½ cups flour, plus extra for work surface
1 package rapid-rise or instant yeast
2 tsp. salt

Topping
3 large egg whites
½ cup sliced almonds
1½ cups confectioners’ sugar
2 ounces cream cheese, softened
2 tbsp. milk
½ tsp. vanilla extract

For the filling
Fit stand mixer with paddle attachment and mix almond paste, confectioners’ sugar, dark brown sugar, cinnamon, and cream cheese until smooth.  Cover with plastic wrap and refrigerate until ready to use.

For the dough
Adjust oven rack to upper-middle and lower-middle positions and heat oven to 200ºF.  When oven reaches 200, shut it off.  Lightly grease large bowl with nonstick cooking spray.  Line two baking sheets with parchment paper.

Mix milk, honey, melted butter, yolks, and vanilla in large measuring cup.  Mix flour, yeast, and salt in bowl of standing mixer fitted with dough hook.  Turn mixer to low and slowly add milk mixture.  After dough comes together, increase speed to medium and mix until shiny and smooth, 4 to 6 minutes.  (Dough will be sticky.)  Turn dough onto heavily floured work surface, shape into ball, and transfer to greased bowl.  Cover bowl with plastic wrap and place in turned-off oven until dough is nearly doubled, about 20 minutes.  (DT: In my experience, the dough does not rise much at all at this point.  I just continue with the recipe and always get a nice risen final product.)

On lightly floured work surface, divide dough into 2 equal pieces.  Working with one piece at a time, roll dough into 18-by-9-inch rectangle with long side facing you.  Spread with half of filling and roll up dough.  Brush top edge with water, then press to seal and transfer, seam side down, to parchment lined baking sheet.  Repeat with remaining dough and filling.  Shape each cylinder into a ring or horseshoe.  Using paring knife, make cuts around outside of dough, about 1½ inches apart, leaving about an inch of intact dough at the top of your cut.  In other words you are making slices but keeping the cake together as one unit.  With your fingers, turn each “slice” of dough so that the filling is showing.

Cover with plastic wrap coated with cooking spray and return to oven until rings have puffed slightly, 30 to 40 minutes.  remove from oven and heat oven to 375ºF.

For the topping, whisk reserved egg whites in a small bowl, then brush rings with egg whites.  Sprinkle with almonds and bake until deep brown, about 25 minutes, switching and rotating pans halfway through baking.  While rings are baking or cooling, whisk confectioners’ sugar, cream cheese, milk, and vanilla in small bowl until smooth.  Drizzle icing over baked coffee cakes and serve warm.  (DT: Warm is ideal, room temperature is nearly as delicious.)


Happy Birthday Randy

January 3, 2011

First things first.  The chocolate winners.  My trusty assistants picked their numbers, I took their picture, and I accidentally deleted that picture.  I just realized this.  So, I turned to a random number generator which gave me the following:

38 86

Random numbers generated Jan 2 2011 at 16:14:41 by www.psychicscience.org
Free educational resources for parapsychology, psychical research & mind magic.

So, #38 is Jackie whose best gift was healthy children and a hot shower without interruption from children (I completely understand the value of that gift).

#86 is Sonnet whose best gift was coming home to a cat who had not ripped up her apartment!

Please contact me within a week at danatreat{at}gmail{dot}com so I can get your addresses!

Thank you to everyone who shared your holidays gifts.  I was so moved by many of the things I read.  I have such thoughtful readers!

I know this first post of the new year should be something healthy, right?  Has everyone gone on their post holiday/resolution diet?  Well today, January 2nd, is Randy’s birthday.  It is probably the worst day to have a birthday of the entire year.  Everyone is sick of eating, drinking, spending money, and partying.  Everyone has just given up drinking, or sworn off dessert, or vowed to put a hold on spending.  Poor guy.  So I always try and do something nice for his birthday.  And I always bake.  This year, his parents are in town so we are having a weekend-long celebration and we are also doing a party next weekend.

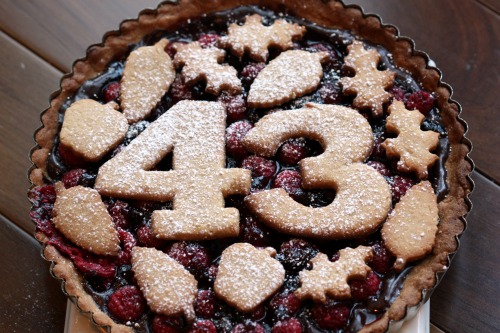
This is a riff on a linzer tart.  Rather than be filled with just jam, it has a layer of chocolate and fresh raspberries.  And rather than the traditional lattice crust, you cut out cookies from the crust dough to make a more playful presentation.

Years and years ago, before I was much good at baking, my mom made this tart to bring to Christmas dinner.  I fell in love with it as did everyone at the table.  She confided in me that it was actually surprisingly easy to make.  I was having friends over for dinner a week later and I decided to make the tart.  My friend John asked me, in all seriousness, where I had bought it, and my journey on the baking path started.  I made this lovely dessert several times that year, always to rave reviews, and then it fell by the wayside.

In thinking of desserts for Randy’s birthday, I came back to this tart.  It was just time for it to reappear in my life.  I know that in previous incarnations, I have used small heart cookie cutters or small star cookie cutters for the top, but in looking for them, I found my number cookie cutters from my childhood.  So yes, Randy turns 43 today.  Happy birthday honey!

One Year Ago: Chickpea. Lentil and Vegetable Stew and Orecchiette with Roasted Beets, Fennel, and Toasted Almonds

Linzer Tart
Makes one 9-inch tart

The recipe I have is copied from my mom’s and is in my own handwriting.  I’m not sure where it came from originally but probably either Bon Appétit or Gourmet.  In my experience, the jam that is brushed on the berries make the topping kind of wet.  You will want to carefully put the cookies on top so they don’t get soaked and ruin the look.  I would not travel with this tart for that reason.

Crust
2/3 cup golden brown sugar, packed
1 stick (½ cup) unsalted butter, room temperature
1 egg
1½ cup flour
½ cup ground toasted blanched almonds
¾ tsp. cinnamon
½ tsp. baking powder
½ tsp. salt

Filling
6 ounces bittersweet chocolate, chopped
2 pints fresh raspberries
½ cup seedless raspberry jam
Powdered sugar

Beat the sugar, butter, and egg until creamy.  Add flour, almonds, cinnamon, baking powder, and salt.  Beat until just well combined.  Measure ¾ cup of the dough.  Flatten that portion into a disk, wrap in plastic, and put in the refrigerator.  Using floured fingertips, press the remaining dough into bottom and up sides of a 9-inch tart pan.  Pierce several times with a fork.  Refrigerate at least one hour and up to one day.

Roll out the rest of dough on floured surface to ½-inch thickness.  Use 2 or 3-inch star cookie cutters and cut out as many cookies as possible.  Do not reroll dough.

Preheat oven to 375ºF.  Bake crust until light golden, pierce with toothpick if it bubbles, about 15 minutes.  Put on rack and cool.  Bake cookies about 6 minutes until light golden.  Transfer to a rack and cool.

Melt the chocolate in a double boiler or a bowl set over a pan of simmering water.  Spread the chocolate over the cooled crust.  Arrange berries over the chocolate, spacing evenly.  Stir the jam in a small saucepan until liquid and smooth.  Carefully brush the jam over the berries.  Bake for about 30 minutes, covering with foil if the crust starts to get too brown.  Transfer to a rack and cool.

Once completely cool, arrange the cookies on top so they are touching.  Dust with powdered sugar.  Serve with whipped cream or ice cream.


Newer Posts »