Category: Yoga Retreat Food

Happy Birthday Dip

May 18, 2010

How to write about a getaway with some of the coolest, funniest, most interesting, kindest women I have ever known?  A night spent in celebration of a truly special and life-long friend?  On a beautiful island in a beautiful setting?  Not easy.  So how about some photos.  And a win-friends-and-influence-people recipe for dip.

Signs near the farmers’ market in Bayview.

The birthday girl, setting the table for lunch.

The outermost point on the property.  If I had a better lens, you would see a full mountain range in the background.

So many lovely places to sit and enjoy the beauty.

One of the friends brought beads for each of us to make bracelets.  The charm says “Jen Zen”.

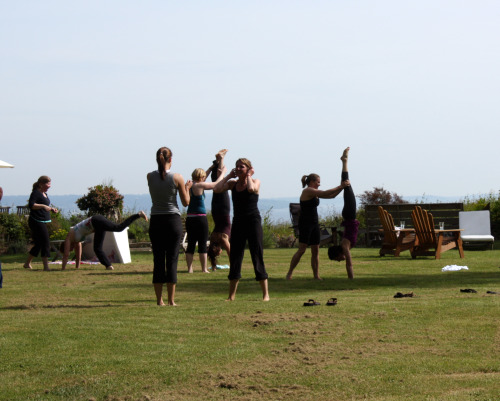
4pm yoga was optional.  It was amazing to practice outside.  That is me in the purple shirt off to the right attempting a handstand without help.  (Didn’t happen.)

The grass was perfect for a headstand though.

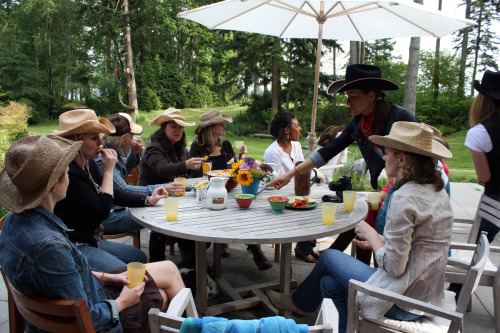
Jen requested cowgirl attire for dinner.

She was one of the most well-behaved (and beautiful) cowgirls at the party.

(This photo is actually from last week’s yoga retreat.)

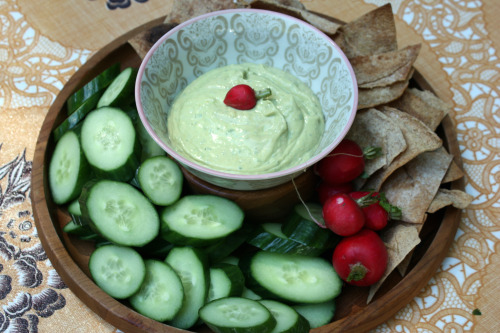
And dip!  I made this dip twice in a week and both times it got devoured.    People dig in expecting something mildly sour, as so many dips are, and are surprised by the lusciousness of it.  This dip gets its rich texture from avocado, silken tofu, and yogurt.  The interesting flavor comes from curry powder and mint.  The mix sounds unpromising, but the empty bowls speak otherwise.   Jen’s sister, after learning about the healthy mix of ingredients, told me, “I’ve been dipping delicately since I assumed it was really fattening.  Now I’m going to dig right in!”.

Curried Tofu-and-Avocado Dip
Adapted from Food and Wine
Makes about 2 cups

1 12-ounce box silken tofu
1 large or 2 small Hass avocados, peeled, pitted, and coarsely chopped
1/3 cup low-fat sour cream
1/3 cup low-fat plain yogurt
Zest and juice of 1 lime
1 garlic clove
2 tsp. honey
1½ tsp. curry powder
3 tbsp. chopped mint
Salt and freshly ground pepper.

In a food processor, combine everything except the salt and pepper.  Process until completely smooth, then season the dip to taste.  Chill until cold.  This dip will keep for two days in the refrigerator, but the top layer will turn brown-ish because of the avocado.  I suggest storing it in a cylinder-shaped container (such as a large yogurt container) which has a smaller top surface area.


Dynamic Duo

May 11, 2010

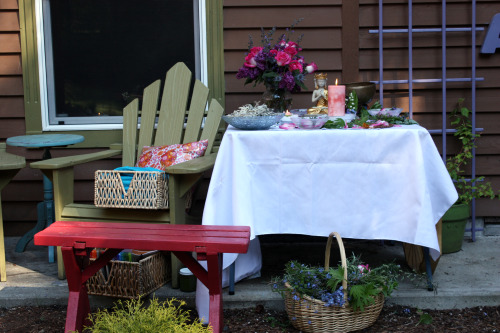
The beautiful shrine set up outside Jen’s studio.
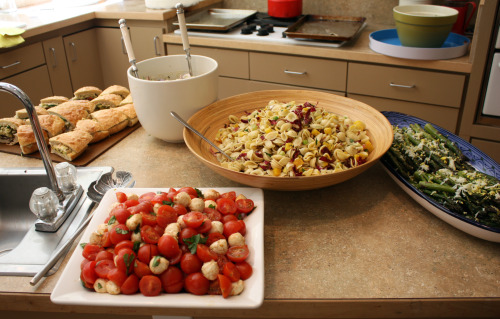
The food inside the house.

This past Saturday, I was off to another yoga retreat on Bainbridge Island with my friend Jen.  There are many reasons I treasure these day-long retreats.  One is getting to spend some time with one of my oldest and dearest friends.  Another is that I get to participate in two challenging and invigorating yoga classes.  Another is sharing in this incredible community of women.  And I love getting the chance to cook for those deeply appreciative and very hungry yoginis.

In general, lunch is funny for me.  I usually either eat it out, or scarf down something I would be embarrassed to tell you about before running off to pick up my kids.  I almost never actually prepare something for myself, so it is always a fun challenge to come up with lunch menus for these retreats.  I want to make something hearty yet not heavy and I want there to be plenty of variety.  Even though I almost never eat sandwiches myself (I find them either too spare or too greasy), I try to come up with a new one for each retreat.  Hungry women need sandwiches.
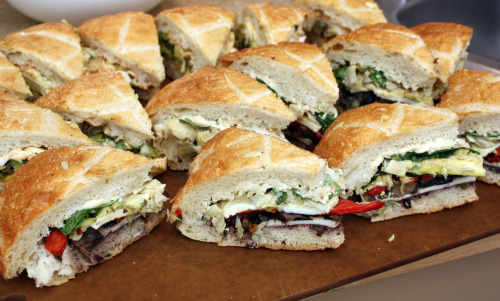
I’ve been on a bit of a creative roll here at Dana Treat.  After feeling tied to my cookbooks for most of my cooking life, I have been branching out and trusting myself more.  This time I had the idea to take the idea of a pan bagnat and run with it.  A pan bagnat is made using a large round of bread which is cut in half, innards scooped out, then stuffed with all manner of things, but traditionally including olives, hard-boiled eggs, and tuna.  The sandwich is made the day before you plan to serve it, wrapped tightly, and stored in the refrigerator so the flavors have a chance to meld and some yummy juices seep into the bread.  I wanted to use the idea, but change up the inside.  To feed 25 people, I knew I would need at least four of these rounds, so I decided to do two each of two different sandwiches.
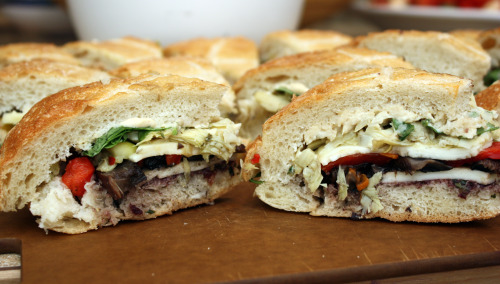
I immediately had an idea for the first one, an Antipasto Sandwich.  I drizzled whole portabello mushroom caps and thick slices of zucchini with olive oil, sprinkled them with salt and pepper, and roasted them in a 425°F oven until they were nice and soft and a little browned.  I allowed them to cool and then thinly sliced them.  To save time, I used jarred roasted red peppers, and store-bought tapenade and hummus (don’t tell anyone!).  I layered it as follows:  tapenade spread on the bottom of the bread, roasted red peppers, portabello slices, provolone cheese, zucchini slices, chopped marinated artichoke hearts, more cheese, arugula leaves, and hummus spread on the top of the bread.  This sandwich came together easily in my mind and it worked beautifully in practice.  It also held together well under the serrated knife although the bottom of the bread got a little soggy from the tapenade.  No one complained.
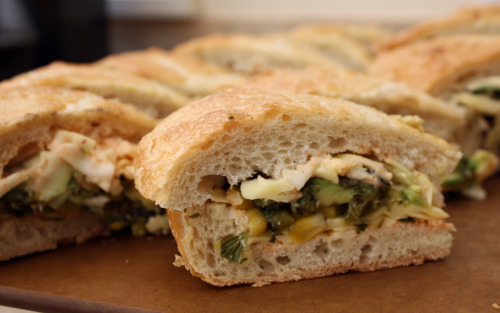
The second creation I mulled over for longer.  I had seen a recipe for a sandwich with jack cheese, avocado slices, and a tomatillo/sour cream spread.  Good, but not quite hearty enough for this kind of bread or this kind of eater.  I decided to make a type of corn salsa with scallions and roasted tomatillos, poblano peppers, and cilantro.  I kept the avocado and the jack cheese and moistened the bread with a remoulade sauce made famous by none other than Jen herself.  She serves it with fish tacos and I knew the flavor would work here.  Finally, because I had some and felt like I needed one more layer, I tossed some thinly sliced cabbage with more of the remoulade to make an instant coleslaw and piled that on top.  That sandwich was a little trickier to cut – the filling kept wanting to ooze out the sides – but the flavors were fantastic.  Really unusual for a sandwich and I like unusual.  I’m dubbing that one Corn Salad Sandwich with Tomatillos, Poblano Peppers, and Jack Cheese.

Everyone loved the sandwiches which I think is a great success seeing as I had never made them before and was guessing and hoping it would all come together.
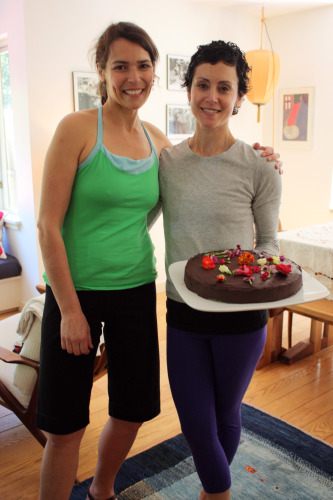
Oh, you thought “Dynamic Duo” referred to my sandwiches?  No, I meant me and Jen.  Yes, that is a birthday cake – her 40th is next week.  Recipe coming soon.  For now, my “unusual” sandwich.

(Don’t forget, I’m giving away Mario Batali’s new cookbook and a bag of the most delicious sun-dried tomatoes.  Enter by leaving a comment on this post by this Friday at noon PDT.)

One Year Ago: Moroccan Carrot and Hummus Sandwiches

Corn Salad Sandwich with Tomatillos, Poblano Peppers, and Jack Cheese
Dana Treat Original
Serves 4-8 depending on how you cut the sandwich

This looks like a long recipe but parts of it can be done in advance and I swear it will take you longer to gather the ingredients for the remoulade than it will to mix it together.  Don’t forget, the whole sandwhich needs to spent the night in the refrigerator for maximum flavor, so plan ahead.

When all is said and done, you may have leftover corn salsa.  I don’t need to tell you the many ways that you could use that delicious stuff, but Randy topped grilled salmon with it and loved it.

For the remoulade:
½ of a small yellow onion, minced
1 stalk of celery, minced
½ cup mayonnaise (I used low-fat)
2 tbsp. ketchup
1 tbsp. chili sauce (I used Sriacha)
10 shakes of Tabasco or other hot sauce
1 tbsp. horseradish
Juice of 1 lemon
Pinch each of paprika and cayenne pepper
Salt and freshly ground black pepper

For the corn salsa:
1 large poblano pepper
1 pound tomatillos, husked and rinsed
1 tbsp. unsalted butter
4 scallion, green and white parts, thinly sliced
1 cup frozen corn
¼ cup cilantro, roughly chopped
Salt and freshly ground black pepper

For final assembly:
¼ head of green cabbage, core removed and thinly sliced
1½ cups shredded Monterey Jack cheese, divided
1 large round bread, preferably sourdough
1 large avocado, thinly sliced

Make the remoulade:
Mix all of the ingredients except the salt and pepper together in a medium bowl.  Season to taste with salt and pepper.  (Can be made up to two days ahead.  Cover and store in the refrigerator.)

Make the corn salsa:
Preheat oven to 400°F.  Place the poblano chili and tomatillos together on one rimmed baking sheet.  Do not oil them, just place them in the oven.  Roast for about 15 minutes total, until the skin of the poblano is turning black and the tomatillos are turning brown and starting to leak their juices.  You will need to turn the poblano periodically so it roasts on all sides.  Give the tomatillos a little shake while you are at it.

Remove sheet from the oven and allow the poblano to cool enough to handle.  Gently remove the skin, it doesn’t matter if you don’t get every speck off, and then pull out the seeds and membranes.  Discard those and the top of the chile.  Put the chile in a food processor along with the tomatillos and any juices left on the baking sheet.  Pulse until puréed.  Set aside.  (Can be made one day ahead.  Cover and store in the refrigerator.)

Heat a large skillet over medium heat.  Add the butter and once it melts, add the scallions.  Sauté for three minutes, just until they start to soften.  Add the corn, give it a good stir, then pour in the poblano mixture along with a good pinch of salt and few grinds of pepper.  Sprinkle in the cilantro and cook, stirring occasionally, until most of the moisture has evaoporated, about 20 minutes.  Set aside.  (Can be made one day ahead.  Cover and store in the refrigerator.)

For final assembly:
Using a serrated knife, cut the bread round in half.  Using your fingers, pull most of the innards out of both the top and bottom of the bread and set aside.  (You can make fresh bread crumbs with this part by allowing them to dry out overnight and then pulsing in your food processor.  Store them in your freezer in storage bags.)  Take about half of the remoulade and spread it over the bottom of the bread round.  Sprinkle with 1 cup of the cheese.  Spoon a generous amount of the corn salsa over top of the cheese.  Lay avocado slices over the salsa, then sprinkle with the remaining ½ cup of cheese.  Put the cabbage in the bowl with the remaining remoulade and mix well.  Put the cabbage down as the top-most layer of the sandwich and cover with the bread top.

Wrap well in plastic and let side in the refrigerator overnight.  Cut into 4 or 8 slices and serve with lots of napkins.


Sometimes You Feel Like a Nut (Sometimes You Don’t)

March 2, 2010

IMG_4837

It’s been a while since I last talked about how I don’t like nuts in baked goods.  So, if you are new here, I don’t like nuts in baked goods.  I like nuts, I like baked goods but I don’t like them together.

And yet, I like people.  I like cooking and baking for people and some people do like nuts in baked goods.  Hence these bars.

For just about every yoga retreat, I have made some kind of cookie and some kind of bar for dessert.  I was leaning heavily toward lemon bars this time but to me, lemon screams spring and this was a winter retreat.  So along came the nuts.

Several years ago, when I was eight months pregnant with my second child and we had just moved into a new house, I thought it was a great idea to tell my then clients that I was making gift bags for the holidays.  One client ordered five large bags and 20 small bags.  Do you call that nesting?  Or maybe you call it being a crazy person?  Either way, every night I was in my brand new kitchen baking my pregnant little heart out.  I made these bars and I filed the recipe away in the “I would never eat this but they sure do look good” category.  Honey.  Mmmm.  I love honey.  Almost enough to eat it with nuts.

IMG_4844

One Year Ago:  Rosemary Flatbread with Blue Cheese Grapes and Honey

Honey Nut Squares
Adapted from Gourmet
Makes 25 1-inch squares

For crust
1 1/4 cups all-purpose flour
2 tablespoons sugar
1/2 teaspoon baking powder
1/4 teaspoon salt
1 stick (1/2 cup) cold unsalted butter, cut into pieces
1 large egg, lightly beaten

For topping
1/3 cup plus 1 tablespoon mild honey
1/4 cup packed light brown sugar
1/8 teaspoon salt
3 tablespoons cold unsalted butter, cut into pieces
1 tablespoon heavy cream
1/2 cup whole almonds with skins, toasted
3/4 cup hazelnuts, toasted and any loose skins rubbed off in a kitchen towel
1/4 cup pine nuts, lightly toasted

Make crust:
Butter a 9-inch square metal baking pan (2 inches deep) and line with 2 crisscrossed sheets of foil, leaving a 2-inch overhang on all sides. Butter foil.

Blend together flour, sugar, baking powder, salt, and butter with your fingertips or a pastry blender (or pulse in a food processor) until most of mixture resembles coarse meal with small (roughly pea-size) butter lumps. Add egg and stir with a fork (or pulse) until a crumbly dough forms.

Turn out dough onto a work surface and divide into 4 portions. With heel of your hand, smear each portion once or twice in a forward motion to help distribute fat. Gather dough together with scraper.

Preheat oven to 375°F.

Press dough evenly onto bottom (but not up sides) of baking pan and bake in middle of oven until edges are golden and begin to pull away from sides of pan, 15 to 20 minutes. Cool in pan on rack.

Make topping:
Bring honey, brown sugar, and salt to a boil in a 2-quart heavy saucepan over moderate heat, stirring until sugar is dissolved, then boil, without stirring, 2 minutes. Add butter and cream and boil, stirring, 1 minute. Remove from heat and stir in all nuts until completely coated.

Pour nut mixture over pastry crust, spreading evenly, and bake in middle of oven until topping is caramelized and bubbling, 12 to 15 minutes. Cool completely in pan on a rack. Lift dessert out of pan using foil overhang and cut into 25 squares.

(Honey nut squares keep, layered between sheets of wax paper, in an airtight container at room temperature 1 week.)


Moving Into Stillness and Making Choices (or Not)

February 28, 2010

IMG_4850

About a year ago, my amazing friend Jen told me her vision for quarterly day-long yoga retreats at her studio.  She wanted to theme each one around the season and asked me if I would participate and also cook lunch for the yogis.  Jen is one of my very closest friends and one of my favorite people in the world, so even if I hadn’t thought it was a good idea, I would have said yes.  But I thought it was a terrific idea and the first retreat happened the Saturday before Mother’s Day last year.  We did one in July, one in October and now, one in February.

Yesterday was the winter one – she called it Moving Into Stillness.  Jen emphasized the need for us to embrace winter and find beauty in it, instead of waiting for it hurry past.  She mentioned the importance of home at this difficult time of year and welcomed us into hers.

Parents of small children – I know you can understand when I say having a day away is one of life’s greatest treasures.  Even just being by myself in the car is precious.  Then throw in a ferry ride, a challenging and invigorating morning of yoga, a lunch prepared by me, time to just hang with incredible women, and then another yoga class, another ferry ride, and more time in the car by myself.  Nirvana or what?

IMG_4851

Now that I have done four of these, I have a rhythm down.  I get to Jen’s house early and unload my car.  Everything cold goes in the refrigerator and everything else goes on the counter in groups of how it will be served.  The menus I plan need to be as simple as possible in terms of last minute prep because I only have about 45 minutes to get it all out and that includes a shower (Jen teaches hot yoga).  Then, I go down to the studio to secure my mat space and Jen and I get a few moments of talking time before she and I are both “on”.

If you are lucky, you have had a wonderful teacher in your life.  Maybe you have had several.  I had a tremendous 3rd grade teacher, a 9th grade English teacher who taught me how to write, math teachers all through high school who sat with me patiently and explained things over and over, and a physics professor in college who gave me a “B” even though I was doing “C” work because I tried hard.  And now, Jen.  I have taken and taught a lot of yoga classes in my life.  I have never had a teacher like her.  She manages to make the class extremely challenging and extremely approachable.  She gives very clear and yet minimal instructions on the poses and talks more about real life.  Honoring yourself.  One of my favorite things she says is, “Try easy.  We are always told to try harder.  Try easy.”  She speaks in English, not yoga speak and she is very real.

IMG_4854

After a morning of intense self-focus using poses and breath, it always feels a bit weird to change into frantic trying-to-get-the-food-out mode.  But I know everyone is hungry (including me) so I do my best to hurry.  I worry the entire time that I don’t have enough food.  If I made enough to feed 100 (we were 21 this time), I would still worry.

IMG_4828

One thing I never have to worry about is dessert.  Things can be made in advance and people are so appreciative of a home-baked treat.  Especially after sweating their guts out in a challenging class.  This time I made Honey Nut Bars (recipe coming soon) and these cookies.

Sometimes making choices is great and sometimes it is nice to have a choice made for you.  This cookie makes a choice for you.  Rather than having to decide between a cookie and a brownie, this recipe just combines them for you.  Yes, those chunks are brownies.  There are lots of nice things about this recipe, one of them being that you only use half the pan of brownies in the cookies.  The other half can either be served just as brownies, or you can freeze them for next time.

IMG_4835_picnik

One Year Ago:  Oatmeal Chocolate Chunk Cookies

Brownie-Chunk Cookies
Adapted from Bon Appétit
Makes approximately 30 cookies

Take note that you will need to refrigerate the brownies overnight before using them in the cookies.

2½ cups flour
1 tsp. baking soda
¼ tsp. salt
1 cup (2 sticks) unsalted butter, room temperature
1 cup (packed) golden brown sugar
½ cup sugar
2 large eggs
1 tsp. vanilla extract
1 cup walnuts, coarsely chopped
½ recipe (½ sheet) chilled Old Fashioned Brownies (recipe follows), cut into ½-inch pieces

Preheat oven to 350°F.  Whisk first 3 ingredients in medium bowl.  Beat butter and both sugars in large bowl until smooth.  Beat in eggs and vanilla.  Sir in dry ingredients, then walnuts.  Gently fold in brownies cubes (brownies may crumble).

Fill a small bowl with water.  Dip ice cream scoop in water, scoop batter; drop onto cookie sheets, spacing about 2 inches apart and dipping scoop as needed.  Using moist fingertips, flatten mounds to 1-inch thickness.

Bake cookies, 1 sheet at a time, until just golden – 15 to 18 minutes.  Remove cookies to cooling rack.

Old-Fashioned Brownies
Makes one 13×9 – inch brownie sheet

5 ounces unsweetened chocolate, chopped
½ cup (1 stick) unsalted butter, diced
2 cups sugar
2 tsp. vanilla extract
4 large eggs
¼ tsp. salt
1 cup flour

Preheat oven to 350°F.  Line 13x9x2 – inch metal baking pan with foil, leaving overhang.  Stir chocolate and butter in heavy large saucepan over low heat until melted and smooth.  Cool 15 minutes.

Whisk sugar and vanilla into chocolate mixture, then whisk in eggs and salt; stir in flour.  Spread batter in prepared pan.

Bake brownies until tester inserted in center comes out with moist crumbs attached, about 20 minutes.  Cool in pan.  Cover and chill overnight.

Using foil as aid, lift brownie sheet from pan and cut in half to use in cookies.  Serve other half (cut into squares) or wrap well in foil and freeze for up to one month.


Apple Pie Bars

October 30, 2009

IMG_3679

Sometimes you need a lot of treats.  Maybe you are having a big party or have a weekend’s worth of events coming up and want to bring something to each one.  Or perhaps you are incredibly well-organized and want to stock your freezer full for the family that is coming over the holidays, plus still have something to give to your kids’ teachers.

If any of the above fits you, I would advise you to make these Apple Pie Bars.  If you like the look of them but don’t know what you would do with 48 of them, I would not advise you to make them.  I made them for last weekend’s yoga retreat and I only brought about half of them and then only about half of them got eaten.  I felt like everywhere I looked in my life there were apple pie bars.  They were like little bunnies, just multiplying and multiplying.

This is not to take anything away from what is a really lovely treat.  It’s really like a slice of apple pie but in pick-up-and-eat bar form.  Aside from the task of peeling and slicing 12 apples, it’s not a lot of work for a lot of bars.  I didn’t freeze mine, but the recipe says you can and wouldn’t it be nice to have a big batch to pull from now and then?  The recipe also says you can make them up to four days ahead and keep them at room temperature but I will tell you that the crust gets a little soggy after a day or two.  No flavor is compromised, just not as crisp.

IMG_3684

One Year Ago:  Zucchini Soup

Apple Pie Bars
Adapted from Food and Wine
Makes 48 large bars

Whenever I bake with apples, I almost always use Granny Smith.  They are readily available and while they are not what I would choose to eat out of hand, they are wonderful for baking.  I like that they keep their structure more than other apples (i.e. don’t become mush) and I also like that they are on the tart side.  To me, apple desserts should have some play on sweet and sour.

Crust
3 sticks unsalted butter, softened
3/4 cup sugar
3 cups flour
1/2 tsp. kosher salt

Filling
6 tbsp. unsalted butter
1/2 cup light brown sugar
12 Granny Smith apples (about 6 pounds) – peeled, cored and thinly sliced
1 tbsp. cinnamon
1/4 tsp. freshly grated nutmeg
1 cup water, as necessary

Topping
3/4 cup walnuts
3 cups quick-cooking oats
2 cups flour
1 1/2 cups light brown sugar
1 1/4 tsp. cinnamon
1/2 tsp. baking soda
1/2 tsp. kosher salt
3 sticks unsalted butter, cut into 1/2-inch cubes and chilled

1.  Make the crust.  Preheat the oven to 375°F.  Line a 15-by-17-inch rimmed baking sheet with parchment paper.  In a standing electric mixer fitted with a paddle, beat the butter with the sugar at medium speed until light and fluffy, about 2 minutes.  At low speed, beat in the flour and salt until a soft dough forms.  Press the dough over the bottom of the prepared pan and 1/2 inch up the side in an even layer.  Bake in the center of the oven for about 20 minutes, until the crust is golden and set.  Let cool on a rack.

2.  Meanwhile, make the filling.  In each of 2 large skillets, melt 3 tablespoons of the butter with 1/2 cup of the light brown sugar.  Add the apples to the skillets and cook over high heat, stirring occasionally, until softened, about 10 minutes.  Stir half of the cinnamon and nutmeg into each skillet.  Cook until the apples are caramelized and very tender and the liquid is evaporated, about 10 minutes longer; scrape up any bits stuck to the bottom of the skillet and add up to 1/2 cup of water to each pan to prevent scorching.

3.  Make the topping.  Spread the walnuts in a pie plate and toast until golden and fragrant, about 8minutes.  Let cool, then coarsely chop the walnuts.  In a large bowl, mix the oats with the flour, light brown sugar, cinnamon, baking soda and salt.  Using a pastry blender or two knives, cut in the butter until the mixture resembles coarse meal.  Stir in the walnuts and press the mixture into clumps.

4.  Spread the apple filling over the crust.  scatter the crumbs on top, pressing them lightly into an even layer.  Bake in the center of the oven for 1 hour, until the topping is golden; rotate the pan halfway through baking.  Let cool completely on a rack before cutting into 2-inch bars.

Make ahead: The bars can be stored in an airtight container at room temperature for 4 days or frozen for a month.


« Older Posts Newer Posts »