Category: Tart

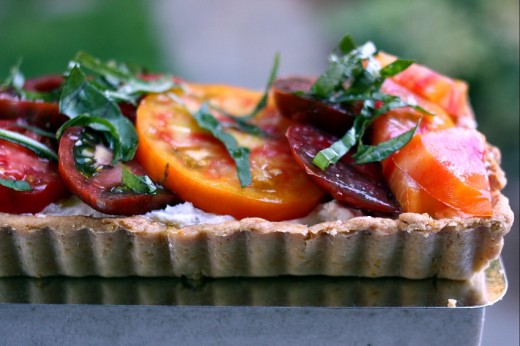
End of Summer Heirloom Tomato Tart

September 18, 2011

Uh oh.  I think I may have waited a bit too long to share the recipe for this tart with you.  Feel that?  Smell that?

Fall.

September in Seattle actually means the end of summer produce-wise.  Those things that many of you get in July (squashes, tomatoes, corn, etc) we don’t really get until September.  I’ve said this before but as amazing as our markets are in the peak of summer – tables filled to every square inch with berries, peaches, peas, green beans – fall is the produce season that makes me swoon.  Heirloom tomatoes, corn, and summer squash sit right next to booths with winter squash, carrots, eggplants, and all manner of peppers.  For the next six weeks or so, I will be a very happy shopper.

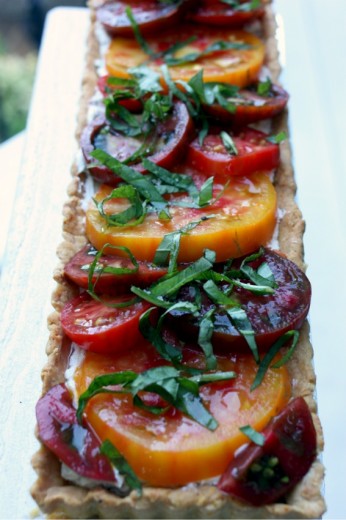
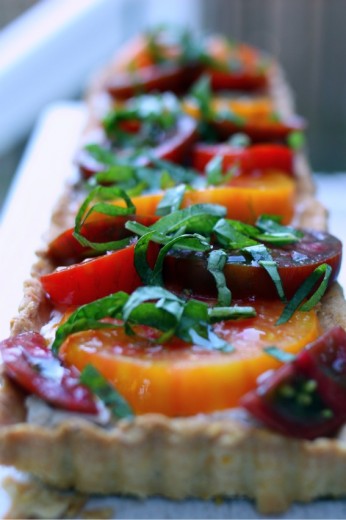
This lovely tart was inspired by three things.  One, my new rectangular tart pan.  Two, a similar tart that Ashley made last summer in a class I attended.  Three, a crust from this book I keep yammering on about.  Ok, four – those gorgeous tomatoes that keep calling my name.  This is actually quite simple.  A cornmeal studded crust, soft goat cheese mixed with fresh basil, perfect tomatoes, salt.  Oh all right, I did use a secret weapon.

Rather than just drizzle the top with olive oil, I took a cue from Purple Citrus & Sweet Perfume and mixed together some pomegranate molasses, lemon juice, and olive oil.  I drizzled that simple but intoxicating mixture sparingly over the top and gave it a healthy sprinkle of sea salt.  You know how once in a while you take a perfect bite?  What is in your mouth is an ideal mix of texture and flavor?  This tart is full of those bites.  The cornmeal in the tart dough gives it a delightful crunch and a bit of sweetness – also, the crust has more heft which is a nice contrast for the creaminess of the goat cheese.  The tomatoes, of course, are the star but they are certainly helped along by the sour punch of the lemon and pomegranate molasses.  I hope you don’t have to wait until next year to give this a try.

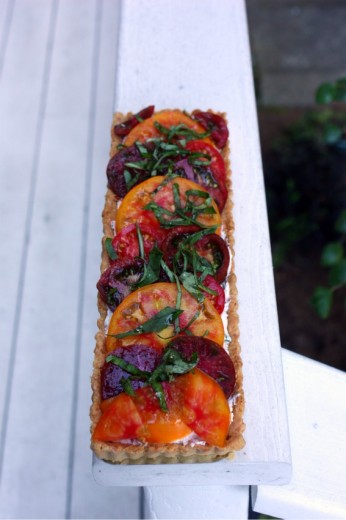
One funny note.  I balanced the tart on the railing of our deck for these photos.  I am a bit vertically challenged and was having trouble getting enough distance from it to get a good photo.  I didn’t want to put it on the ground.  Randy, who is 9 inches taller than I am, offered to take a shot.  So here is the view from 6 feet.

One last piece of news!  My friend Jen and I are doing another yoga retreat together on October 1st.  These dates always sell out which is why I’ve never mentioned them beforehand.  This time, with the busy fall that we are all diving into head-first, there are a few spots.  Come join us on Bainbridge Island for the most amazing yoga day complete with lunch made by me.  Details are here.

One Year Ago:  Peach and Heirloom Tomato Salad
Two Years Ago:  Nutella Pound Cake (probably the most popular recipe on my site)

Heirloom Tomato Tart with Basil Goat Cheese and Cornmeal Crust
Dana Treat Original (inspired by many)
Serves 6-8

If you don’t have a 14 x 4-inch rectangular pan, this can also be made in a 9-inch round tart pan.  I also made mini tarts for a party and used colorful cherry tomatoes as the topping.  You will have left over pomegranate molasses mixture but it’s pretty great on just about any vegetable.

For the crust
1 1/3 cups flour
¼ cup yellow cornmeal
½ tsp. kosher salt
½ cup (1 stick) unsalted butter, cut into small pieces and chilled
1 large egg, beaten

For the tart
8 ounces soft goat cheese, such as Montrachet
2 tbsp. heavy cream
¼ cup (packed) basil leaves, sliced into thin ribbons, plus additional for garnish
Kosher salt and freshly ground black pepper
6-8 (depending on size) heirloom tomatoes, mixture of colors
2 tbsp. pomegranate molasses
2 tbsp. lemon juice
6 tbsp. olive oil
Sea salt

Make the crust
Place the flour, cornmeal, and salt in the bowl of a food processor fitted with the metal blade.  Process until well combined.  Add the butter and pulse until the mixture resembles bread crumbs.  Add the egg and process until the mixture comes together.  Dump the dough out onto a lightly floured board and knead to bring it together into a cohesive mass.  Flatten into a rough rectangle, wrap in plastic wrap, and refrigerate for 2 hours.

Preheat the oven to 400ºF.  Roll the pastry out into rectangle about 1/8th of an inch thick.  Carefully transfer the dough to the pan.  This dough is very stiff and can be difficult to roll out without tearing and cracking.  You can also just press it into the pan with your fingers rather than rolling.  Trim any edges.  Prick all over the bottom with a fork and place the pan in the freezer for 10 minutes.  Remove from the freezer, line with parchment paper or foil, and pour in pie weights or dried beans.  Bake for 15 minutes.  Carefully remove the pie weights, return to the oven for 8-10 minutes, until the crust is a nice golden brown.  Cool completely.

Finish the tart
Place the goat cheese in a large bowl and mash roughly with a fork.  Add the cream and mix well to combine.  (The cream will make it, um, creamier, and will also help with the chalkiness that goat cheese tends to have.)  Gently mix in the basil.  Season with salt and pepper.  Scoop the goat cheese into the cooled crust and smooth it with a spatula.  Slice the tomatoes and layer them in decoratively.

Mix together the pomegranate molasses, lemon juice, and olive oil.  Drizzle the mixture over the top of the tart.  Sprinkle with a healthy pinch of your best sea salt and a few more ribbons of basil.


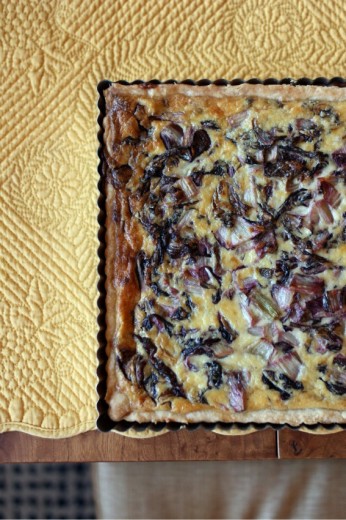
When Life Gives you Radicchio…

August 19, 2011

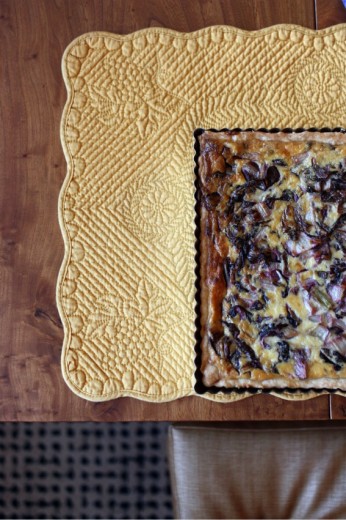
…you make a radicchio tart.  Which I will tell you about in a moment.  But first, yesterday was one of those days when the stars were in very strange alignment.  One of those days when coincidence became kind of creepy.  Not once but several times.  One of those days when I should have bought a lottery ticket because, clearly, the universe was trying to tell me something.  And, because I have approximately one million other things to do rather than tell you this story, I am going to tell you this story.

This was my day.  On the way out the door to take Graham to day camp, I saw my UPS guy.  I waved.  Walking Graham to the playground at camp, I started talking with another mom who was walking her daughter as well.  I had never met her before but her name is Jill and she teaches music at my old high school.  Kind of weird.  Spencer and I ran errands, went to the wading pool, and then got frozen yogurt.  As we walked in, we passed my UPS guy and while we were sitting and eating, Jill came in on her bike.  Pretty weird.  Then, last night, I taught a class.  One of the participants was a guest at a wedding my brother was in over the weekend, and two of the participants were former yoga students of mine from a regular class I taught in 2003.  They didn’t know it was me, their former yoga teacher, teaching the class, they came because one of their sisters-in-law recommended me.  Really quite weird.

Anyway, radicchio!  We all get surprising things in our inboxes, right?  A couple of weeks ago, I got an email from Emily at Royal Rose Radicchio.  She was offering to send me some radicchio straight from their farm in California.  Odd?  A  bit, yes.  But I do like radicchio and don’t buy it all that often.  It is terrific in salad for a little bitter bite and I love it grilled or roasted.  That bitterness mellows and a wonderful sweetness emerges under heat.  (My brother says it is great on a sandwich instead of lettuce.  Good call.)  So sure, I said, send me some of those gorgeous purpley-red heads of goodness.

Late last week, a giant box appeared on my doorstep.  Inside was no fewer than 20 heads of radicchio.  Now, I do like it but 20 of anything is a lot to get through, especially if it is highly perishable.  For the record, these were gorgeous specimens.  Tight heads, not a blemish in sight, heavy for their size, more beautiful than any I have seen in the store.  I gave some to the neighbors, gave some to the potluck people, roasted a bunch of it (it’s terrific on top of crostini topped with blue cheese and a bit of honey), and I made this tart.

I am a member of a very cool book club – a foodie book club.  Every book club I have ever been a part of has always been much more about the food and drink than about the book so I thought this was a brilliant idea.  Each member contributes a dish from the book we read.  This month we read a book of Julia Child’s letters and we had free reign to make one of her recipes from any of her books.  I have my mom’s copy of Mastering the Art of French Cooking which, truthfully, I had never even opened until this week.  With my plethora of radicchio, I figured it only made sense to try and use some of it.

Radicchio is a member of the chicory family along with things like endive, escarole, and other bitter greens.  I knew Julia wouldn’t have had access to radicchio in the 60’s but I knew, without even looking in the book, that there would be endive recipes.  I road a bike through five different regions of France when I was 16 and we had homestays with families in each of those regions.  I had endive, in various styles, in every single one of those homes.  The French like their endive.

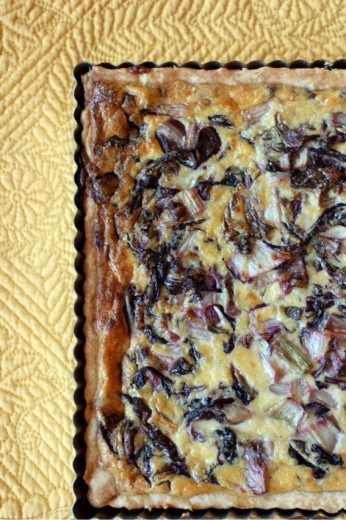
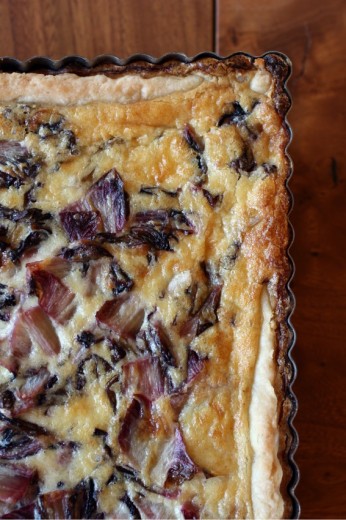
Mastering the Art of French Cooking boasts several endive recipes but as soon as I saw a tart, I knew that was the thing to make.  It does feel like sacrilege to change a Julia Child recipe but I made this my own by using my favorite tart dough, putting it in 9-inch square pan, and using a different chicory.  I planned to use half milk and half cream for the filling but found I was out of milk, so all cream it was.

One final note.  I made this tart in a 9-inch square pan which looked very snazzy, I must say. It  is a little tricky because not everyone gets a piece with crust.  You can certainly make the recipe in a 9-inch round pan but if you have a 10-inch (or even an 11-inch), I would use one of those.  Any way you slice it (ha!) you might not need all the filling and please resist the urge to overfill.  If you do, the liquid goes over the sides of the crust and makes the crust soggy and the tart difficult to remove from the pan.  Just to be safe, I always bake my tarts on a baking sheet to prevent any egg leakage on the floor of my oven.

One Year Ago:  Green Bean Salad with Mustard Seeds and Tarragon
Two Years Ago:  Heirloom Tomato Salad with Burrata, Torn Croutons, and Basil (if you have not made this, do so!)
Three Years Ago:  Black Bean Salad with Corn and Cotija Cheese

Radicchio Tart
Inspired by Mastering the Art of French Cooking
Makes one 10-inch tart

My plan was to use Gruyère cheese but I was out.  I opted for Parmesan instead.

1 medium head radicchio, outer leaves removed, cut in quarters, cored, and thinly sliced
½ cup water
Juice of ½ lemon
1 tsp. salt
3 tbsp. unsalted butter
3 eggs
1½ cups whipping cream
Pinch of nutmeg
Few grinds of pepper
½ cup freshly grated Parmesan cheese, divided

½ recipe Olayia’s Tender Tart Dough (recipe follows)

Preheat the oven to 400ºF.

Boil the radicchio over moderately high heat in a heavy-bottomed saucepan with the water, lemon juice, salt and butter until the liquid has almost evaporated.  Lower the heat and stew gently for 20 to 30 minutes until the radicchio is very tender and has lost its brilliant color.  Allow to cool slightly.

Beat the eggs, cream, ¼ cup of the Parmesan, and seasonings in a mixing bowl to blend.  Gradually stir in the radicchio.  Check seasoning.  Pour into the partially baked pastry shell.  Sprinkle on the other ¼ cup of cheese.  Bake in the middle of the oven for 25 to 30 minutes, or until puffed and browned.

Olaiya Land’s Tender Tart Dough

3 cups all-purpose flour
2 tbsp. sugar
1¾ tsp. salt
1 cup plus 2 tbsp. (2¼ sticks) chilled unsalted butter, cut into ½-inch cubes
8 tbsp. (or more) ice water
1½ tsp. apple cider vinegar

Blend flour, sugar, and salt in a food processor.  Add butter; using on/off turns, process until coarse meal forms.  Add 8 tablespoons ice water and cider vinegar; blend until moist clumps form, adding more ice water by the teaspoon if dough is dry.

Gather dough together.  Turn out onto work surface; divide dough in half.  Form each half into ball and flatten into disk.  Wrap disks separately in plastic and refrigerate 1 hour.  (Can be made ahead.  Keep dough refrigerated up to 2 days, or enclose in a resealable plastic bag and freeze up to 1 month.  Thaw in the refrigerator overnight.)  Soften slightly at room temperature before rolling out.

For this tart, use half the dough.  Roll out into a 13-inch circle or square.  Transfer the dough to the tart pan and prick the bottom all over with a fork.  Place in the freezer for 10 minutes.  Remove from the freezer and line the pan with parchment paper or foil.  Fill with pie weights or dried beans and bake for 10 minutes.  Remove the weights and bake for another 10 minutes, or until the crust is still pale, but dried out and starting to turn just a bit brown.  Proceed with the recipe.


Butterscotch Pudding Tarts

April 20, 2011

Remember Snack Pack pudding?  I guess that question isn’t a huge stretch because it is still around.  The packaging looks nothing like it did when it sat in my Donny and Marie lunchbox, just waiting to be eaten with a plastic spoon.  I thought that pudding, chocolate flavor only please, was the best thing about  bringing lunch to school.  I didn’t get it every day but it was a happy day when I did.

Graham, my kindergartner, has never heard of Snack Pack pudding and I’m pretty sure, up until recently, he had never had pudding at all.  In case you think that is because I don’t give him sweets, or I only give him whole grain treats or even just homemade treats, you would be mistaken.  I am liberal with my sweet giving.  This is another post for another time, but suffice it to say that while I prefer him to eat things that I have made, the lure of Halloween/Valentine’s Day/Easter candy can be great.  I do try to draw the line at certain things (which would probably seem arbitrary to a more strict mother), and pudding that does not have to be refrigerated and is full of things I can’t pronounce is one of those lines.

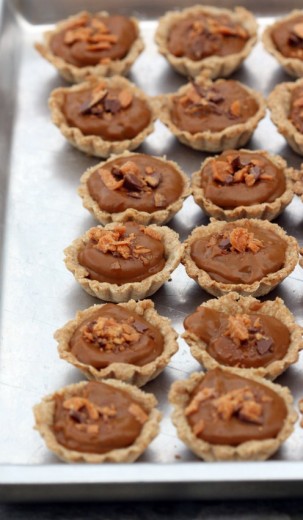
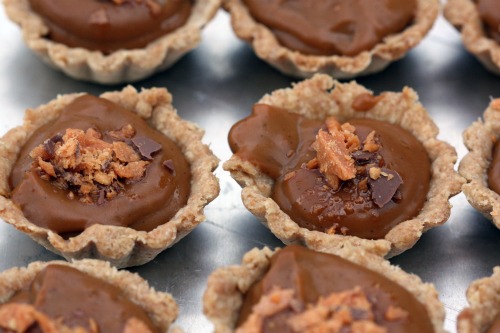
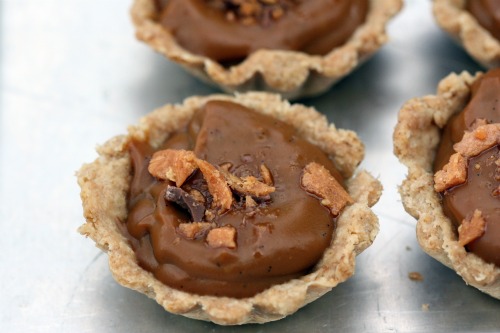
While pudding is not a dessert that pops into my mind with any regularity, it certainly has its place.  Comfort food at its most comfortable.  And how about if the pudding is butterscotch and sitting inside a tart shell?  Mini tart shells?  Not long ago, I purchased 24 mini tart pans.  At 79 cents a pop this was not a huge investment.  And they have allowed me to make super cute appetizers and desserts.  I had no problem getting 24 rounds of dough out of the recipe and I actually had some pudding left over once they were all filled.  I filled two small bowls with the butterscotch pudding and gave it to my boys.  Neither of them liked it.

By the way, who was on your favorite lunchbox?

One Year Ago:  Zucchini and Olive Salad
Two Years Ago:  Mississippi Mud Cupcakes

Butterscotch Pudding Tarts
Baked
Makes 8 (4-inch) tarts or 24 mini tarts

Below is the recipe as written for the larger tarts.

For the oat wheat pie crust
1 cup rolled oats
½ cup whole wheat flour
1 cup all-purpose flour
¼ cup firmly packed dark brown sugar
½ tsp. salt
¾ cup (½ stick) cold, unsalted butter, cut into cubes
¼ cup milk

For the butterscotch pudding
6 large egg yolks
¾ cup granulated sugar
¼ cup heavy cream
½ cup firmly packed dark brown sugar
1/3 cup cornstarch, sifted
1 tsp. salt
3 cups whole milk
1 vanilla bean
1 tbsp. unsalted butter
2 tbsp. whiskey

To assemble
1 Butterfinger candy bar, broken into small pieces

Make the oat wheat pie crust
Put the rolled oats in a food processor and process for about 30 seconds, until ground but not powdered.  Add the flours, brown sugar, and salt and pulse until combined.

Add the butter and pulse until the butter pieces are small and the dough looks crumbly, like coarse sand.  Add the milk and pulse for a few seconds..

Scoop the dough out of the food processor and form it into a large disk.  Wrap tightly in plastic and refrigerate for at least 1 hour and up to 3 hours.

Dust a work surface with a sprinkling of flour.  Unwrap the disk of chilled dough and put it directly on the work surface.  Cut the dough into eight equal pieces, about 2 ounces each, and gently shape each piece into a smooth disk.  The dough will be sticky.  Make sure to turn the dough over (use a spatula or a bench knife) as needed and keep the working surface floured.  Put the dough disks in the refrigerator for 10 minutes.

Using a rolling pin, roll each dough ball into a 6-inch round just over 1/8-inch thick.  Place a round over a 4-inch tart pan and very gently press the dough into the pan.  Roll the rolling pin over the pan to trim off excess.  Repeat with the remaining dough rounds.

Preheat the oven to 325ºF.  Put the tarts pans in the freezer for 30 minutes.

Remove the tarts pans from the freezer and arrange on a baking sheet and gently prick the dough with a fork.  Bake on the baking sheet until golden brown, 12 to 15 minutes, rotating the baking sheet halfway through the baking time.  Transfer the tart pans to wire racks and let cool completely.

Make the butterscotch pudding
Put the egg yolks in a large heatproof bowl and set aside.  (DT: I find it helpful here to put a damp paper towel under the bowl with the yolks.  That way, when you go to whisk it later, the bowl stays still on your counter.  I do the same thing when making ice cream.)

In a small saucepan, combine the granulated sugar and ¼ cup water and stir gently with a heatproof spatula; do not splash the sides of the pan.  Cook over medium heat until the sugar is dissolved, then increase the heat to medium-high and cook until the mixture begins to turn a dark amber color.  Swirl the pan, if necessary, to create an even color, but do not stir.  Remove from the heat, let stand for 1 minute, then use the heatproof spatula to stir in the cream.  Pour the caramel into a small bowl.  Set aside.

In another small saucepan, combine the brown sugar, cornstarch, and salt.  Stir in the milk and whisk to combine.

Cut the vanilla bean in half lengthwise, and, using the tip of the knife or a small teaspoon, scrape the seeds into the saucepan with the milk.  Add the vanilla bean to the milk as well.  Cook over medium-high heat, whisking occasionally, until the mixture comes to a boil.  Remove from heat and add the caramel.  Whisk together until combined, then pour one third of the mixture over the eggs.  Keep whisking the egg mixture and add another third of the hot milk mixture.  Transfer the egg mixture back to the saucepan with the milk mixture and, whisking constantly, bring to a boil over medium-high heat.  Boil for 2 to 3 minutes, or until very thick.

Remove from the heat and add the butter and whiskey.  Keep whisking vigorously for about 1 minute to cool the pudding slightly.  Let the pudding sit for about 15 minutes, then remove the vanilla bean.

Assemble the tarts
Whisk the pudding one more time until smooth.  Divide the pudding equally among the tart shells and sprinkle the crumbled candy bar over the pudding.  Cover the tarts with plastic wrap and put the in the refrigerator for about 2 hours before serving.

The tarts can be stored, tightly covered, in the refrigerator for up to 2 days.


Why I Made Dinner (and Dessert)

April 10, 2011

Thank you all for your sympathy over my challenging week.  First let me tell you that my kids are fine.  I took Graham to the ER at 4am on Tuesday because he had been complaining for days of a tummy ache and woke up in the middle of the night crying.  Since that is completely unlike him, I started to really worry.  After many hours and tests, he is fine and fond of telling anyone who will listen how brave he was with the doctor.

Second, I have to be honest and tell you the only reason that I persevered and made that Pasticcio and this most favorite lemon tart is because I had friends coming over for dinner.  If it had just been Randy and me, I would not have hesitated to punt on cooking and ordered in.  I even considered take-out for my dinner guests but I already had all the ingredients on hand and we needed to celebrate one in our midst.

This small group is friends from a co-op preschool.  We attended for two years when Graham was one and two years old.  I met an amazing group of women there and a few of us have remained close.  We try to get together at least monthly and our evening usually (ok, always) revolve around food and drink.  I will often offer to host when Randy is out of town because I do so love these women and it gives me something to look forward to.

One of our group is about to give birth to her fourth child.  Yes, fourth.  She, more than almost anyone I know, is equipped with the energy, the boundless love, and the sense of humor that four children requires.  It is just a couple of weeks before her due date and I thought a special dinner was in order before all hell breaks loose in her house.  Again.

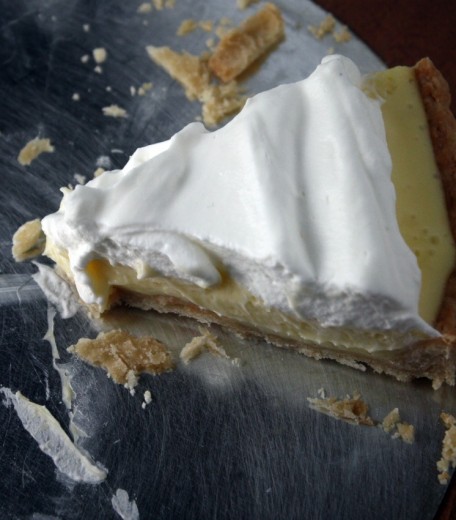
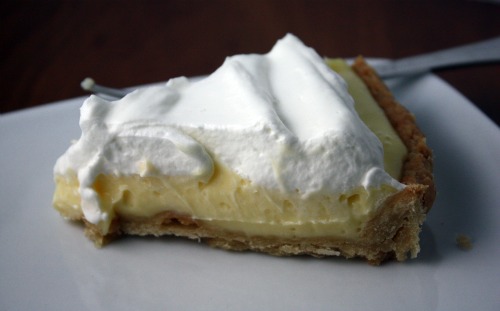
So you see, I had to make dinner.  And dessert.  I can’t send a dear friend off to infant-land on a dinner of takeout pizza and boxed cookies, right?  Plus I needed an excuse to make this lemon tart.  A few weeks ago, I received an email from a reader saying she had a plethora of Meyer lemons and wondered what to do with them.  I didn’t hesitate to tell her she should make this tart from the Tartine cookbook.  And then I realized that I had not posted the recipe.  I wrote about it, way back in May of 2008, the second post ever on this blog, but there was no photo and no recipe.  Considering this a fall-back recipe, one I make over and over, it really needs to be here in all its glory.

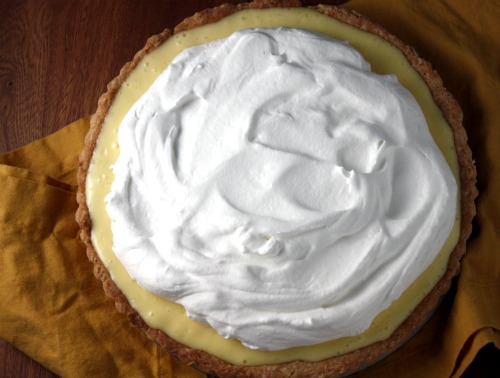
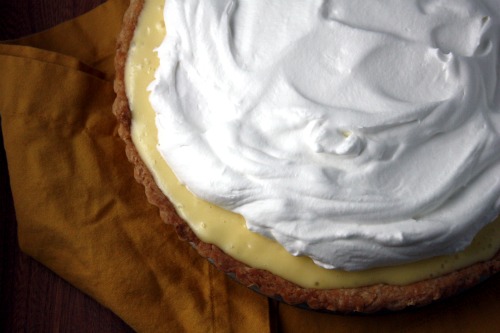
Until I started making this particular tart, all the other lemon tarts in my life featured lemon curd as a filling.  I like lemon curd as much as the next person, but something about all those tarts just did not taste right.  A little metallic, a little funky.  This tart uses lemon cream and the addition of butter makes all the difference.  The cream is silky smooth but with over a half cup of lemon juice, it has the perfect amount of pucker.  The sour marries perfectly with the Tartine sweet crust.  For last week’s tart, I had a round of my favorite tart dough in the freezer and a hole in my ceiling, so I decided to save myself the step of making the Tartine crust.  But truthfully, for this tart, theirs is better.  It is sweeter and the balance against the sour lemon is intoxicating.

A few notes.  This dough recipe will yield 4 tart crusts.  They freeze beautifully, so don’t be tempted to scale down the recipe.  Just set one aside in the fridge and wrap the other three, separately, in plastic wrap and then foil.  Put them in a Ziploc bag, date it, and put in the freezer.  They will keep at least one month and possibly two.  You can use this crust for any sweet tart that goes in a 9-inch tart pan (which is the most common size).  Also, I use my immersion blender to mix the butter into the lemon cream and while that might sound strange, it works really well.

One Year Ago:  Baked Rice with Chiles and Pinto Beans
Two Years Ago:  Pasta with Broccoli Rabe and Chickpeas

Lemon Cream Tart
Adapted from Tartine
Makes one 9-inch tart, 8 to 12 servings

I made a few changes in the recipe just in terms of streamlining and personal taste.

For the crust
9 ounces (1 cup + 2 tbsp.) unsalted butter, at room temperature
1 cup sugar
¼ tsp. salt
2 large eggs, at room temperature
3½ cups all purpose flour

For the lemon cream
½ cup + 2 tbsp. fresh lemon juice
3 whole large eggs
1 large egg yolk
¾ cup sugar
Pinch salt
1 cup (2 sticks) unsalted butter, room temperature

To finish the tart
1 cup heavy cream, very cold
2 tsp. sugar

Make the crust
Using a stand mixer fitted with the paddle attachment, combine the butter, sugar, and salt and mix on medium speed until smooth.  Mix in 1 egg.  Add the remaining egg and mix until smooth.  Stop the mixer and scrape down the sides of the bowl with a rubber spatula.  Add the flour all at once and mix on low speed just until incorporated.

On a lightly floured work surface, divide the dough into 4 equal balls and shape each ball into a disk ½ inch thick.  Wrap well in plastic wrap and chill for at least 2 hours or overnight.  (At this point, unless you are planning to make four lemon tarts, make sure three of your crusts are well-wrapped in plastic and then foil, then put them in the freezer.)

Place the dough on a lightly floured work surface and roll out to 1/8-inch thick round, rolling from the center toward the edge in all directions.  Lift and rotate the dough a quarter turn after every few strokes, dusting underneath as necessary to discourage sticking, and work quickly to prevent the dough from becoming too warm.  Roll the dough out to an 11-inch circle.  If the dough becomes too soft to work with, place it in the refrigerator briefly.  Loosely roll the dough onto the rolling pin and then unroll it into a 9-inch tart pan.  Carefully coax the dough into the pan without stretching it, but making sure it is touching the whole bottom of the pan and is in the “corners”.  Fold the excess dough over to double the thickness of the sides.  Dock (make small holes in) the bottom of the pan with a fork or a knife and place the pastry shell in the freezer for 15 minutes.

Preheat oven to 325ºF.  Place in the oven and bake for 12 to 15 minutes, or until golden brown.  Let cool completely on a wire rack.

Make the lemon cream
Pour water to a depth of about 2 inches into a saucepan, place over medium heat, and bring to a simmer.  Combine the lemon juice, whole eggs, egg yolk, sugar, and salt in a stainless-steel bowl that will rest securely in the rim of saucepan over, not touching, the water.  Whisk the lemon juice, eggs, yolk, sugar, and salt together.  (Never let the egg yolks and sugar sit together for more than a moment without stirring; the eggs will “cook” the yolks and turn them granular.)  Place the bowl over the saucepan and continue to whisk until the mixture becomes very thick and registers 180ºF on a thermometer.  This will take 10 to 12 minutes.  Remove the bowl from over the water and let cool to 140ºF, stirring occasionally from time to time to release the heat.

Meanwhile, cut the butter into 1 tablespoon pieces.  When the cream is ready, leave it in the bowl if using an immersion blender, or pour it into a counter top blender.  With the blender running, add the butter 1 tablespoon at at time, blending after each addition until incorporated before adding the next piece.  The cream will be pale yellow and opaque and quite thick.  You can use the cream immediately, or pour it into a storage container with a tight-fitting lid and refrigerate for up to 5 days.  To use after refrigeration, gently heat in a stainless-steel bowl set over simmer water until it has softened.

Finish the tart
Make sure the tart shell is completely cool.  Pour the lemon cream filling into the crust and smooth the top.  Chill the tart until firm, about 2 hours, before serving.  It will keep for up to 3 days in the refrigerator.

To serve the tart, in a mixing bowl, whip the cream with a whisk until thickened.  (DT: I used my hand mixer.)  Add the sugar and whip until the cream holds soft peaks.  Top the tart with the whipped cream.  Serve the tart cool.


Happy Birthday Randy

January 3, 2011

First things first.  The chocolate winners.  My trusty assistants picked their numbers, I took their picture, and I accidentally deleted that picture.  I just realized this.  So, I turned to a random number generator which gave me the following:

38 86

Random numbers generated Jan 2 2011 at 16:14:41 by www.psychicscience.org
Free educational resources for parapsychology, psychical research & mind magic.

So, #38 is Jackie whose best gift was healthy children and a hot shower without interruption from children (I completely understand the value of that gift).

#86 is Sonnet whose best gift was coming home to a cat who had not ripped up her apartment!

Please contact me within a week at danatreat{at}gmail{dot}com so I can get your addresses!

Thank you to everyone who shared your holidays gifts.  I was so moved by many of the things I read.  I have such thoughtful readers!

I know this first post of the new year should be something healthy, right?  Has everyone gone on their post holiday/resolution diet?  Well today, January 2nd, is Randy’s birthday.  It is probably the worst day to have a birthday of the entire year.  Everyone is sick of eating, drinking, spending money, and partying.  Everyone has just given up drinking, or sworn off dessert, or vowed to put a hold on spending.  Poor guy.  So I always try and do something nice for his birthday.  And I always bake.  This year, his parents are in town so we are having a weekend-long celebration and we are also doing a party next weekend.

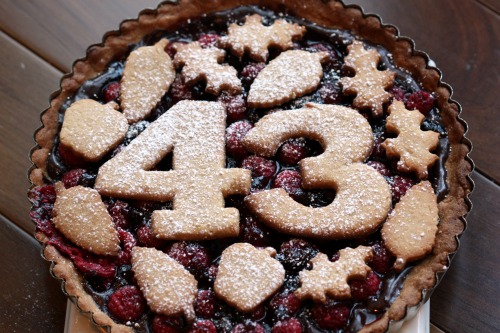
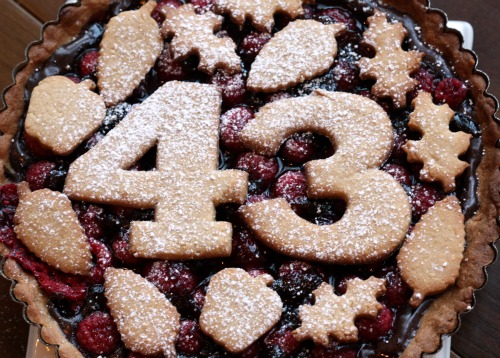
This is a riff on a linzer tart.  Rather than be filled with just jam, it has a layer of chocolate and fresh raspberries.  And rather than the traditional lattice crust, you cut out cookies from the crust dough to make a more playful presentation.

Years and years ago, before I was much good at baking, my mom made this tart to bring to Christmas dinner.  I fell in love with it as did everyone at the table.  She confided in me that it was actually surprisingly easy to make.  I was having friends over for dinner a week later and I decided to make the tart.  My friend John asked me, in all seriousness, where I had bought it, and my journey on the baking path started.  I made this lovely dessert several times that year, always to rave reviews, and then it fell by the wayside.

In thinking of desserts for Randy’s birthday, I came back to this tart.  It was just time for it to reappear in my life.  I know that in previous incarnations, I have used small heart cookie cutters or small star cookie cutters for the top, but in looking for them, I found my number cookie cutters from my childhood.  So yes, Randy turns 43 today.  Happy birthday honey!

One Year Ago: Chickpea. Lentil and Vegetable Stew and Orecchiette with Roasted Beets, Fennel, and Toasted Almonds

Linzer Tart
Makes one 9-inch tart

The recipe I have is copied from my mom’s and is in my own handwriting.  I’m not sure where it came from originally but probably either Bon Appétit or Gourmet.  In my experience, the jam that is brushed on the berries make the topping kind of wet.  You will want to carefully put the cookies on top so they don’t get soaked and ruin the look.  I would not travel with this tart for that reason.

Crust
2/3 cup golden brown sugar, packed
1 stick (½ cup) unsalted butter, room temperature
1 egg
1½ cup flour
½ cup ground toasted blanched almonds
¾ tsp. cinnamon
½ tsp. baking powder
½ tsp. salt

Filling
6 ounces bittersweet chocolate, chopped
2 pints fresh raspberries
½ cup seedless raspberry jam
Powdered sugar

Beat the sugar, butter, and egg until creamy.  Add flour, almonds, cinnamon, baking powder, and salt.  Beat until just well combined.  Measure ¾ cup of the dough.  Flatten that portion into a disk, wrap in plastic, and put in the refrigerator.  Using floured fingertips, press the remaining dough into bottom and up sides of a 9-inch tart pan.  Pierce several times with a fork.  Refrigerate at least one hour and up to one day.

Roll out the rest of dough on floured surface to ½-inch thickness.  Use 2 or 3-inch star cookie cutters and cut out as many cookies as possible.  Do not reroll dough.

Preheat oven to 375ºF.  Bake crust until light golden, pierce with toothpick if it bubbles, about 15 minutes.  Put on rack and cool.  Bake cookies about 6 minutes until light golden.  Transfer to a rack and cool.

Melt the chocolate in a double boiler or a bowl set over a pan of simmering water.  Spread the chocolate over the cooled crust.  Arrange berries over the chocolate, spacing evenly.  Stir the jam in a small saucepan until liquid and smooth.  Carefully brush the jam over the berries.  Bake for about 30 minutes, covering with foil if the crust starts to get too brown.  Transfer to a rack and cool.

Once completely cool, arrange the cookies on top so they are touching.  Dust with powdered sugar.  Serve with whipped cream or ice cream.


« Older Posts Newer Posts »