Category: Cookbooks

Southwestern Sweet Potato Gratin

April 15, 2009

img_1880

There are friends you trust and those you don’t.  There are co-workers you trust and those you don’t.  There are probably even family members you trust and those you don’t.  And for me, there are cookbook authors I trust and those I don’t.  In case you are curious, I trust Deborah Madison, Jeanne Lemlin, Ina Garten, the people at Cook’s Illustrated, and I trust Martha Stewart.

Let me say this, I am not a Martha Stewart kind of gal.  I am not neat, or crafty, and I have never been to jail.  (Both my brothers have though.  Another story for another time.)  But I do love to cook and I very much appreciate a well-written cookbook with well-tested recipes.

There is the theory that, when cooking for guests, you should only make familiar recipes.  Being a personal chef for three years (!) who very rarely repeats menus has forced me to make all kinds of things I have never made before.  Every so often I make something and wonder – is this going to be any good?  If it has come from one of my trusted books, it always is.

Two books I use on a regular basis are the two volumes of The Martha Stewart Living Cookbook.  Some of my favorites have come from these huge tomes.  Everything I have made turns out well.  The recipes are clear and concise and many of them are truly delicious.

img_18781

I made this gratin last night for my clients and for my friend John who came to dinner.  When I pulled it out of the oven, I wasn’t sure.  It smelled good and I knew I liked all the ingredients in it, but I just didn’t know how it would come together.  But, because it came from Martha – or from the people who write her cookbooks – I didn’t worry.  And it was delicious – smoky and sweet, cheesy but not too rich, and just a bit of spice.  I served this as a main course with red beans and rice and a citrus salad, but it would be lovely as a side dish as well.

img_1871

A few words about the recipe.  The next time I make it (and there will be a next time), I will make three layers instead of two.  This will no doubt require a bit of squishing because the pan was quite full with just two layers, but it bakes down considerably and I would have loved another layer.  Even if you do not like spicy food, do not skip adding the chipotle chile.  Martha says it is optional but I say the smokiness that it lends to the dish is essential and it is not too spicy.  If you like spice, add another one.

img_1884

Southwestern Sweet Potato Gratin
Adapted from The New Classics
Serves 8-10 as a side, 4-6 as a main

4 large sweet potatoes (about 4 pounds), peeled and thinly sliced into rounds
1 1/2 cups grated Chihuahua or Monterey Jack cheese, 6 oz. (DT: I used Monterey Jack)
1 1/2 cups crumbled Cotija or French feta cheese, 6oz. (DT: I used Queso Fresco)
1 small onion, thinly sliced
1 tsp. finely chopped canned chipotle chile in adobo
1/3 cup vegetable stock, or water
1/4 cup finely chopped cilantro leaves
1 cup crushed tortilla chips
Lime wedges, for garnish
Mexican crema or sour cream, for garnish (optional)

1. Preheat oven to 350 degrees.  Arrange half of the potatoes in a 9 x 13 baking dish, overlapping the slices.  Sprinkle with half of each cheese.  Top with onion.

2. Stir the chipotle into the stock or water; drizzle over the onion.  Sprinkle with half the cilantro.  Top with the remaining potatoes; sprinkle with the remaining cheeses and cilantro.  Scatter the chips on top.

3. Cover with foil; bake 30 minutes.  (DT: I sprayed my foil with non-stick spray so the cheese wouldn’t stick too much.)  Remove the foil; bake until very tender and top is well browned, about 30 minutes more.  Let cool slightly before serving.  Serve with limes and crema, if desired.


Teasing You with a Tart

March 23, 2009

Tart

It’s a beauty isn’t it? It was delicious too. I want to share this recipe with you all, but I can’t just yet.

You see, this tart has issues. Crust issues and filling issues. It doesn’t have flavor issues which is why I’m even willing to give another chance.

This recipe comes from one of my all time favorite cookbooks, Fields of Greens, written by Annie Sommerville, the chef at Greens Restaurant in San Francisco. It is a book I turn to when I want to make something special. The recipes are not difficult, but many require a fair amount of work. In my experience, that work has always been worth it because the payoff is something truly special and delicious. And the recipes always turn out.

The crust she suggests you use is a yeasted tart dough. I have used it for other tarts in this and Sommerville’s other book, Everyday Greens, and I have decided that it’s just not for me. It’s easy to make and work with, but I don’t like the texture. I expect my tart crust to be crisp, as a foil for the creaminess of the filling. The yeasted dough felt like I was eating tart filling on top of a slice of bread.

I had some galette dough in my freezer so I decided to try that. It wasn’t quite right either, not crisp enough for me when made in a tart pan, although plenty crisp when used for the galette. Clearly, I need another option.

The biggest tinkering challenge I have ahead of me is the filling. The proportions are way off in this recipe – something I find very surprising coming from this extremely reliable cookbook. There is about one and half times too much filling so that, even though I held quite a bit of it back, it started to run over the top and outside the tart pan (read: onto the floor of my oven.) Yes, I had a baking sheet in there to catch the drips, but I was making two tarts and the baking sheet wasn’t quite big enough to catch all the goop. Side note: you know how high end cars (like Porsches) famously don’t have cup holders? My high end (Viking) oven does not have a timer or a self-cleaning option. Sigh.

So the recipe makes too much filling, and what it does make is too runny. Normally, if a recipe gave me this much trouble, I would just write in bold letters, “DO NOT MAKE AGAIN” in my cookbook. But this was really tasty and the flavor is haunting me. There is Gruyere cheese in there and chervil, people. This tart deserves another chance.


Pasta with a Side of Memories

March 19, 2009

img_1623

I made this pasta the other night to go with the garlic bread and roasted tomato caprese. Although this is only the second time I have made it, I can honestly say it is a favorite of mine. It has so many delightful flavors and textures and it is very versatile. Parts of it can be made in advance, and the whole dish can be made a day ahead without suffering any ill effects.

This dish comes from a cookbook called From the Earth to the Table which was written by John Ash, one of the pioneers of California wine country cooking. This cookbook is not vegetarian, although over half of the recipes are meat-free, and it is one that I turn to over and over, especially when I am craving exceptionally fresh and flavorful food. Ash has a fabulous restaurant in Santa Rosa – just north of the Napa Valley – where I was lucky enough to have a lovely, if solitary, meal.

I’m sure we all have some time in our lives that we would like to, if not forget, then to go back and live differently. Mid-1998 to the end of 2000 was like that for me. I went through a messy divorce, began a relationship with a not-so-good guy, and worked at a job that I hated. In March of 2000, I quit my job and took a road trip to clear my head. First, I went to Arizona to visit the not-so-good guy, but after that the trip got much better. I spent a few days in L.A. with my dear friend Karen, I flew to Mexico on a free ticket, and once back in the States, I slowly meandered my way up the West Coast enjoying the incredible scenery on offer.

For the most part, I ate very cheaply, but I did splurge at John Ash. I dressed up, brought my book, and treated myself to a nice dinner. I don’t remember what I ate, although I do remember that I was blown away by how fresh and tasty everything was. I remember that I was reading The Grapes of Wrath – savoring every word on the page – and I remember that I wished I had a date across the table from me. I did not wish it was the not-so-good guy.

A week or so later, I arrived back in Seattle. It took me another month or two, but I did break it off with the not-so-good guy. A few months later, I met my husband who has been a wonderful dinner date every since.

img_1629

A few words on the recipe. The first time I made it, I used fresh cranberry beans that I bought at the Farmer’s Market. Sadly, I don’t have any left in my freezer, so I just used good canned cannelini beans and they blended in beautifully. Ash suggests that the sun-dried tomatoes are optional, I think they are essential both for color and flavor. I made some changes that I won’t bore you with, just personal preferences. This pasta is really a beauty because it is great at room temperature as well as hot.

For the pesto, you will want to roast about 3 large cloves of garlic. To do so, place the unpeeled cloves on a small piece of foil, drizzle them with olive oil, fold them up in the foil packet and then put them in a 400 degree oven for about 20 minutes. A toaster oven is perfect for this if you have one. They should feel soft to the touch. Squeeze the garlic out of the skins and proceed with the recipe.

Pasta with Roasted Cauliflower and Parsley Pesto
Adapted from
From the Earth to the Table
Serves 6
generously

You can make the pesto five days and roast the cauliflower one day before you finish the pasta. Slicing the cauliflower (as opposed to just breaking it into florets) give you more surface area for caramelization – a good thing.

1 medium cauliflower (2 pounds or so), sliced 1/2 thick vertically
Olive oil

Kosher salt and freshly ground black pepper

1 lb. tubular shaped pasta, such as penne or rigatoni

Parsley Pesto (recipe follows)

3/4
cup pitted Kalamata olives
1/2
cup sun-dried tomatoes, thinly sliced
1 can cannelini beans, rinsed and drained

Thinly shaved or grated Parmesan cheese for garnishing

Preheat the oven to 425 degrees. Sprinkle both sides of the cauliflower lightly with olive oil, then liberally with pepper and salt. Arrange on a single layer on a baking sheet. Put in th eoven ad roast for 15 to 20 minutes or until the cauliflower is lightly browned and tender. Break into large irregular pieces and set aside.

In a large pot of lightly salted boiling cooking water, cook the pasta until just al dente. Drain, reserving 1/2 cup of the cooking water. Toss the hot pasta with the Parsley Pesto, cauliflower, olives, tomatoes, and beans, adding a bit of the reserved water if the mixture seems to dry. Top with cheese and serve warm or at room temperature. (Can be made one day ahead. Allow to cool completely and then store, covered, in the refrigerator. Bring to room temperature before serving or reheat until it is warm.)

Parsley Pesto
Makes a generous cup

4 cups packed fresh parsley leaves and tender stems, coarsely chopped
1 tbsp. roasted garlic

2 tbsp. pine nuts

2 tbsp. Parmesan or Asiago cheese

=”font-family:trebuchet ms;”>
Grated zest of 1 lemon

1/3
cup olive oil
Kosher salt and freshly ground black pepper

Combine the parsley, garlic, pine nuts, cheese, lemon zest, and olive oil in a food processor or blender, and process until smooth. Season to taste with salt and pepper.


An Ina Kinda Day

March 18, 2009

picnikcollage

I have four of the Barefoot Contessa cookbooks in my collection and I use them with surprising regularity. If you are new here, I am a vegetarian – something Ina definitely is not. Like not even close. But I love her books and love her recipes. I use many of the dessert ones and also get a lot of mileage out of the soup, salad, and vegetable chapters.The dinner I made last night contained two recipes from her latest book, Back to Basics.

img_1585

Do you remember the garlic bread from your childhood? The one I remember is from some “Italian” restaurant in the suburb of Seattle where I grew up. My parents are transplanted New Yorkers and I think the hardest part about moving West was the loss of good Italian food and good bagels. (It has gotten better, but we are by no means close to what NY has to offer.) We would go to this restaurant and my brothers and I would chow on garlic bread which consisted of styrofoam-like bread, slathered with butter, and liberally sprinkled with garlic salt. There may have even been some green can Parmesan cheese on there for good measure. Needless to say we loved it, but there is no way I would eat that now.

This is real garlic bread. Ciabatta bread, a heady concoction of lots of garlic, parsley, and fresh oregano sauteed with salt and pepper in a good amount of olive oil, and a very restrained amount of butter – especially for Ina. This is baked in the oven for only 10 minutes – just enough for the all the flavors to mingle and for the bread to get nice and warm – not enough to toughen the bread. In true Ina form, this recipe is found in the Vegetables section of the book!

img_1637

The other recipe I made yesterday was for this Roasted Tomato Caprese Salad. For me it was one of those – why didn’t I think of that?! – moments. Here in Seattle, we are fortunate to have amazing produce. We get incredible spring asparagus and peas, summer berries that people all over the country would pay a fortune for, and wild mushrooms all fall. We do not, however, get good tomatoes. If you grow them yourself, you can get a decent tomato now and then, but I have never experienced the New Jersey tomato. If I did, I think I would cry.

I love tomatoes so I eat them anyway. But Caprese salad never did much for me. Mozzarella doesn’t have that much flavor, so if your tomatoes are tasteless, why exactly would you eat it? Enter Ina and her good idea to roast the tomatoes. That way, you can concentrate the flavor and give it a little boost with olive oil, salt, pepper, a little sugar, and a little balsamic vinegar. Eating this last night really was a revelation and a recipe I will make again and again.

img_1574

Garlic Ciabatta Bread
Adapted from
Barefoot Contessa Back to Basics
Serves 8

To make my cooking healthier, I always add a minimal amount of oil when I am sauteing. For this recipe, you will want to add more – perhaps not the full 1/2 cup called for in the recipe, but at least 1/4 cup. You want the garlic and herbs nice and moist so they can be easily spread on the bread.

6 large garlic cloves, roughly chopped
1/4
cup fresh parsley
2 tbsp. fresh oregano leaves

1 tsp. kosher salt

1/2
tsp. freshly ground black pepper
1/2
cup olive oil
1 large ciabatta bread

2 tbsp. unsalted butter, at room temperature

Preheat the oven to 350 degrees.

Place the garlic, parsley, oregano, salt, and pepper in the bowl of a food processor fitted with the steel blade and process until finely minced. (DN: A mini food processor is perfect for this if you have one.) Heat the olive oil in a medium saute pan over low heat. Add the garlic and herb mixture and cook for 3 minutes, until the garlic is tender but not browned. Remove from the heat and set aside. (DN: You can leave this for several hours if need be.)

Cut the ciabatta in half horizontally, running a serrated knife parallel to the board. Spoon the garlic mixture onto the bottom half and spread the btuter on the top half and place together.

Bake the bread for 5 minutes, then unwrap and discard the foil. Bake for another 5 minutes. Slice crosswise and serve warm.

img_1639

Roasted Tomato Caprese Salad
Adapted from
Barefoot Contessa Back to Basics
Serves 6

This is essentially a simple salad so the components are very important. If you have access to very fresh mozzarella, now is the time to splurge. If you live in Seattle, DeLaurenti makes their own and it is amazing. Also, use your best olive oil and Balsamic vinegar, even your best sea salt. You will taste the difference.

12 plum tomatoes
1/4 cup quality olive oil, plus more for drizzling

1 1/2 tbsp. balsamic vinegar

2 garlic cloves, minced

2 tsp. sugar

Kosher salt and freshly ground black pepper

16 oz fresh mozzarella

12 basil leaves, julienned or chopped

Sea salt

Preheat oven to 275 degrees.

Arrange the tomatoes on a sheet pan, cut sides up, in a single layer. Drizzle with the olive oil and balsamic vinegar. Sprinkle with the garlic, sugar, 1 1/2 tsp. kosher salt, and 1/2 tsp. pepper. Roast for 2 hours until the tomatoes are concentrated and begin to caramelize. Allow the tomatoes to cool to room temperature. (DN: These can be made up to 1 day in advance. Allow to cool and then store in the refrigerator. Allow to come to room temperature before serving.)

Cut the mozzarella into slightly less than 1/2 inch thick. If the slices of mozzarella are larger than the tomatoes, cut the mozzarella slices in half. Layer the tomatoes alternately with the mozzarella on a platter and scatter the basil on top. Sprinkle lightly with sea salt and pepper and drizzle lightly with olive oil. Serve at room temperature.


Goodbye to Butternut Squash

February 26, 2009


Belltown is a neighborhood in Seattle where it once was not safe to go. It is north of the famous Pike Place Market and, seriously, when I was a kid you steered clear of that part of town. Now it is known for having super-hip restaurants, pricey shops, and multi-million dollar condos. One of the people who is credited for beginning this change is Leslie Mackie. She opened a bakery and a few years later, a neighborhood was gentrified. Build it and they will come applies to bakeries too!

But this isn’t just any bakery. It’s really quite a special spot. In terms of the bread and baked goods, I have to honestly say that I think the quality has gone downhill. You can buy their bread almost everywhere in town now and I wonder if that diversification has hurt them. Still, whenever I walk into their original location in Belltown (there are now two others), I immediately want to start baking. Everything look so good.

For me, the best thing about Macrina is eating lunch there. They have about 8 small tables so it can be kind of tricky to snag one, but if you do you are in for a treat. Everyday, in addition to salads and sandwiches, they offer a meze plate. You get to choose three things from a list of five and your choices go something like this. Savory galette, some kind of grain or pasta salad, a large piece of crostini which in itself has three choices, soup, and green salad. The green salad stays the same, the rest change daily. I have never had anything there that wasn’t lip-smackingly delicious – down the roasted onions, olives, and almonds they put on every plate.


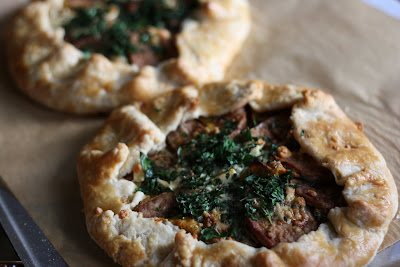
Several years ago, Mackie came out with a cookbook called Macrina Bakery & Cafe Cookbook. I bought it right after it came out and was thrilled to find that there were three savory galette recipes in there. They are all phenomenal and real showstoppers if you want to impress company. This one, because I love squash so much, is my favorite. Although there is snow on the ground here today (again!), I feel that asparagus, peas, and artichokes are on their way. I don’t feel like I gave winter squash it’s due so last week I made these galettes for my clients.

If you are intimidated by things with crusts, this galette is a great place to start. The dough is incredibly easy to work with – it behaves the best of any I have made. And because the tart is free form, there is no rolling it or worrying about transferring it to a pan. The recipe as written makes one very large galette – I have been happier with it when I make smaller ones. Even if you are serving it for a dinner party, just make two smaller ones. They will look better and be easier to work with. Last week, I made two small ones for my clients and one medium sized one to eat with my parents and brother who came over for dinner.

The crust makes enough for two galettes so you can freeze half of it for up to a month and make another one another day. Or, you can use the dough as a double pie crust. I love versatility!


Butternut Squash and Apple Galette
Adapted from
Macrina Bakery and Cafe Cookbook
Serves 8-10

I have made this tart with the fresh butternut squash and the canned pumpkin and they both taste great. Don’t hesitate to take the canned short cut.

2 Granny Smith apples
1/2 tsp. ground allspice

1 tsp. cinnamon

1/4 tsp. ground cloves

2 tbsp. unsalted butter

3 cups Roasted Butternut Squash, or canned pumpkin

2 tbsp. light brown sugar

3 eggs, lightly beaten

1/2 tsp. kosher salt

1 tbsp. finely chopped fresh sage

1/2 recipe Flaky Pie Dough, chilled

Egg wash made with 1 egg and 1 tsp. water

2 ounces Gorgonzola cheese, crumbled

1 tbsp. freshly chopped parsley

Line a baking sheet with parchment paper.

Core and peel the apples and cut into 1/2 inch wedges. Place wedges in a medium bowl and toss with half of the allspice, half of the cinnamon, and half of the cloves. Melt butter in a medium saucepan over medium-low heat, then add the spice apples and continue cooking for another 5 minutes, or until the apples are tender. Set aside to cool.

Combine butternut squash puree with the remaining allspice, cinnamon, and cloves in a large bowl. Add brown sugar, eggs, salt, and sage, and mix with a whisk to fully blend the ingredients.

Form chilled pie dough into a ball and place in on a lightly floured work surface. Cut it in half and reform each half into a ball. Flatten each ball slightly, then working with one ball at a time, roll it into an approximately 8 inch circle, about 1/8 of an inch thick. Carefully lift it onto the preapred baking sheet. Spoon half of squash mixture onto center of circle and spread to within 2 inches of the edge. Place a single layer of apples in concentric circles on top of the squash filling. Lift border over top of the filling, tucking and folding the dough to create a gathered, or pleated, finish. Lift each of the folds up and brush underneath with egg wash to seal the crust. Brush all exposed dough with egg wash then repeat with other half of dough and filling. (You may need to place it on another sheet.) Place the baking sheet(s) in the refrigerator and chill for 30 minutes.

Preheat oven to 375 degrees. Remove tart from oven and bake on center rack of oven for 30 minutes. Remov
e and sprinkle with Gorgonzola and parsley, then return to oven to bake another 25-30 minutes, or until crust is golden brown. Let cool on baking sheet for 20 minutes. (DN: I add the cheese and parsley half way through to prevent them from burning. I have found you can bake this tart 4 hours ahead and reheat in a 375 degree oven for 10 minutes before serving.)

Flaky Pie Dough
Makes enough for 2 double-crusted (9-inch) pies, or 2 galettes

I always make pie dough in my food processor, but this amount is too much for it, so I do it by hand.

5 1/4 cups flour
1 tbsp. kosher salt

12 tbsp. (1
1/2 sticks) butter, chilled and cut into 1/4-inch pieces
1
3/4 cups solid vegetable shortening, chilled
1 cup ice water

Combine flour and salt in a large bowl and toss together. Add butter and cut it into the flour until the texture is coarse and crumbly. You can use a pastry cutter, two knives, or your fingers. Cut the shortening up and add it in small pieces. Cut in the shortening until the dough is crumbly again. Add ice water and mix just until the dough sticks together when pinched. Pull dough from bowl onto a lightly floured surface and pat it into a block. Cut it in half and wrap each half in plastic wrap. Keep in the refrigerator for up to 4 days, or wrap it again in foil and store in the freezer. One day before you are going to use frozen dough, transfer it to the refrigerator and allow it to thaw there.

Roasted Butternut Squash
Makes about 4 cups of pureed squash

1- 3 lb. butternut squash

Preheat oven to 375 degrees.

Wash squash, then cut it in half lengthwise and remove the seeds with a spoon. Place squash, cut sides down on a rimmed baking sheet or roasting pan. Pour 2 cups of water into the baking sheet, surrounding the squash. Bake for about 1 hour, or until the skin is dark brown and flesh is fork tender. Remove from oven and let cool for about 20 minutes. Scoop cooled squash out of its skin and puree in a food processor until smooth. Let the pureed squash cool completely, uncovered, then store it in an air-tight container. The squash will last for up to 3 days in the refrigerator or for up to 1 month in the freezer.


« Older Posts Newer Posts »