Category: Cookbooks

Heavy on the Veg

July 21, 2009


img_2872

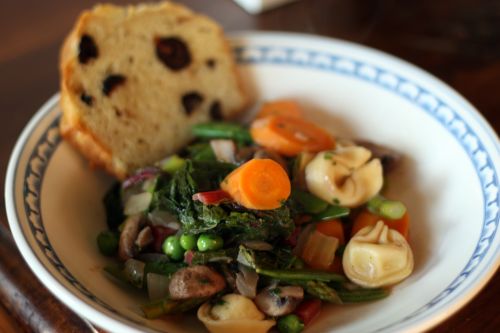
Here is something I must tell you…I love vegetables.  I know, big confession from a vegetarian, right?  But there is no rule that says you must love vegetables if you are a vegetarian.  After all, cheese is vegetarian – as is bread, pasta, chocolate, french fries…you get the picture.  But I am a card carrying member of the vegetarians-who-love-vegetables club.  The only one I don’t like is okra.

Once in a while, I want to make something really heavy on the veg.  Summer time is when it usually hits me.  I’m in the mood for something flavorful, but don’t want anything too heavy.  It just doesn’t feel right to eat a big dish of something rich when the sun is shining, the temperatures are soaring, and it’s light until 10.  On of those days, vegetables are where it’s at.
img_2875

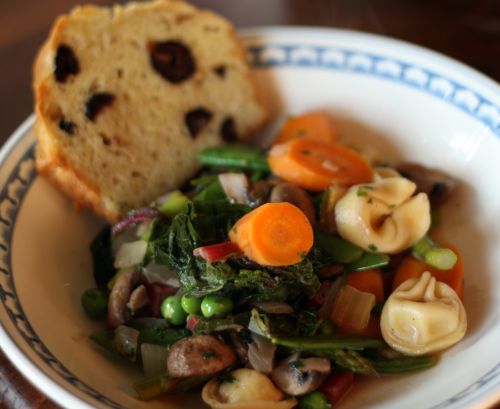
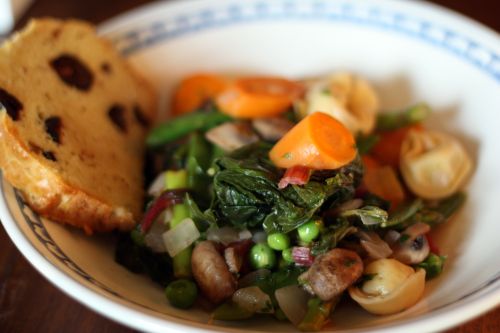
This recipe comes from one of my all-time favorite cookbooks, Vegetarian Suppers from Deborah Madison’s Kitchen.  It is a slim and modest volume, but there are incredible treasure inside.  I’ve used this book so much that some of the pages have torn away from the spine.  I made this dish a few years ago, made some notes in my book about changes I made, and was glad to have those notes last night.  At first glance, this may seem like an overly fussy recipe.  Lots of chopping and cooking things separately.  I actually streamlined a few things from the original and the recipe below reflects that.  Please trust Ms. Madison and trust me – any fuss is worth it.  What you will get is a perfectly cooked and perfectly seasoned bowl of seasonal and healthy goodness.
img_2881

Oh…and that gorgeous Olive Bread off to the side in the photo?  You can find the recipe here.
One Year Ago:  Those amazing New York Times chocolate chip cookies

Asparagus Ragout
Adapted (with many changes) from Vegetarian Suppers from Deborah Madison’s Kitchen
Serves 4

The Beurre Blanc
1/4 cup white wine vinegar or Champagne vinegar
1/4 cup dry white wine or Champagne
2 tbsp. finely diced shallot
sea salt and freshly ground black pepper
4 tbsp. cold butter, cut into small pieces

The Ragout
1 bunch rainbow chard, with stems
sea salt and freshly ground black pepper
Olive oil
1 small onion, finely diced
4 medium carrots, peeled and thinly sliced on a diagonal
1/2 cup dry white wine
1 1/2 pound asparagus, tough ends snapped off, cut into 2 inch lengths
1/2 pound snap or snow peas, trimmed
3/4 cup freshly shelled English peas
1 pound cremini mushrooms, wiped clean, and cut into quarters
8 ounces cheese tortellini, cooked according to package directions, and drained
2 tbsp. minced chervil, or a mixture of parsley and tarragon
Freshly grated Parmesan cheese, for serving

1.  To make the beurre blanc, put the vinegar, wine, shallot, and a pinch of salt in a small saucepan and simmer until only 2 tablespoons remain.  Turn off the heat and whisk in the butter piece by piece until it is all incorporated.  The sauce should be thick.  Season with a little pepper and set aside.  (This can be made several hours ahead and covered, at room temperature.)

2.  To make the ragout, slice the leaves off the chard stems, wash well, then cut into ribbons about an inch wide.  Trim the ends of the stems, then thinly slice.  Heat a large skillet over medium heat.  Add about 2 tbsp. olive oil, then the stems with a pinch of salt.  Sauté, stirring occasionally, for 4 minutes.  Lay the leaves on top (it may seem crowded at first) and continue stirring until the leaves wilt, about 4 more minutes.  Scrape out the pan into a large bowl and set aside.

3.  Return the same pan to the heat.  Add another few tablespoons of olive oil, then add the mushrooms.  Sauté until the mushrooms have browned nicely, then released and partially reabsorbed their juices, about 8 minutes.  Season to taste with salt and pepper and add to the bowl with the chard.

4.  Return the same pan to the heat.  Add another few tablespoons of olive oil.  Add the onion and carrots.  Cook over medium-high heat for a few minutes just to brown things a bit, then reduce the heat to medium.  Add the wine, let most of it sizzle away, then add 1 cup water and the asparagus.  Season with a pinch of salt, then lower the heat even more, cover, and cook until the asparagus and carrots are nearly tender, about 6 minutes.  Add the snap and English peas, cover, cook for another 3 minutes.  Add the tortellini, mushrooms, and chard.  Stir to heat through.

5.  Carefully stir in the beurre blanc and the herbs.  Serve the ragout in shallow bowls, garnished with a dusting of Parmesan cheese.


Grilled Vegetable Salsa

June 24, 2009

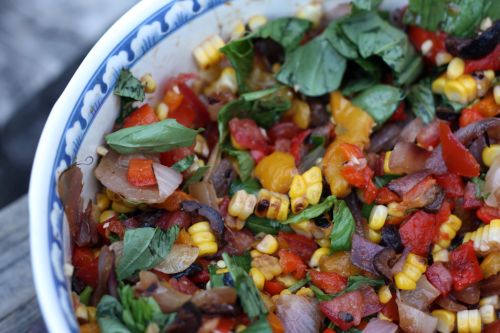
img_2663

In addition to the cake that I brought for my friend Lauren’s 40th birthday, I also brought a couple of appetizers.  I figured since her husband Travis was going to be hauling the entire dinner up the mountain, the least I could do was bring some things to munch on while he got the rest of the food ready.

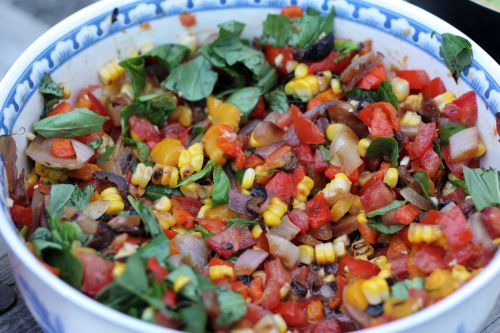
When I was searching for recipes for another friend’s 40th birthday party, I found this one for Grilled Vegetable Salsa.  I was planning to make it for John, but then decided to take the party in a more Mediterranean and less Mexican direction.  The idea of the salsa stayed with me and when I learned fajitas were on last weekend’s menu, I knew exactly what to make as an appetizer.

This recipe comes from Martha Stewart’s Hors d’Oeuvres Handbook.  I love this book on principle.  It has lots of gorgeous photographs in the front and all the recipes in the back.  It is well laid out and all the recipes I have tried are winners.  What I don’t like is that almost every recipe suggests you serve the dish right away.  What kind of cocktail party is there where you can make everything à la minute?   So, I take a lot of what is said in the book with a grain of salt.  Against Martha’s advice, I also streamlined the cooking process and I made parts of the salsa ahead of time.  It was great and everyone loved it. The salsa was awesome with chips, but you could incorporate it into a main course by spooning a generous amount of the salsa over black beans and rice, and topping it all off with slices of avocado or guacomole.

img_2658

One Year Ago:  Mushroom Pearl Pasta with Sweet Peas and Goat Cheese (if peas are in season where you live, make this!)

Grilled Vegetable Salsa
Adapted from Martha Stewart’s Hors d’Oeuvres Handbook
Makes 1 1/2 quarts

Stewart calls for three different cooking methods for the vegetables.  I streamlined it into two.  You could further streamline it by just grilling the peppers rather than roasting them.  If you do roast the peppers, they can be made up to four days ahead of time and stored, covered, in the refrigerator.

1 tsp. olive oil
2 ears of fresh corn, husk and silk removed
1 large red onion, root intact, sliced into 1/2-inch rings
4 plum tomatoes, seeded and cut into 1/2 inch pieces
2 roasted large red bell peppers, seeds removed and cut into 1/2 inch pieces
1 roasted large yellow bell pepper, seeds removed and cut into 1/2 inch pieces
1 roasted large orange bell pepper, seeds removed and cut into 1/2 inch pieces
3 oz. kalamata or oil-cured black olives, pitted and chopped
1 garlic clove, minced
1 tsp. ground cumin
2 tbsp. freshly squeezed lime juice
Kosher salt and freshly ground black pepper
1/2 roughly chopped fresh basil

1.  Prepare a grill over high heat.  Place the corn and onions on the grate and grill, turning, until grill marks appear on all sides and the corn and onions are cooked through.  The onions will take 5-8 minutes and the corn will need 15-20 minutes.  Transfer to a plate to cool.  When cool, cut the corn off the cob.  Cut the onion rings into 1/2 inch pieces.  Set aside.  (Can be made one day ahead.  Cover and chill.  Return to room temperature before continuing.)

2.  In a large bowl, combine the tomatoes, peppers, corn, and onion.  Stir in olives, garlic, cumin, and lime juice.  Season with salt and pepper.  Allow the vegetables to marinate for at least one hour and up to six hours.  Just before serving, stir in the basil and season to taste.


Spreading Scone Love

April 26, 2009

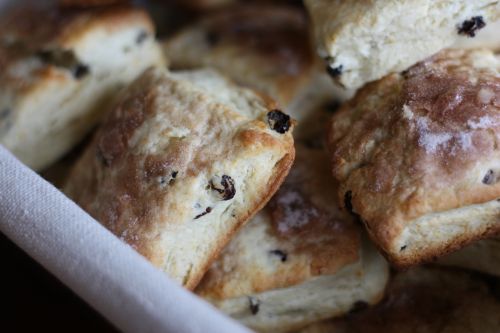
img_1988

Scones.  They are almost everywhere coffee is sold (in Seattle, that is everywhere), and most of them are terrible.  It seems to me that each year, they get a little bigger and a little less flavorful.  At this point in history, they just taste like flour, sugar, and air.

This is the only scone I have ever made and, aside from a pumpkin one I remember seeing on Eggs on Sunday, the only one I will probably ever make.  Everyone who eats them loves them.  Our brunch guests each had several and my own four year old had two all to himself.  I think it’s because they are simple.  No 100 ingredients thrown in to mask the taste of nothing, just a few really good things.

I got this recipe from The Joy of Cooking.  It’s a book I turn to when I just want the essence of a dish.  Do you ever feel like no, I don’t want to make a pasta salad with heirloom beans and $75 balsamic vinegar, I just want to make a pasta salad?  The Joy of Cooking is your friend.  One day, long ago, I found myself wanting to make scones and all the recipes I was seeing had enough ingredients in them to make my mouth tired just thinking about eating them.  I turned to this book and it did not disappoint.

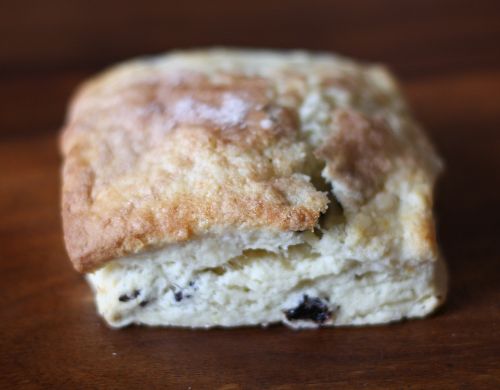
img_1992

Classic Currant Scones
Adapted from The Joy of Cooking
Makes 8-12 scones

Do yourself a favor and double this recipe.  It takes no extra effort and they freeze beautifully.  I used square biscuit cutters for these but I have also used round and have formed the dough into a round and cut them into wedges as described below.  All wonderful!

2 cups all-purpose flour
1/3 cup sugar
1 tbsp. baking powder
1/2 tsp. salt
6 tbsp. (3/4 stick) cold unsalted butter, cut into 1/2 inch pieces
1/2 cup dried currants or raisins
1 large egg
1/2 cup heavy cream
1 tsp. grated orange zest (optional)
2-3  tsp. heavy cream or milk
Cinnamon and sugar

Position a rack in the middle of the oven.  Preheat to 425 degrees.  Have ready a large ungreased baking sheet. Whisk together the flour, sugar, baking powder, and salt in a large mixing bowl.  Drop in the butter and cut it in with 2 knives or a pastry blender, tossing the pieces with the lour mixture to coat and separate them as you work, until the largest pieces are the size of peas and the rest resembles breadcrumbs.  Stir in the currants.

In a liquid measuring cup, whisk together the egg, cream, and zest.  Add to the flour mixture.  Mix with a rubber spatula, wooden spoon, or fork just until the dry ingredients are moistened.  (DT: I usually find it necessary to add a little extra cream here, maybe 1-2 tbsp.)  Gather the dough into a ball and knead it gently against the sides and bottom of the  bowl 5-10 times, turning and pressing any loose pieces into the dough each time until they adhere and the bowl is fairly clean.  Transfer to a lightly floured surface and pat the dough into an 8-inch round about 3/4 inch thick.  Cut into 8 or 12 wedges and place at least 1/2 inch apart on the baking sheet.  Brush the tops with the cream or milk and sprinkle with the sugar and cinnamon.

Bake until the tops are golden brown, 12-15 minutes.  Let cool on a rack or serve warm.


Cupcake Scrooge

April 21, 2009

img_1922

I’m going to sound like a huge party pooper here, but I’m over the whole cupcake thing.  I subscribe to many a blog and when they post about cupcakes, I just hit delete.  I’m over the multitudes of new cupcake shops opening all over this and every other town.  I’m just over it.  About the only place I like to see cupcakes is in these illustrations.

But I have children and children love cupcakes.  I hit up the local shops and I bake them for my boys.  My boys love sweets but nothing makes them happier than a cupcake.  Just seeing their faces makes me feel over my “over it” attitude.

This week, I need several desserts.  We had a high school friend of Randy’s over for dinner last night, I am teaching a cooking class on Thursday, and we need to celebrate the birthday of our incredible babysitter.  I made one big batch to satisfy all needs.

A word about Erika, our babysitter.  She watches the boys two mornings a week and has babysat for us over two separate weekends.  She is amazing for many reasons.  First of all, I like her.  I feel comfortable around her and enjoy her company.  She cleans up around the house, does laundry, takes the boys outside to the park and to the local doughnut shop, and she plays all kinds of crazy games with them.  Most importantly, she loves them.  She really truly does and tells them so.  I have informed her that she can never move and she can never get married because I can’t imagine our life without her.

This Friday is her birthday and I know the boys will want to celebrate with her, seeing as “Happy Birthday” is one of their favorite songs.  I know they will enjoy sharing these!

The cupcakes come from a book my husband (who will never be over the cupcake thing) bought me a couple of years ago.  It is entitled, imaginatively, Cupcakes! and it has become my go-to for this type of dessert.  There are lots of good recipes, from the basic to the fancy.  If you have cupcake lovers in your house, I highly recommend it.

img_1942

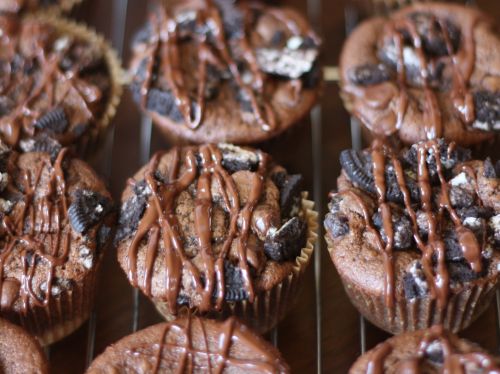
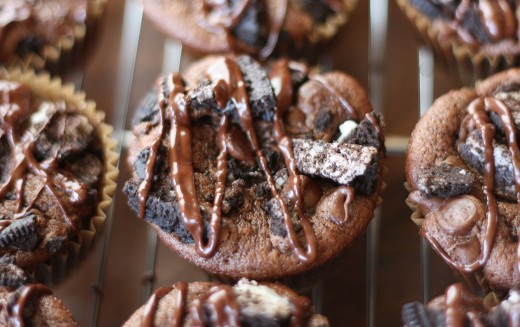
Mississippi Mud Cupcakes
Adapted from Cupcakes!
Makes 18-24 regular cupcakes

I used Newman’s Own for the cookies.  The recipe says the yield is 18, but I got 24 – never a bad thing!

2 1/4 cups crushed chocolate sandwich cookies , in 1/2 inch to 1/4 inch pieces
1 cup (6oz.) semisweet chocolate chips
Chocolate Sour Cream Cupcake Batter (recipe follows)
3 oz. semisweet chocolate, chopped

Position a rack in the middle of the oven.  Preheat the oven to 350 degrees.  Line 18 muffin tin cups with paper cupcake liners.

Spoon 1 tbsp. of the cookie pieces into the bottom of each paper liner, then spoon about 8 chocolate chips over the cookie pieces in each liner.  Spoon a scant 1/4 cup of batter over the chocolate chips.  Sprinkle the remaining chocolate chips and cookie pieces over the  tops, pressing them gently into the batter.

Bake just until the tops feel firm and a toothpick inserted in the center comes out clean, about 22 minutes.  Cool the cupcakes for 20 minutes in the pans on a wire rack.

Carefully lift the cupcakes from the pan and place them on a wire rack to cool completely.  Put the chopped chocolate in a heatproof bowl and place it over, but not touching, a saucepan of barely simmering water.  Stir until the chocolate is melted and smooth.  Remove from the water and set aside to cool slightly.

Use a small spoon to drizzle thin lines of melted chocolate over the top of each cooled cupcake.  The cupcakes can be covered and stored at room temperature for up to 3 days.

Chocolate Sour Cream Cupcake Batter

This is a great basic cupcake to have in your repetoire.  All kinds of frosting taste great on top.

3 oz. unsweetened chocolate, chopped
1 cup flour
1/2 tsp. baking powder
1/2 tsp. baking soda
1/4 tsp. salt
1/2 cup (1 stick) unsalted butter, at room temperature
1 1/4 cups sugar
2 large eggs
1 tsp. vanilla extract
1/2 cup sour cream
1/2 cup water

Put the chocolate ina heatproof bowl and place it over, but not touching, a saucepan of barely simmering water.  Stir until the chocolate is melted and smooth.  Remove from the water and set aside to cool slightly.

Sift the flour, baking powder, baking soda, and salt into a medium bowl and set aside.

In a large bowl, using an electric mixer on medium speed, beat the butter and sugar until smoothly blended and creamy, about 2 minutes.  Stop the mixer and scrape the sides of the bowl as needed during mixing.  On low speed, mix in the melted chocolate.  On medium speed, add the eggs one at a time, mixing well until each is blended into the batter.  Add the vanilla and beat until the mixture looks creamy and the color has lightened slightly, about 1 minute.  Mix in the sour cream until no white streaks remain.  On low speed, add half of the flour mixture, mixing just to incorporate it.  Mix in the water.  Mix in the remaining flour mixture unil it is incorporated and the batter looks smooth.  Proceed with above recipe.


Gruyère Gougères

April 17, 2009

img_1899

If you are new to baking or cooking, it might make you feel better that a fairly experienced person – I’m talking about myself here – gets kitchen jitters.  Now, if I got nervous every time I made something new, I would be nervous all the time and we all know that’s not healthy.  But if I am going to venture into relatively new territory, I get a few butterflies.

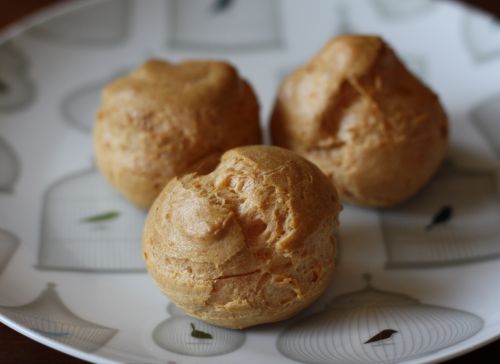
For example, these gougères.  Gougères are made from pâte à choux which is the same dough used to make profiteroles and éclairs.  It has the amazing ability to bake up a firm, slightly crunch exterior while maintaining a soft airy interior.  I first encountered this dough a few years ago when I decided to make profiteroles for my parents’ anniversary dinner.  They both love them and everything I read about pâte à choux was that it was easy to make and easy to work with.

When I am making something new or something unfamiliar to me, it is extremely important to me to go to a cookbook that I trust.  In this case, I turned to Baking Illustrated by the publishers of the magazine Cook’s Illustrated.  These people test recipes to death and make all the mistakes you or I would as they work to find the foolproof recipe.  I feel safe in their hands and in their detailed recipes.

I am catering a dinner party on Saturday and wanted to have a couple of nibbles for guests to eat before they sit down for the five course meal.  Gougères are something I have been wanting to try for a long time and I figured this was a good opportunity.  In addition to being easy to pop in the mouth, they can be made in advance and frozen – always a huge bonus in my book.

img_1901

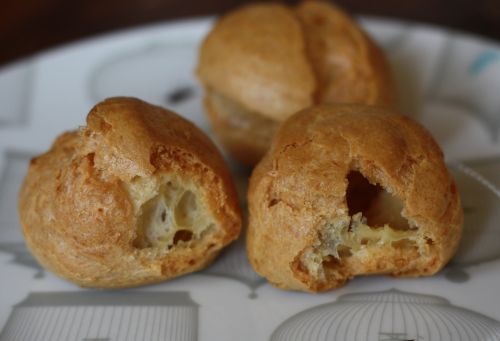
In the above photo you can see what they look like inside.  This is courtesy of my two small taste testers, neither of whom liked the gougères, but mama is proud that they tried them!

Gougères
Adapted from Baking Illustrated
Makes about 16

2 large eggs, plus 1 large egg white
5 tbsp. butter, cut into 10 pieces
2 tsbp. whole milk
6 tbsp. water
1/4 tsp. salt
1/2 cup all-purpose flour, sifted
3 oz. Gruyère cheese, shredded (about 3/4 cup)
Pinch cayenne pepper

1.  Beat the eggs and egg white in a measuring cup or small bowl; you should have 1/2 cup (discard the excess).  Set aside.

2.  Bring the butter, milk, water, and salt to a boil in a small saucepan over medium heat, stirring once or twice.  When the mixture reaches a full boil (the butter should be fully melted), immediately remove the saucepan from the heat and stir in the flour with a heatproof spatula or wooden spoon until combined and the mixture clears the sides of the pan.  Return the saucepan to low heat and cook, stirring constantly, using a smearing motion, until the mixture is slightly shiny, looks like wet sand, and tiny beads of fat appear on the bottom of the saucpan, about 3 minutes.

3.  Immediately transfer the mixture to a food processor and process with the feed tube open for 10 seconds to cool slightly.  With the machine running, gradually add the eggs in a steady stream, followed by the Gruyère and the cayenne pepper.  When everything has been added, scrape down the sides of the bowl, then process for 30 seconds until a smooth, thick, sticky paste forms. (Can be made two hours ahead.  Transfer to a medium bowl, press a sheet of plastic wrap that has been sprayed with nonstick cooking spray directly on the surface, and store at room temperature.)

4.  Adjust an oven rack to the middle position and heat the oven to 425 degrees.  Spray a large (18 by 12 inch) baking sheet with nonstick cooking spray and line with parchment paper; set the pan aside.

5.  Fold down the top 3 or 4 inches of a large pastry bag fitted with a 1/2-inch plain tip to form a cuff and fill the bag with the paste.  Unfold the cuff, lay the bag on the work surface, and, using your hands or a bench scraper, push the paste toward the tip of the pastry bag.  Twist the top of the bag and pipe the paste onto the prepared baking sheet into sixteen 2-inch mounds spacing about an inch and a half apart.  Use the back of a teaspoon dipped in water to even out the shape and smooth the surface of the mounds.

6.  Bake 15 minutes (do not open oven door), then reduce the oven temperature to 375 degrees and continue to bake until golden brown and fairly firm, 12-14 minutes longer.  Remove the baking sheet from the oven.  With a paring knife, cut a 3/4 – inch slit into the side of each puff to release steam; return puffs to the oven, turn off the oven, and prop the oven door open with the handle of a wooden spoon.  Dry the puffs in the turned-off oven until center is just moist (not wet) and the surface is crisp, about 45 minutes.  Transfer puffs to a rack and cool until just warm.  Serve warm.  (Puffs can be cooled completely and stored at room temperature for 24 hours or frozen in a zipper-lock plastic bag for up to 1 month.  Before serving, crisp the room temperature puffs in a 300 degree oven 5-8 minutes; crisp the frozen puffs 8-10 minutes.)


« Older Posts Newer Posts »