Category: Bread

Thoughts On Cinammon Rolls

April 11, 2009

img_1812

How do you like your cinammon rolls?  Do you like them more like cake or more like bread?  Do you like them filled with all kinds of things and extra sweet, or stripped down?  Do you like them small and manageable or extra extra large like the one above?

For me, the ultimate cinammon roll can be found at Holly B’s Bakery on Lopez Island.  They are made with a bread dough, so they are not at all cakey.  They have a restrained amount of raisins and sliced almonds in them, and are sweetened with equal parts brown and white sugar.  The effect is almost carmel-y but they are not overly sweet.  One of life’s great pleasures is sitting at one of the communal tables on the porch and slowly unwinding your perfect treasure until you get to the final bite, the middle, which is the very best part of the whole thing.  I have the recipe for those extraordinary rolls, I just haven’t made them yet.
img_1806

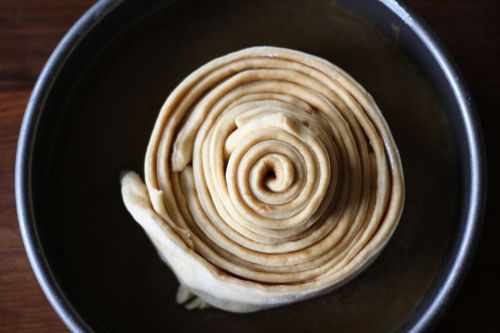
Several months ago, when I first bought Flo Braker’s Baking for All Occasions, the photo that truly jumped off the page was for this Butterscotch Spiral Coffee Cake.  What it is, really, is a giant cinnamon roll and who wouldn’t want that?  But I actually put this book away without making anything for many months because I really don’t like how it is laid out.  The chapters have titles like “Blue Ribbon Worthy”, “Baking for a Rainy Day”, and “Ready to Share” – great for perusing, but not the best when you actually want to find a recipe.  I pulled the book out several times and each time I put it back, annoyed.

When our lovely friend Joy invited us to the annual Easter egg hunt/brunch at their house, I asked if I could bring a coffee cake.  I almost made this one, but remembered that I wanted to try this giant cinammon roll.
img_1808

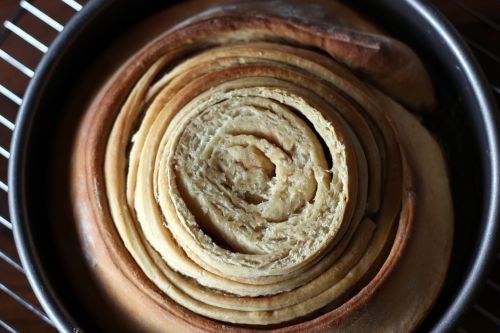
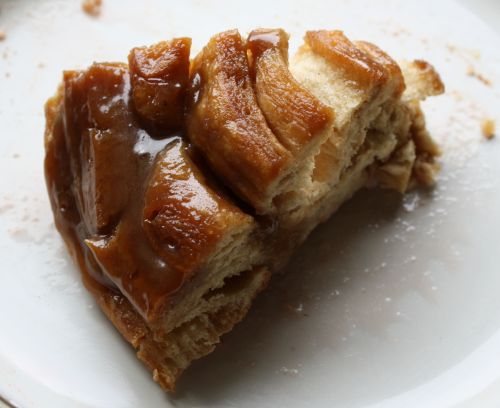
The dough is a joy to work with, very forgiving and responsive to what you want to do with it.  The rising times are short, making this a possible cake to start in the morning and easily serve to your brunch guests.  The wow factor is high.  The taste is, well, pretty good.  It’s quite bread-y and not very sweet.  I think the spices could be punched up a bit to give the actual cake part more flavor.  The glaze is spectacular but there isn’t much of it.  I had some problems with the middle part being too high for the rest of the cake so I had to trim it off.  There were other minor problems along the way, some of them my fault (like the butter explosion in the microwave), but all in all, it’s a recipe I would make again.  Or maybe I’ll just make those Holly B’s cinammon rolls instead.
img_1853

Butterscotch Spiral Coffee Cake
Baking for All Occasions
One 9-inch cake

Braker says this serves 14-16 but I think 10 is closer to reality.  She also says the cake is best the day it is made and I think that is true.  We ate it the next day and it was still good, just not as tender.

Dough
2 1/2 to 2 3/4 cups all-purpose flour
1/4 cup granulated sugar
2 1/4 tsp. (1 envelope) instant yeast
1/2 tsp. salt
1/2 tsp. ground cardamom
1/8 tsp. ground nutmeg
1/8 tsp. ground cinnamon
1/3 cup whole milk
2 oz. (1/2 stick) unsalted butter
1/4 cup water
2 large eggs, at room temperature
1 tsp. pure vanilla extract

Butterscotch Glaze
1/2 cup firmly packed light brown sugar
2 oz. (1/2 stick) unsalted butter
2 tbsp. dark corn syrup

Cinnamon-Butter Filling
1/2 tsp. ground cinnamon
2 tbsp. unsalted butter, melted

To Make the Dough: Stir together 2 cups of the flour, the sugar, yeast, salt, cardamom, nutmeg, and cinnamon in the bowl of a stand mixer; set aside.  In a small, heavy saucepan, combine the milk and butter and heat over low heat just until the butter melts.  Add the water and set aside until warm, about 1 minute.

Pour the milk mixture over the flour-yeast mixture and mix well with a rubber spatula until all of the dry ingredients are moistened.  Attach the bowl to the mixer, and fit the mixer with the paddle attachment.  With the mixer on low speed, add the eggs, on at a time, beat after each addition until incorporated.  Add the vanilla in the final moments of mixing.  Stop the mixer, add 1/2 cup more flour and resume mixing on low speed until smooth, 30-45 more seconds.  Add 2 tablespoons additional flour and resume mixing on medium speed until the dough is smooth, still soft, and slightly sticky, about 45 seconds.

Sprinkle the work surface with 1 tablespoon of flour and center the dough on the flour.  Knead the dough gently until it is smooth and no longer sticky, adding an additional 1-2 tablespoons flour only if necessary to prevent stickiness.  Place the dough in a large bowl, cover the bowl securely with plastic wrap, and let the dough rise in a warm place until doubled in bulk, 45-60 minutes.  The dough is ready when a finger gently pressed into it leaves an indentation.  Meanwhile prepare the baking pan, the glaze and the filling.

To Make the Butterscotch Glaze: Lightly coat a 9 by 2-inch round cake pan with nonstick spray, or butter the pan.  Combine the sugar, butter, and corn syrup in a small, heavy saucepan and set over low heat until the butter is completely melted.  Pour the mixture into the prepared pan and tilt the pan to cover the bottom evenly’ set aside.  (The glaze might thicken slightly before it’s time to place the dough in the pan, but it will liquefy again as the coffee cake bakes.)

To Make the Cinnamon-Butter Filling: In a small bowl or cup, stir the cinnamon into the butter; set aside.

Before Baking: Center a rack in the oven and preheat the oven to 350 degrees.

To Assemble the Coffee Cake: Gently deflate the dough.  On a lightly floured work surface, roll out the dough into a 16 by 12-inch rectangle.  Using a pastry brush, spread the butter-cinnamon mixture evenly over the dough.  Cut the dough lengthwise into six 2-inch-wide strips.  (A pizza cutter is helpful here.)  Loosely (so the dough has some give as it expands in the oven) roll up 1 strip and place it, cut edge up, in the center of the prepared pan on top of the glaze.  One at a time, coil the remaining dough strips around the center strip, starting each strip at the end of the previous one, to make a single large spiral.  As you roll the dough strips around the coffee cake, the butter-cinnamon side of the dough strips should be facing inside.  (When you finish forming he spiral there will be plenty of space sleft in the pan.  The spaces around the dough will fill in as the dough bakes.)  Loosely cover the pan with plastic wrap and let teh cake rise in a warm place until it is almost doubled in size, about 30 minutes.

Bake the coffee cake until the top is deep golden brown, about 35 minutes.  Check after 20 minutes to make sure the cake is not browning too fast.  If it is, cover the top loosely with aluminum foil for th ealst 10-15 minutes of baking to prevent overbrowning.  Transfer to a wire rack (if you have used foil, remove it) and let cool for 10 minutes.

Gently tilt the pan and tap the sides on a counter to release the cake sides, then invert a serving plate on top of the cake and invert the pan and the plate.  Leave the pan on the cake for 1 minute, so the glaze transfers to the cake, then gently lift off the pan.  Using a rubber spatula, scrape out any butterscotch syrup remaining in the pan and spread it over the warm surface of the cake.

Serve the cake warm or at room temperature, cut into wedges gently with a serrated knife.  This coffee cake is best the day it is made.


An Ina Kinda Day

March 18, 2009

picnikcollage

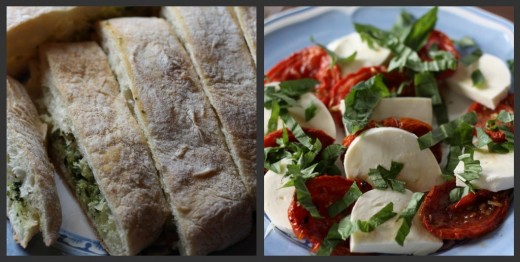
I have four of the Barefoot Contessa cookbooks in my collection and I use them with surprising regularity. If you are new here, I am a vegetarian – something Ina definitely is not. Like not even close. But I love her books and love her recipes. I use many of the dessert ones and also get a lot of mileage out of the soup, salad, and vegetable chapters.The dinner I made last night contained two recipes from her latest book, Back to Basics.

img_1585

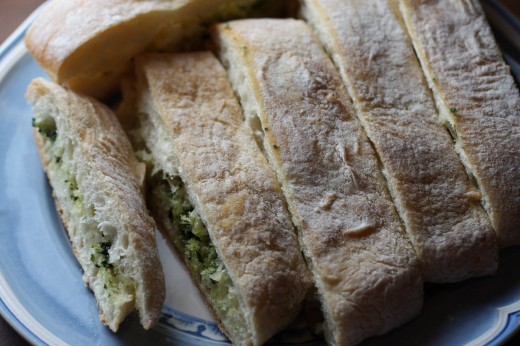
Do you remember the garlic bread from your childhood? The one I remember is from some “Italian” restaurant in the suburb of Seattle where I grew up. My parents are transplanted New Yorkers and I think the hardest part about moving West was the loss of good Italian food and good bagels. (It has gotten better, but we are by no means close to what NY has to offer.) We would go to this restaurant and my brothers and I would chow on garlic bread which consisted of styrofoam-like bread, slathered with butter, and liberally sprinkled with garlic salt. There may have even been some green can Parmesan cheese on there for good measure. Needless to say we loved it, but there is no way I would eat that now.

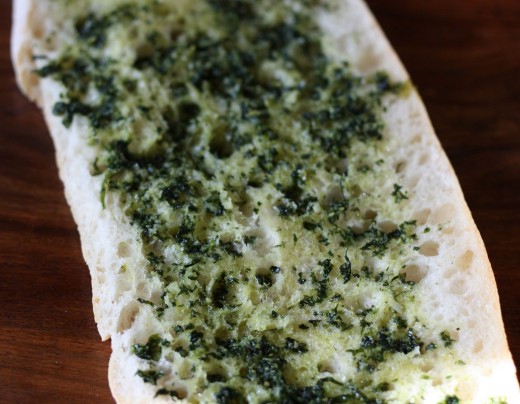
This is real garlic bread. Ciabatta bread, a heady concoction of lots of garlic, parsley, and fresh oregano sauteed with salt and pepper in a good amount of olive oil, and a very restrained amount of butter – especially for Ina. This is baked in the oven for only 10 minutes – just enough for the all the flavors to mingle and for the bread to get nice and warm – not enough to toughen the bread. In true Ina form, this recipe is found in the Vegetables section of the book!

img_1637

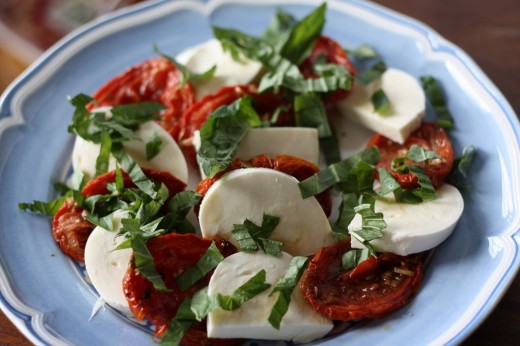
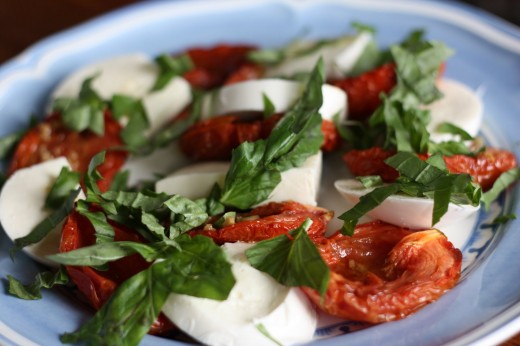
The other recipe I made yesterday was for this Roasted Tomato Caprese Salad. For me it was one of those – why didn’t I think of that?! – moments. Here in Seattle, we are fortunate to have amazing produce. We get incredible spring asparagus and peas, summer berries that people all over the country would pay a fortune for, and wild mushrooms all fall. We do not, however, get good tomatoes. If you grow them yourself, you can get a decent tomato now and then, but I have never experienced the New Jersey tomato. If I did, I think I would cry.

I love tomatoes so I eat them anyway. But Caprese salad never did much for me. Mozzarella doesn’t have that much flavor, so if your tomatoes are tasteless, why exactly would you eat it? Enter Ina and her good idea to roast the tomatoes. That way, you can concentrate the flavor and give it a little boost with olive oil, salt, pepper, a little sugar, and a little balsamic vinegar. Eating this last night really was a revelation and a recipe I will make again and again.

img_1574

Garlic Ciabatta Bread
Adapted from
Barefoot Contessa Back to Basics
Serves 8

To make my cooking healthier, I always add a minimal amount of oil when I am sauteing. For this recipe, you will want to add more – perhaps not the full 1/2 cup called for in the recipe, but at least 1/4 cup. You want the garlic and herbs nice and moist so they can be easily spread on the bread.

6 large garlic cloves, roughly chopped
1/4
cup fresh parsley
2 tbsp. fresh oregano leaves

1 tsp. kosher salt

1/2
tsp. freshly ground black pepper
1/2
cup olive oil
1 large ciabatta bread

2 tbsp. unsalted butter, at room temperature

Preheat the oven to 350 degrees.

Place the garlic, parsley, oregano, salt, and pepper in the bowl of a food processor fitted with the steel blade and process until finely minced. (DN: A mini food processor is perfect for this if you have one.) Heat the olive oil in a medium saute pan over low heat. Add the garlic and herb mixture and cook for 3 minutes, until the garlic is tender but not browned. Remove from the heat and set aside. (DN: You can leave this for several hours if need be.)

Cut the ciabatta in half horizontally, running a serrated knife parallel to the board. Spoon the garlic mixture onto the bottom half and spread the btuter on the top half and place together.

Bake the bread for 5 minutes, then unwrap and discard the foil. Bake for another 5 minutes. Slice crosswise and serve warm.

img_1639

Roasted Tomato Caprese Salad
Adapted from
Barefoot Contessa Back to Basics
Serves 6

This is essentially a simple salad so the components are very important. If you have access to very fresh mozzarella, now is the time to splurge. If you live in Seattle, DeLaurenti makes their own and it is amazing. Also, use your best olive oil and Balsamic vinegar, even your best sea salt. You will taste the difference.

12 plum tomatoes
1/4 cup quality olive oil, plus more for drizzling

1 1/2 tbsp. balsamic vinegar

2 garlic cloves, minced

2 tsp. sugar

Kosher salt and freshly ground black pepper

16 oz fresh mozzarella

12 basil leaves, julienned or chopped

Sea salt

Preheat oven to 275 degrees.

Arrange the tomatoes on a sheet pan, cut sides up, in a single layer. Drizzle with the olive oil and balsamic vinegar. Sprinkle with the garlic, sugar, 1 1/2 tsp. kosher salt, and 1/2 tsp. pepper. Roast for 2 hours until the tomatoes are concentrated and begin to caramelize. Allow the tomatoes to cool to room temperature. (DN: These can be made up to 1 day in advance. Allow to cool and then store in the refrigerator. Allow to come to room temperature before serving.)

Cut the mozzarella into slightly less than 1/2 inch thick. If the slices of mozzarella are larger than the tomatoes, cut the mozzarella slices in half. Layer the tomatoes alternately with the mozzarella on a platter and scatter the basil on top. Sprinkle lightly with sea salt and pepper and drizzle lightly with olive oil. Serve at room temperature.


Want Some Dinner?

December 18, 2008


It’s snowing in Seattle. If you are not from around here, that may not sound surprising. You look at a map of the United States and see that Seattle is north. North like Montana, North Dakota, Minnesota, Maine, etc. It snows in all of those places but it doesn’t usually snow here. Our fair city is in the middle of two mountain ranges, so the clouds come off the Pacific, dump a bunch of snow in the Olympic mountains (the range to the west of us) and warm up as they move over Seattle. We get a bunch of rain and then the clouds move East and dump a bunch of snow in the Cascade range. At least, this is how I used to explain it to college friends when they asked me if we got a lot of snow.

Because we are usually snow-less in Seattle, and because this is a very hilly city, snow wreaks havoc on us when it does come. I think our entire city has three snow plows so the only roads that get cleared are the highways and very major arterials. You are a fool to try and drive – or you are my husband who pooh-poohs all the fuss and will most likely get stuck downtown tonight.

Thursdays are a food delivery day for me. I was proactive yesterday (as I always try to be) and made everything but the salad dressing for tonight’s dinner. Because I will not be delivering, I now have enough chili and cornbread to feed a small army. Any takers?

Let’s talk about cornbread. Cornbread is one of those things that used to be a disappointment for me. I love the idea of it, but always found the actual thing to be dry and tasteless. Then I found the recipe in the original Moosewood cookbook and decided that cornbread was a necessity when making things like chili or black bean soup. From there, I moved on to the recipe in the Joy of Cooking which is that much more moist and the one I still use when I want something more on the plain side. If you want to jazz it up, make this one. It is incredibly moist and rich and savory. I use three (seeded) jalapenos which gives it a little kick but not so much that it hurts the tongue. This cornbread freezes beautifully so make a whole batch even if you don’t plan to eat it all in one sitting. Also, I have made it in muffin tins and mini muffin tins and it turns out great.

Jalapeño Cheddar Cornbread
Adapted from
Barefoot Contessa at Home
Makes 12 very large pieces

3 cups flour
1 cup yellow cornmeal

1/4 cup sugar

2 tbsp. baking powder

2 tsp. kosher salt

2 cups milk

3 eggs, lightly beaten

2 sticks butter, melted
and cooled slightly
8 oz. Cheddar cheese, grated and divided

3 scallions, chopped, plus extra for garnish

2-3 seeded and minced jalapeno peppers

Combine the flour, cornmeal, baking powder, and salt in a large bowl. In a separate bowl, combine the milk, eggs, and butter with a whisk. With a wooden spoon, stir the wet ingredients into the dry until most of the lumps are dissolved. Don’t overmix! Mix in 2 cups of the grated cheddar, the scallions, and jalapenos, and allow the mixture to sit at room temperature for 20 minutes.

Meanwhile, preheat the oven to 350 degrees. Grease a 9x13x2 baking pan.

Pour the batter inot the preapred pan, smooth the top, and sprinkle with the remaining grated Cheddar and extra chopped scallions. Bake for 30-35 minutes, or until a toothpick comes out clean. Cool and cut into large squares.

UPDATE: Do not, under any circumstances, decide to reheat this bread in the oven. We ended up taking the whole dinner to a friends’ house and decided to warm up the bread. I stuck the whole pan in a 350 oven for about 15 minutes and it just turned into soup in the middle. I think that much butter, cheese, and milk wasn’t meant to be reheated.


Starting Early

November 14, 2008


Remember when I said I wasn’t going to bully you into making something? Well, in that post I strongly suggested. In this post, I’m going to have to insist. You have to make this bread for Thanksgiving.

Yes, I said the T-word. Friends, Thanksgiving is less than two weeks away and, at least at my house, it is never too soon to start preparing. Seeing as this is a non-client cooking day for me, I am going to spend some time finalizing my menu and start the shopping list.

Thanksgiving is huge this year because the torch has officially been passed. Ever since I was a baby, my mom has hosted Thanksgiving. The guest list more or less stayed the same, the menu more or less stayed the same and very occasionally the setting shifted as we moved a couple of times. Certain traditions were established. Every year my mom worried that the power was going to go out (it did one year). Every year my brother Michael and my parents’ friend Tom whipped the cream in a copper bowl with a whisk (because of the year the power went out – no Kitchen Aid). Every year Tom said the turkey was dry (it never was). And so on and so on.

Last year my mom decided she was done with making Thanksgiving dinner and gave me the gift of creating new traditions in our home. Already things are going to be different. We are having many more people (21 adults, at least 8 children) and we are going to – you might want to sit down for this – deep fry a turkey. Yes, – not one but two turkeys are going to cross the threshold of my vegetarian home. Here is how I see it. Of the 21 adults coming, only 3 are vegetarian. Of the 18 carnivores, I know that at least half of them LOVE turkey. This is not a group that eats turkey because it’s what you are supposed to do, they eat it because they love it. How can I, someone who loves to feed people, deny them the thing that they love?

The answer is I can’t. So, turkey it is. After talking to some friends who have always done the deep-fried thing, Randy has it in his head that we have to deep fry. Because we are having so many people, I figure we should have two turkeys anyway, so we will roast one and deep fry the other. People can decide which one they like best. Here is the catch – aside from carrying them home from the grocery store, my goal is to not touch the turkeys at all. Randy assures me he has the deep frying one and Deb (who has moved – sob!), promised she would come help me with the other one. Other invited guests have offered to come help as well (I think they are nervous that I am going to try and slip a Tofurkey by them) so I think I can get away with not touching any bird.

I digress. Back to my bullying ways. I have been making this bread for Thanksgiving for about 15 years. In my family, it wouldn’t be Thanksgiving without it. If you are nervous about making bread, this is a great one to start with because it is extremely forgiving and easy to work with. It also looks beautiful and has the perfect sweetness to balance what is a very savory meal. If that isn’t enough to convince you, it can be made up to 2 weeks in advance and stored in the freezer. I take it out the morning of and let it thaw, still wrapped, at room temperature.

Let’s talk about bread for a minute. I make mine in a Kitchen Aid mixer using first the regular blade and switching to the dough hook when it is time to knead. Of course, people have been making bread for millenia without this tool, so don’t let not having a stand mixer stop you from trying it. One of the most helpful pieces of advice I have ever read came from Mollie Katzen in her Enchanted Broccoli Forest cookbook. She said that when dough has been kneaded enough – either by hand or machine – it should feel like your ear lobe.

I’m sending this to Wild Yeast’s weekly Yeastspotting showcase.

Cranberry-Walnut Braid

Adapted from
Bon Appetit Magazine
Makes 1 Loaf

I have had trouble finding orange extract so I use Simply Organic’s Orange Flavor which is essentially orange flavored oil.

3 cups (or more) bread flour
1/4
cup sugar
2 envelopes quick-rising yeast

1
1/2 tsp. salt
1/2
cup buttermilk
2 large eggs

2 tbsp. (
1/4 stick) unsalted butter, melted
1
1/2 tbsp. orange extract
1/3
cup (about) hot water (120-130 degrees F)
1 cup dried cranberries

1/2
cup coarsely chopped walnuts
1 large egg, beaten to blend (for glaze)

Stir 3 cups flour, the sugar, yeast and salt in large bowl to blend. Add buttermilk, 2 eggs, melted butter and orange extract and stir vigorously until well blended. Gradually stir in enough hot water to form soft, slightly sticky dough. Transfer dough to floured work surface. Knead dough until smooth and slightly tacky but not sticky, adding more flour if necessary, about 7 minutes. Knead in dried cranberries 1/3 cup at a time; then knead in walnuts. Form dough into ball.

Oil large bowl. Add dough to bowl, turning to coat with oil. Cover bowl with plastic wrap, then towel. Let dough rise in warm draft-free area until doubled in volume, about 1 1/2 hours.

Lightly oil large heavy baking sheet (or line with parchment paper). Punch down dough. Turn dough out onto floured surface. Divide dough into 4 equal pieces; then divide 1 piece of dough into 3 equal pieces and reserve. Using palms of hands, roll out each of remaining 3 large pieces on work surface to 13-inch long ropes. Braid ropes together. Tuck ends under and pinch together. Transfer braid to prepared baking sheet. Roll out each of the reserved 3 small dough pieces to 10-inch long ropes. Braid ropes together. Tuck ends under and pinch together. Brush large braid with some of egg glaze. Place small braid atop center of large braid. Brush small braid with some of egg glaze. Let rise uncovered in warm area until almost doubled in volume, about 1 hour 15 minutes.

Preheat oven to 325 degrees. Brush loaf again with egg glaze. Bake until loaf is deep golden brown and sounds hollow when tapped on bottom, about 45 minutes. Transfer loaf to rack and cool at least 45 minutes before slicing. (Can be made ahead. Cool completely. Wrap tightly in foil and a plastic bag and freeze for up to 2 weeks. Thaw at room temperature.)


Just the Recipe, Please

October 8, 2008


I feel like I have been very wordy lately. I guess it’s a cyclical thing with blogging. Sometimes you have a lot to say and sometimes not much. Sometimes a story goes naturally with a recipe, sometimes not.

I don’t have much to say about this bread except that it is one of those exceptional recipes that requires little of your time and delivers a lot. It is moist, incredibly flavorful, and totally addictive. From now on, I am going to call those “bang for your buck” recipes. I don’t mean “buck” as in money but as in time or effort. To me, these kinds of recipes are priceless. Some examples from this blog would be this cake, this tart, and these tomatoes.

I made this bread yesterday to serve with the 5 Lentil Soup and a Chopped Salad with Apple Vinaigrette. Because it doesn’t take any extra effort, I doubled the recipe and put one in the freezer for a dinner party this coming Saturday. I would recommend always doing this with any type of quick bread – they freeze beautifully for a month or more. Just be sure to double wrap them in foil and put them in a plastic bag (the ones from the produce department of your grocery store are great for this.) The bread is also great served cut into small slices and served as an appetizer.

Quick Olive and Cheese Bread
Adapted from
Mediterranean Harvest
Makes 1 9×5 inch loaf

I used oil-cured black olives this time, but I have made it with Kalamata olives in the past and it was equally delicious.

1 2/3 cups all-purpose flour
1 tsp. baking powder

1/2 tsp. baking soda

1/2 tsp. salt

1/4 tsp. freshly ground pepper

4 large eggs

1/3 cup white wine

1/3 cup olive oil

1 cup imported black olives, pitted and sliced

1 1/4 cups tightly packed grated Gruyere cheese

1. Preheat the oven to 375 degrees with the rack in the the center. Butter or oil a 9 x 5 loaf pan.

2. Sift together the flour, baking powder, baking soda, and salt. Stir in the pepper.

3. In a large bowl, beat the eggs and whisk in the white wine and olive oil. Quickly stir in the dry ingredients, then the olives and cheese. Scrape in to the loaf pan.

4. Bake for about 40 minutes, until the bread is nicely browned and a tester comes out clean. Cool for 10 minutes in the pan, then reverse onto a rack to cool completely.


Newer Posts »