Category: Beans

The Short List

June 13, 2010

Most people who cook have some kind of short list.  Those go-to recipes that require very little thought, contain ingredients you either have on hand or that can be easily procured from any grocery store, and that taste delicious.  Those are precious recipes indeed and I need a few more in my arsenal.

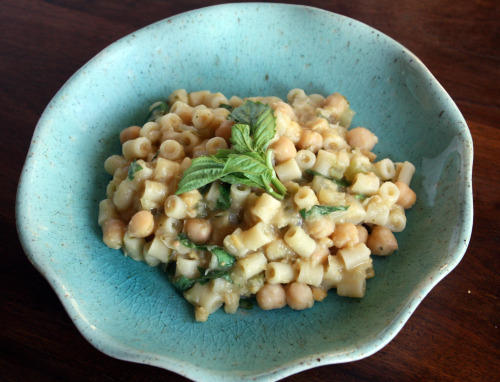
For now, this Jamie Oliver dish is at the top of my short list which, if I haven’t made it clear, is very short.  No matter – I love this recipe.  I always have onions and garlic plus many cans of chickpeas, almost always have celery, and I have rosemary growing in my yard.  Give me half an hour and I will give you something healthy, appealing to most people, satisfying, and very tasty.  It is also a very forgiving dish so you can either eat it right away or allow it to sit for a bit with the flavor only improving.

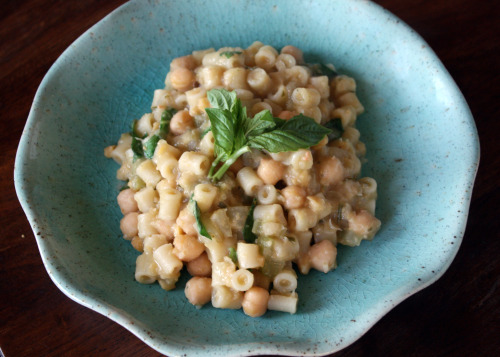
The method is simple.  The onions and garlic get sautéed together in a bit of olive oil along with the rosemary, which immediately makes your kitchen smell wonderful.  The chickpeas are next in the pot along with the broth and after those have cooked for a bit, half of the chickpeas are scooped out and reserved while the goodness in the pot gets a quick purée with an immersion blender.  After everything is reunited in the pot, in goes the pasta.  As soon it is tender, you are ready for dinner.  Add some fresh herbs on top (which I always seem to have some remnant of in my crisper drawer) and you have a rich and creamy tasting (but very healthy) meal.

I change this up a bit from the original recipe by adding some red pepper flakes for a bit of heat, and I also add more pasta and broth.  I always seem to need even more broth as the cooking process happens and you can add even more than that if you want the dish to be more saucy.  I don’t think it is possible to screw up this dish, so do what you like.  You will see my changes in the recipe below.  If you don’t have an immersion blender, you can use a food processor instead – just be careful with the hot stuff!

What is on your short list?

One Year Ago: Chilled Avocado Soup
Two Years Ago: Ina Garten’s Outrageous Brownies

Pasta e Ceci (Pasta with Chickpeas)
Adapted from Jamie’s Italy
Serves 4

1 small onion, peeled and finely chopped
1 stick of celery, trimmed and finely chopped
1 clove of garlic, peeled and minced
½ tsp. red pepper flakes
Olive oil
1 sprig of rosemary, leaves picked and finely chopped
2 14-oz. cans of chickpeas, rinsed and drained
3 cups vegetable stock
5 ounces ditalini or other small pasta (such as orzo)
Sea salt and freshly ground black pepper
Small handful of fresh basil or parsley leaves, picked and torn

Place a large skillet over medium heat and then pour in just enough olive oil to coat the bottom.  Add the onion and celery and sauté just until tender, about 6 minutes.  Add the garlic, rosemary, and red pepper flakes.  Sauté for 2 minutes, then add the chickpeas and the stock.  Bring to a boil, then lower heat to simmer and allow to cook just until the chickpeas are heated through, about 5 minutes.  Using a slotted spoon, remove half of the chickpeas and set them aside.

Purée the soup in the pan with a handheld immersion blender.  Add the reserved whole chickpeas and the pasta, season the soup with salt and pepper, and simmer gently until the chickpeas are very tender and the pasta is cooked, about 10  minutes.  Add more liquid as necessary.

Season to taste with salt and pepper and sprinkle with torn basil or parsley.


Simplicity

May 13, 2010

Two recipes that I want to share with you are waiting in the wings.  One is a beautiful potato salad that is definitely going on my favorite list.  The other is a birthday cake – a big fat chocolate birthday cake, perfect for feeding a crowd.

But those will have to wait.  I need to talk about chickpeas.

And before that, a word about the Seattle dining scene.  It was really not until recently, within the last ten years or so, that we even really had a dining scene.  You could always get incredible Thai food, Vietnamese food, and sushi in Seattle.  And fresh fish too.  But other than that, pickings were a little meager.  Slowly but surely, things are changing and some terrific new restaurants have opened recently.

One of our favorites is Cantinetta, a truly sweet spot found about 2 miles from our house.  Sometimes a restaurant just gets it right on all fronts.  Cantinetta opened right smack in the middle of a great neighborhood, but not in the bustling business corridor, more in the area where people live.  It is homey and welcoming inside.  The service is excellent.  The menu changes just often enough to make it interesting, but not so often that you mourn your favorite dish leaving before you could taste it again.  That menu is comprised of four different categories and you can spend the evening there tasting bits from each section.  The pasta is made on site and is some of the best I have ever had.  There are always plenty of vegetarian options and they are starred so I don’t even have to ask.

Soon after it opened, Randy and I ate dinner there with friends.  Then we went by ourselves.  Then we went with more friends.  We recommended it to everyone.  We had my 39th birthday dinner there and introduced it to my parents and brothers, all of whom loved it and have been back.  My youngest brother gave us a gift certificate to Cantinetta for Hanumass last year and it was probably the best gift he has ever given me.  It is a place whose food I crave and there are precious few restaurants in Seattle I can say that about.

(Sorry, I just had to share.  Almost all looking at the camera.)

My sister-in-law was in town last Friday and Randy and I thought Cantinetta would be the perfect spot for dinner.  We actually had not been in some time and I was excited about seeing a brand new menu.  Suffice it to say that absolutely everything we ate was delicious.  From the homemade bread that arrives on your table (featuring corn meal and olives) to the utterly creamy tagliatelle that I had for my main course.  We loved every bite.  In fact, we ordered so much and ate so much that none of us had room for dessert.

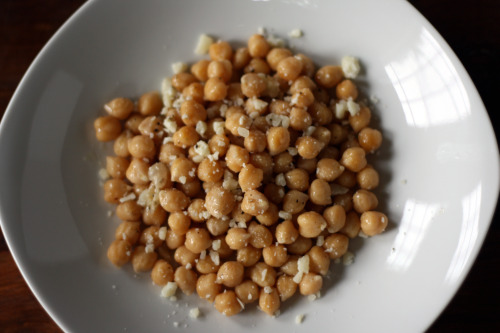
My favorite thing I ate that night, in a sea of good things, was the most simple.  Chickpeas, olive oil, Pecorino Romano, lemon.  The beautiful little dish came to the table and I was shocked to see green chickpeas.  Green means fresh.  Where did they get fresh chickpeas?  And can I have some??  I couldn’t really get a straight answer but after a moment I stopped asking and just started eating.  Sometimes, when every single ingredient is perfect and perfectly balanced, the simplest dish is the best.  That was absolutely the case with these little guys.

So, what’s a chickpea lover to do?  Try and re-create.  Since there was no way (that I know of) for me to get fresh chickpeas, I did the next best thing which is to cook up a bunch of dried beans.  I knew the somewhat mushy texture and tinny taste of canned beans wouldn’t work here, so I soaked and cooked up some dried chickpeas.  (I have nothing against canned beans when they are going into a stew like this one or this one.)  Because the restaurant dish featured tiny pebbles of the Pecorino – not flakes – I ground up a chunk of that amazing cheese in my mini-food processor rather than grating it.  Out of the refrigerator came a lemon and out of the pantry I pulled my best olive oil, sea salt, and pepper mill.  And away we went.  At the end of it all, I was somewhat surprised to find that what I had created was an awful lot like what I tasted at the restaurant.  Deceptively simple, incredibly delicious.

I served some to a friend who was over for dinner and she loved them.  I gave some to Randy and he thought they tasted just the same as Cantinetta’s.  I’m not sure about that exactly, but they are pretty darn close.  Please don’t roll your eyes and scoff – so simple Dana! – take just a bit of time, the best of ingredients, and decide for yourself.

One Year Ago:  Quinoa with Grilled Zucchini, Chickpeas, and Cumin

Chickpeas with Lemon and Pecorino Romano
Inspired by Cantinetta
Makes 2 cups

Definitely serve this dish at room temperature so the flavors can bloom and the chickpeas aren’t chalky.

2 cups chickpeas
1½ tbsp. olive oil
Juice of 1 lemon
¾ tsp. kosher salt
Lots of coarsely ground black pepper
¼ cup ground Pecorino Romano

For the chickpeas, you might as well make a large batch and use them throughout the week.  They are great in all manner of stews and soups, in salads, and you will probably want to make another batch of this recipe.  Let dried chickpeas soak overnight in cold water that covers them by at least 2 inches.  The next day, drain the water and rinse the chickpeas.  Put them back in the pot, cover them again cold water and place on the stove.  Bring to a boil, reduce the heat slightly, and allow to cook until chickpeas are tender, about 1 hour.

Mix together all ingredients for dish in a bowl.  Add more salt and pepper to taste.


Side Dish for Mexican Food

April 8, 2010

The problem with being a self-described “cookbook cook” is that it takes a little more oomph for me to step outside the assurance of my books and just create a recipe.

The other night, while making Black Bean Tostadas (recipe coming soon), I started imagining a good hearty rice dish as a side.  I almost started to go through the tedium of looking up “rice” in my cookbooks when I realized I had a very clear idea of what I wanted, why not just make it?

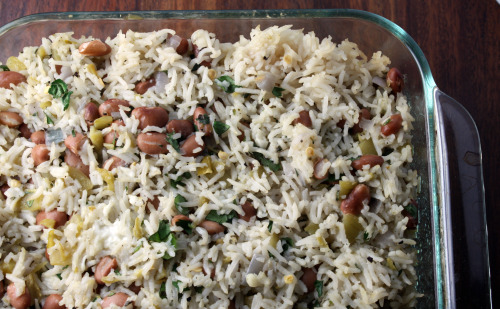
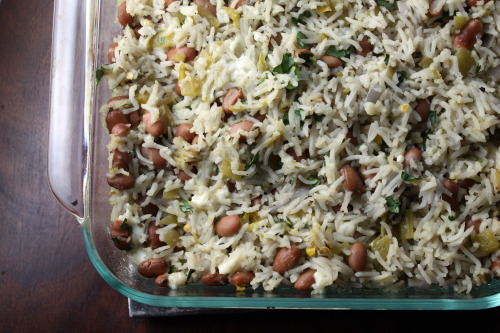
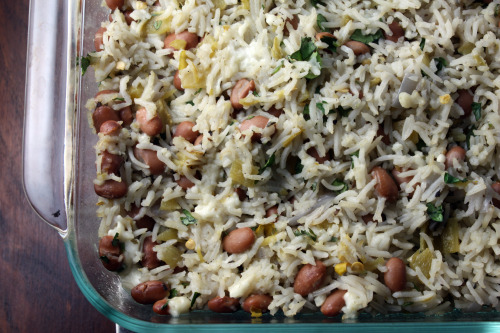
So I did.  And as with most things I have made without a recipe, I was very pleased with how it turned out.  (Note to self: cook more often without a recipe.)  I included some of my favorite flavors in here but, of course, this dish is infinitely adaptable.  I happen to love the slight punch and tang of canned green chiles, but if you like more spice, by all means add a fresh jalapeño or two.  I used queso fresco partly because I also needed it for the tostadas, but partly because I love how mild it is.  But you could certainly use Cheddar or Monterey Jack.  Like more cheese?  Add more and sprinkle some over the top before baking.

A rice note.  Unless I am making risotto or something where I specifically want brown rice (or if I am using sushi rice for this dish), I almost always use basmati rice.  I think it fluffs up beautifully and has terrific flavor.  Trader Joe’s has nice big (and affordable) bags of it.

One Year Ago:  Pasta with Broccoli Rabe and Chickpeas

Baked Rice with Chiles and Pinto Beans
Dana Treat Original
Serves 4-6

Canola or other neutral tasting oil
Small red onion, diced
3 garlic cloves, minced
1 tsp. dried oregano
1 cup white rice
2 cups water or vegetable stock
Salt
1 15-oz. can pinto beans, rinsed and drained
1 7-oz. can diced green chiles
¼ cup chopped cilantro
¾ cup queso fresco, crumbled

Heat a medium saucepan over medium heat.  (I used a 3 quart.)  Add just enough oil to coat the bottom, then add the onion and a healthy pinch of salt.  Sauté until softened, then add the garlic.  Cook for another 3 minutes, then add the oregano.  Sauté for another minute.  Add the rice and toss to coat with the fat and herbs, then pour in the water or stock.  Bring to a boil, then turn the heat down to low, cover and cook for 20 minutes.

Preheat oven to 400ºF.  Oil an 8×8 baking dish.  Once the rice is done cooking, allow it to sit, off the heat, for 5 minutes.  Remove the lid and, using a fork, carefully fluff the rice.  Add the chiles and the beans and, without mushing the rice, carefully stir them in.  Sprinkle on the cheese and cilantro and stir them in.

Scrape the rice mixture into the prepared pan, cover with foil, then bake until the cheese is starting to melt and the dish is hot throughout, about 20 minutes.  Remove the foil and allow to sit for 5 minutes before serving.

(This is totally the kind of dish you could make a day ahead.  Prepare up through putting the finished rice in the baking dish, allow the whole thing to cool, cover with foil, then refrigerate overnight.  From there, just put it directly into the oven and you will need to add 5-10 minutes to the baking time.)


A Love Affair with Red Lentils

February 21, 2010

IMG_4782_picnik

Variety is a big part of my diet.  In the three years I worked as a personal chef, I only repeated recipes a handful of times, and those were requests.  I figure I love food and love to eat and I want to make as many different things as I can in my lifetime.  Of course, I have my go-to meals but I really do try and have variety in our food lives.

And then there are the things that I could eat every single day and be totally happy.  Good french fries with ketchup.  Noodle soups like this one, noodle dishes like this one (yes, I have a thing for Asian noodles) could fulfill me until the end of my days.  And any kind of red lentil dish is on that list too.

If you have never cooked with red lentils, you are in for a treat.  They are among the fastest cooking of beans and they change utterly and completely from raw to cooked.  Raw they are bright orange (in spite of their name) and look like flat pebbles.  Cooked they become a mellow yellow and they lose their shape.  Depending on how much liquid is in your dish, they can loosely resemble other lentils, or they can disappear completely.  They, like other lentils, are high in protein and fiber, yet low in calories and fat.  They require no pre-soaking time.

On Thursday, I crossed the Sound and did a cooking lesson for a group of extraordinary women.  We have been talking about doing a class for months and I gave serious thought to what I wanted to cook.  In the end, I decided to make a full meal and it took me about one second to decide to feature a red lentil dhal.

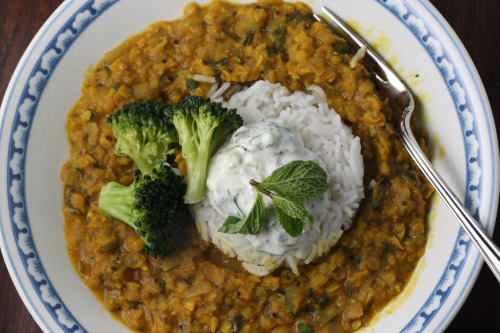
Because I love red lentils and I love this family of spices, I have made various incarnations of this dish many times over the years.  Of all the ones I have made, this is my favorite.  It is very highly spiced – not hot, just spicy.  One of the beauties of this dish is its adaptability.  You could add all manner of vegetables (carrots, potatoes, zucchini, spinach come to mind).  Or you could add more liquid, allow it to simmer away and turn it into a soup.

IMG_4787_picnik

Red Lentils Previously on Dana Treat: Curried Red Lentil Stew with Vegetables
One Year Ago: Double Baked Chocolate Cake

Red Lentil Dhal
Inspired by The Modern Vegetarian
Serves 4-6

This list of ingredients is long but much of it is spices.  The stew actually comes together quite quickly.

Vegetable oil or grapeseed oil
2 tsp. cumin seeds
2 tsp. black or yellow mustard seeds
1 medium onion, finely diced
1 ½ inches of fresh ginger, peeled and minced
2 garlic cloves, minced
1 jalapeno chile, seeded, finely chopped
1 ½ tsp. curry powder
2 tsp. ground cumin
1 tsp. tumeric
Pinch of chile powder
1 tbsp. tomato paste
2 cups red lentils
2 cinnamon sticks (or 1, if large)|
2 cups water
1 15-oz. can “lite” coconut milk
Sea salt
Juice of 1 lemon
A bunch of mint, chopped
A bunch of cilantro, chopped

Heat just enough oil to coat the bottom of a large pan and add the mustard and cumin seeds.  Be careful as they will begin to pop.  Immediately add the onion, adjust the heat to medium, and cook until softened – about five minutes.  Add the ginger, garlic, chile, curry powder, cumin, tumeric, and chile powder and fry for 3 minutes.  Add the tomato paste and fry for 1 minute.

Add the lentils and stir to coat with the oil and spices.  Add the cinnamon stick, water, and coconut milk.  Bring to a boil, then reduce the heat so the dhal is at a simmer.  Cover partially and cook, stirring occasionally so it doesn’t stick to the bottom, until the lentils have partially lost their shape and are soft – about 15 minutes.  Stir in more liquid as necessary for the consistency you want.

Remove from the heat, season with sea salt and add the lemon juice to taste.  At this point, you can allow the dhal to cool and then cover and refrigerate it overnight.  When reheating on the stove, you will need to add more liquid as it will thicken as it sits.

About 10 minutes before serving, add the herbs.  You will want them to cook down a bit but not so much that they lose their color.  Serve warm over basmati rice and with a raita if desired.


Mexican Food for Randy

January 11, 2010

IMG_4414

Ask my husband what he wants for dinner and he will, without fail, say, “Mexican”.  I don’t even know why I ask, but I do.  Maybe someday he will surprise me and ask for a Morrocan tagine with cinnamon couscous…but I’m not holding my breath.

It’s really all right with me because I really like Mexican food too.  We have a good place in our neighborhood where we go on sunny Sunday evenings.  It’s a pleasant walk there and back plus they have terrific margaritas and salsa to die for.  But usually vegetarian Mexican food means lots of cheese which just isn’t my thing.  My margarita skills are lackluster but in all honesty, I prefer “my” Mexican food to most restaurants, inauthentic as it may be.

IMG_4419

This Black Bean Chilaquile recipe came to me via Twitter.  Some friends were tweeting about good low fat cookbooks and I threw in my two cents for the Moosewood version (the cookbook is called Moosewood Restaurant Low-Fat Favorites).  Kate said that this chilaquile recipe is a standby for her.  I’ve owned that cookbook for a good ten years – how did I miss making this?  Very easy and quick to put together, healthy, hearty, and adaptable.

Let’s talk for a moment about low fat cooking.  It’s the thing to do in January after all.  I’m kind of funny about this topic.  I am a healthy eater and I am careful with regards to my weight.  I honestly don’t like food that is super rich or made with lots of oil or butter.  My tastes naturally steer toward clean food.  But I don’t get Cooking Light or own any low fat cookbooks with the exception of the Moosewood one.  I prefer to take regular recipes and just lighten them up slightly.  I sauté with the bare minimum of oil, use less cheese than is called for, steer away from recipes that use lots of cream and butter.  Not all the time of course, there is a time for indulging.  But if a recipe uses cooking spray to sauté and fat-free cheese and fat-free sour cream, I go running in the other direction.  Baked Lay’s have a place in my pantry and I usually eat frozen yogurt instead of ice cream, but the line has to be drawn somewhere.  And when it comes to baking, I am strictly of the full-fat school.  I would rather have one bite of a perfect brownie than a box of “lite” cookies.

All this is a very long-winded way of saying that, while I cringe at most low fat cooking, I really like this cookbook.  I use it all the time.  It isn’t over-zealous it’s just healthy.  It highlights a lot of different cuisines that are healthier than our own and every single thing I have made from it has been delicious.  The book also thoughtfully includes menu suggestions using other recipes in the book.  And for the pescatarians out there, there are fish recipes.

IMG_4433


Black Bean Chilaquile
Adapted from Moosewood Restaurant Low-Fat Favorites
Serves 4 very hungry people or 6 less so

The original recipe calls for fat-free Cheddar cheese.  I just can’t do it so I used the good stuff and just used a lot less of it.  If you want it cheesy, add more.  I used Guiltless Gourmet baked corn chips which do faintly taste like cardboard but become delicious in this dish.  I topped it with this guacamole.

Olive oil
1 medium onion, diced
1 15-oz. can diced tomatoes, drained well
1½ cups frozen corn
1 15-oz. can black beans, drained
2 tbsp. fresh lime juice
1 tsp. salt
½ tsp. freshly ground black pepper
5 oz. fresh spinach or Swiss chard
2 cups crushed baked tortilla chips
¾ cup grated Cheddar cheese
2 cups red salsa of your choice

Preheat the oven to 350°F.  Heat a large sauté pan over medium heat and then add just enough olive oil to coat the bottom.  Sauté the onions for about 8 minutes, until translucent.  Stir in the tomatoes, corn, black beans, lime juice, salt and pepper and continue to sauté for another 5 -10 minutes, until just heated through.

Meanwhile in another pan, cook down the spinach until it is wilted, adding it to the pan in batches if necessary.  Set aside.

Prepare an 8 x 8-inch casserole dish or baking pan with a very light coating of oil.  Spread half of the crushed tortilla chips on the bottom.  Spoon the sautéed vegetables over the tortilla chips and sprinke on about two-thirds of the grated Cheddar.  Arrange the greens evenly over the cheese and spoon on half the salsa.  Finish with the rest of the tortilla chips and top with the remaining salsa and Cheddar.  Bake for about 35 minutes, until the cheese is bubbling and beginning to brown.


« Older Posts Newer Posts »