Archive for March, 2011

Loving Ottolenghi

March 21, 2011

Last May, I spent a weekend down in San Francisco.  I really love that city.  I have been to SF more than any other city, somehow making it there at least once a year for as long as I can remember.  On that particular trip, I made a trek to Omnivore Books – a charming cookbook shop.  In my mind I was picturing Books for Cooks, a truly incredible cookbook shop in the Notting Hill neighborhood of London, where I spent many an hour gazing and drooling.  Omnivore is decidedly less grand but still filled with incredible treasures.  I had been reading about the new Ottolenghi book Plenty and was thrilled to see it at Omnivore.  It had not yet been released in the States so consequently, I paid $60 for it.

Now I see the book everywhere in its American (and $35) version.  I don’t regret buying mine for a second.  I had it for months longer than most people stateside and I also love all the British-isms in my book.  Aubergine, coriander, courgette, rocket, swede, mangetout – all words I had to get used to when we lived in London.  (Side story.  I went to the grocery store one day in search of a swede having no idea what it was.  When the produce guy pointed it out to me, I laughed.  “What a funny name for that vegetable”, I said.  He asked what we call it.  Rutabaga was my reply.  “And that is not a weird name?”  Good point.)

In addition to having charming names for vegetables, my copy has all the metric measurements.  There was a time when I could rapidly double a temperature and add 32 to get Fahrenheit out of Celsius but sadly, these days I just use my Kitchen Pro app most of the time.  But checking a phone repeatedly while cooking is not very efficient and so I wing it much more with this book than I would if the measurements were more “American” (read: antiquated and ridiculous).

It feels almost sacrilegious to tinker with Ottolenghi’s recipes.  Both of his books have imaginative, well-spiced, interesting, and delicious food.  I tend to do things more by feel and taste with his books and I have a sneaking suspicion that he would approve.

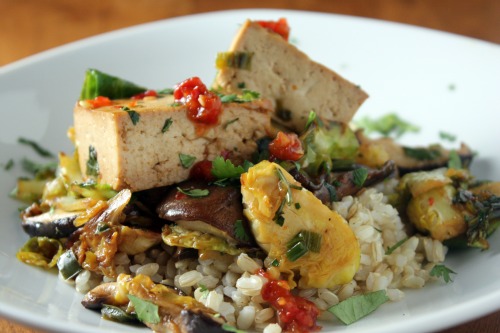
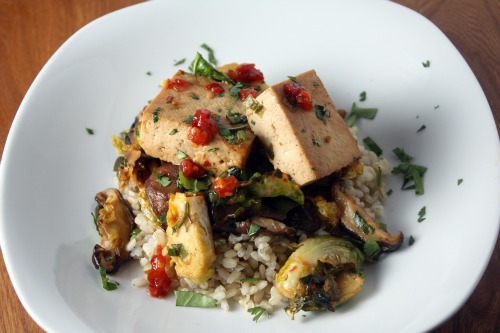
This is one of those “if you think you don’t like brussels spouts then try this!” recipes.  I kind of like those smurf cabbages (my brother’s term).  I loved them here.  Be sure to let them get nice and brown.

One Year Ago: White Chocolate Macadamia Cookies
Two Years Ago: Garlic Ciabatta Bread and Roasted Tomato Caprese Salad

Brussels Sprouts and Tofu
Adapted from Plenty
Serves 3-4

I served this with brown rice and plenty of hot chili sauce.  I used a large cast iron skillet to make the whole dish and was able to cook the sprouts and the tofu in one batch.  If you have a smaller pan, I would do each of them in two batches.  You want to make sure tofu and the vegetables have plenty of contact with the pan and don’t end up steaming.

2 tbsp. sweet chili sauce
2 tbsp. soy sauce
2 tbsp. toasted sesame oil
1 tsp. rice vinegar
1 tbsp. maple syrup
12 ounces extra firm tofu
1 pound brussels sprouts
Kosher salt
Canola oil
3 scallions, white and green parts, thinly sliced
1 red chili, seeded and finely diced
8 ounces shiitake mushrooms, stems removed and thinly sliced
¼ cup finely chopped fresh cilantro

First marinate the tofu.  Whisk together in a shallow dish the chili and soy sauces, the sesame oil, vinegar, and the maple syrup (I used a Pyrex pie plate).  Cut the block of tofu into ½-inch thick slices and then each slice into 6 squares.  Add the tofu to the marinade and gently toss.  Allow to marinate, turning the pieces occasionally, for 30 minutes.

Trim the bases off the sprouts and cut each from top to bottom into three thick slices.  Heat a large skillet over medium-high heat and add just enough canola oil to coat the bottom of the pan.  Add the sprouts along with a large pinch of salt and cook for about 3 minutes without stirring.  You want them to brown a bit.  Then stir them occasionally until they reach your desired degree of doneness (I like mine soft and not crunchy).  Remove to a bowl.

Add just a bit more oil and toss in the scallions, chili, and mushrooms.  Again, allow to cook and brown, about 6 minutes in all, and add to the bowl with the sprouts.

Carefully add the tofu to the pan and allow to cook for 3 minutes without stirring.  Using tongs, turn each piece of tofu over and allow the other side to brown, about another 2-3 minutes.  Add the contents of the sprout bowl, along with the remaining tofu marinade and the cilantro.  Toss everything together gently and turn off the heat.  Taste, and add salt as needed.


Good for Brunch, Good for Dessert

March 17, 2011


Hey, guess what?  I’m in the April issue of Sunset magazine. They did an article on boutique cooking classes and I am in there!  Cool, huh?

On the whole, mine is a family of savory eaters.  No one turns up their nose at my sweets but everyone is happier with dinner than dessert.  Each person, however, has their thing they cannot resist.  As a good treat maker, I know each person’s Achilles heel.  For my dad, it is coconut.  My brother Alex – anything lemon and he also will eat almost an entire batch of my mom’s snickerdoodles in one sitting.  Michael will eat cookies until he is sick and then eat another one.  Randy’s weakness is white chocolate and he also loves carrot cake (which I have yet to make for him because I hate carrot cake).  I want my last meal on earth to include a brownie.  (This one is my current favorite.)  My mom loves nuts – she would love these bars.  But she also loves a good old fashioned coffee cake.

Last week, my parents and Michael came over for dinner.  I was fresh out of cookies so decided to make a quick cake that I found in my Baked Explorations book.  This book is a mystery to me.  I have looked at it so many times and have also made many things from it.  I feel like the recipes reproduce overnight or something because every time I open it, I feel like there is something new in there.  Some new treasure.

Anyway, as I have written about many times here, I am a big fan of a simple cake.  Not simple as in boring, simple as in not a three layer cake with fillings and buttercream frosting on a Tuesday night simple.  A good simple cake is gold for me.

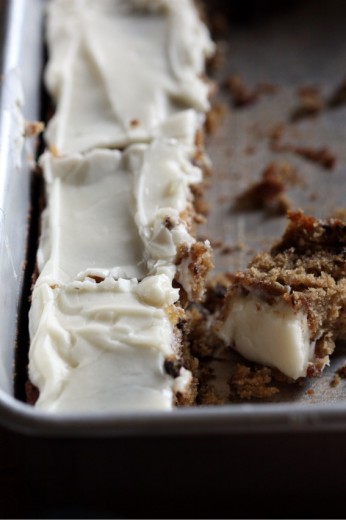
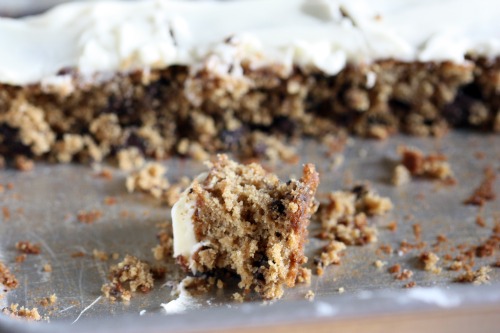
This is no beauty contest winner.  But as I brought it out, my  mom said, “That is my favorite kind of cake.”  And, seeing as this recipe is found under the Breakfast chapter, it really is a coffee cake.  But it is great at night as well.  Spencer surprised me by wanting me to scrape off his frosting.  He only wanted to eat the cake.  This from a child who licks the frosting off his cupcakes and discards the cake part.  I guess it is a testament to how tasty this simple cake is.  But do make the frosting.  Easy and yummy.

One Year Ago: Golden Split Pea Soup
Two Years Ago: Peanut Brittle and Caramel Crunch Ice Cream Pie

Oatmeal Chocolate Chip Cake with Cream Cheese Frosting
Baked Explorations
Makes one 9×13-inch cake

For the cake
8 ounces chocolate chips
½ tsp. Scotch or bourbon
1½ cups plus 2 tbsp. all purpose flour
1 cup rolled oats
½ cup (1 stick) unsalted butter, cut into small cubes, at room temperature
2 eggs, slightly beaten
¾ cup granulated sugar
1¼ cups firmly packed dark brown sugar
½ tsp. salt
1 tsp. baking soda
1 tsp. baking powder
1½ tsp. cinnamon

For the cream cheese frosting
5 tbsp. unsalted butter, softened
5½ ounces cream cheese, softened
2 cups confectioners’ sugar, sifted
¾ tsp. pure vanilla extract

Make the cake
Preheat the oven to 375ºF and position the rack in the center.  Butter the sides and bottom of 9-by-13-inch glass or light-colored metal baking pan.  Heat 1¼ cups water to boiling.

Place the chocolate chips in a small bowl and toss them with the bourbon until covered.  Sprinkle 2 tablespoons of the flour over the chips and toss until coated.  This will keep them from settling at the bottom during baking.  Set aside.

Place the oats and butter cubes in a large bowl.  Pour the boiling water over the oat mixture, wait 30 seconds, and stir to moisten all the oats and melt the butter.  Set the mixture aside for 25 to 30 minutes.

In a separate bowl, whisk together the eggs, both sugars, salt, baking soda, baking powder, and cinnamon until combined.  Fold in the cooled oatmeal and stir until well combined.  Gently fold in the remaining flour and then the chocolate chips.  Pour the batter into the prepared pan.

Bake the cake for 40 to 45 minutes, or until a toothpick inserted in the center comes out clean.  Let the cake cool on a wire rack for at least 30 minutes.

Make the cream cheese frosting
In the bowl of a standing mixer fitted with the paddle attachment, beat the butter until it is completely smooth.  Add the cream cheese and beat until combined.

Add the confectioners’ sugar and vanilla and beat until smooth, about 1 minute.  Cover the bowl tightly and refrigerate for at least 30 minutes.  (DT: I skipped this step.  It did not seem necessary to me.)

Assemble the cake
Spread a thin even layer of frosting over the cake.  Chill it for 15 minutes so that it can set.  Slice and serve.  The frosted cake can be keep, refrigerated and tightly covered, for up to 3 days.  Bring the cake back to room temperature before serving.


Kauai 2011

March 15, 2011

I  love that the beach is endlessly entertaining for boys.

About three and a half years ago, we got a letter from Starwood.  In it was an offer for five days on Kauai at a ridiculously low price.  It was an offer we could not refuse.  Randy and I had never been to Hawaii together and we had yet to travel with Spencer.  It was time and Kauai in February seemed like a great idea.

(Yes, we rented a convertible.  We thought the boys would totally dig it.  They were a little perplexed by the whole thing.  I loved it and so did Randy.)

We knew we would get some kind of pitch to buy something while there, but it seemed worth it to us.  Five nights of cheap accommodations for a sales pitch seemed like a small price to pay.  Randy went instead of me and came back with the news that he thought we should go for it.  I was shocked.  Randy is the more fiscally conservative half of our marriage and I would never have thought a time share would appeal to him.  I resisted initially.  To me, time share meant mediocre accommodations, being forced to travel only certain weeks, getting penalized if you didn’t use your time, etc.  Life is complicated enough without stress about a vacation.

But, as it turns out, this time share is very flexible.  There are lots of different ways we can use it and so far, we have had only positive experiences with it.  Being able to travel with two young boys and stay in a place that has a kitchen, separate bedroom for them, and a washing machine takes a lot of the stress out of the picture.  It also ends up being cheaper because we are able to eat in more than out.  (Although the groceries in Princeville are no bargain.  I went for a basic shop – breakfast stuff, snacks for the boys, wine, enough food for a couple of simple dinners, and spent $400.)

Anyway, this is the reason that we went  back.  And will go back again.  After our last trip, I swore we would never go back to Kauai.  Six hours of sun in seven days was not a vacation.  In fact, when we walked in to the living area of our condo this year, it seemed so much bigger – I think because it seemed very small after being cooped up there for an entire week with a then four and two year old.  We had some rain this time but we also had sun and Kauai is impossibly beautiful in the sunshine.

Our boys ask me everyday when we can go back.  Our place has a kids pool that is only 1½ feet deep with a water slide and turtle fountains.  They played there for hours everyday.  The beach paled in comparison for them.

We fell into a nice routine.  Wake up, eat breakfast, be mellow for a bit, hit the pool.  Maybe a lunch outing, maybe not.  After hours of playing in the sun and the water, the boys would take a three hour nap – heaven!  By the time they woke up, it was time for happy hour.

(Trust me, we are not drinking the same thing.)

Randy and I had two dinners out, one with a couple who are friends of ours and happened to be there at the same time, but mostly we just stayed local and mellow.  This is something I like about Kauai.  The pace is slow and relaxed, the people are nice, the beauty is overwhelming.  We heard stories about how you have to get your towel in place on your beach chair by 9am in Maui, otherwise you were chairless (the horror!).  We never felt anything like that on our trip.  Just cruising the roads, soaking up the sunshine, drinking fruity rum drinks, and eating lots of pineapple.  I’m ready to go back.


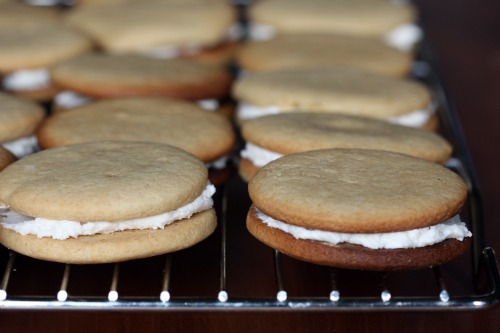
Malted Milk Sandwich Cookies

March 14, 2011

I have a wonderful friend and neighbor whose name is Julie.  Her house is almost exactly the same as mine, just everything is flip flopped.  (They were built by the same person.)  She is a foodie extraordinaire.  She is totally up on all the new restaurants in our city and beyond.  She does incredible amounts of research when she travels and is the type of person who will go way out of her way to find the perfect baguette in Paris.  (I am the same way.)  Julie is an enthusiastic and tremendous cook.  Our kitchens complement each other well.  It seems that whatever I don’t have, she does and vice versa.  Our texts to each other are not, “Can I borrow a cup of sugar?” but “Do you have an extra mini muffin pan?” or “What size pastry tips do you have?”

On top of all that fun stuff, Julie is a very kind and generous person.  She is incredibly quick to offer her help whether it is with cooking classes, catering, or just getting Graham off the bus now and then.  I deeply deeply appreciate her.  A few months ago, she borrowed my Baked cookbook and found a lot of inspiration there.  As a thank you to her for help with a recent party, I bought her the new one, Baked Explorations.  Very soon after, she made these malted cookies.  She brought a few over for us to try one morning.  I left them on the counter, went about my day, and came home only to find that my husband had eaten them.  All of them.  And then he had the nerve to rave about them.  They have been on my mind ever since.

I have a good relationship with the flavor of malt.  When I was a kid my mom would sometimes make us a chocolate malted in the blender.  I loved them.  To this day, the smell that comes from my blender, even if I am puréeing soup, reminds me of those malteds.  (Side note: What is that smell and why does the same smell come from every blender?)  One of my very favorite candies, the one I cannot resist, is the candy coated chocolate malt balls that the Easter bunny brings.

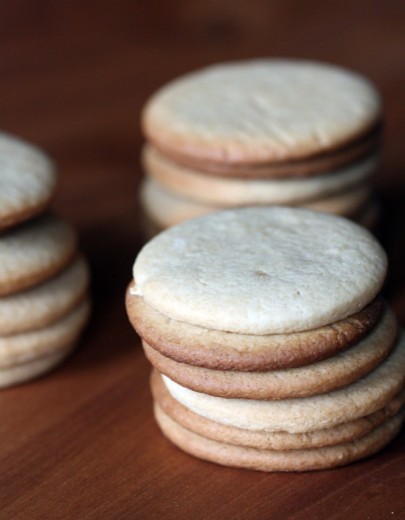
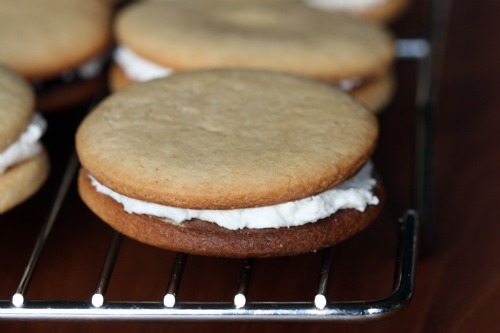
So, you would think I would have made these Malted Milk Sandwich Cookies the very next day.  But theses are roll-out-and-cut cookies which are not my favorite.  Just the added fuss of pulling out the rolling pin, flouring the board, refrigerating the dough can feel like too much in my already busy kitchen.  I am happy to tell you that this dough is very well behaved and the cookies are super easy to make.  The dough is quite sticky, even after a good rest in the refrigerator, but with enough flour I was able to shape these easily.  Much more so than Christmas cookies.

One Year Ago:  Pizza Bianca
Two Years Ago:  Tropical Gazpacho

Malted Milk Sandwich Cookies
Baked Explorations
Makes about 30 sandwich cookies

For the cookies
4 cups all-purpose flour
¾ cup malt powder
2 tsp. baking powder
½ tsp. baking soda
½ tsp. salt
2 sticks unsalted butter, room temperature
1 cup firmly packed dark brown sugar
1 cup granulated sugar
2 eggs
1/3 cup sour cream
2 tsp. vanilla extract

For the vanilla filling
5 ounces vegetable shortening, at room temperature
4 tbsp. (½ stick) unsalted butter, cut into small chunks, at room temperature
3¼ cups confectioners’ sugar, sifted
½ tsp. salt
1 tbsp. vanilla extract
1 tsp. light rum

Make the cookies
In a large bowl, whisk together the flour, malt, baking powder, baking soda, and salt.  Set aside.

In the bowl of a standing mixer fitted with the paddle attachment, beat the butter and sugars together until light and fluffy.  Scrape down the bowl and add the eggs, one at at time, beating until each is incorporated.  Add the sour cream and vanilla and beat until just incorporated.  Add half of the dry ingredients all at once and beat for 15 seconds.  Again scrape down the bowl, then add the remaining dry ingredients and beat until just incorporated.  The mixture should come together almost in a ball.

Loosely shape the dough into two balls, wrap them tightly in plastic wrap, and refrigerate for at least 3 hours.

Preheat the oven to 350ºF.  Line two baking sheets with parchment paper.

Divide each dough ball in half, to make four portions.  Place on portion on a lightly flour-dusted work surface and return the other three to the refrigerator.

Roll out the dough so that it is ¼-inch thick.  The dough will be sticky, so you may have to flip and lightly flour it a few times while you work.  Use a 2-inch round cookie cutter to create the sandwich tops and bottoms, and transfer them to the prepared baking sheets, leaving about 1 inch of space around each cookie.  Extra dough scraps can be refrigerated and rerolled once more, if desired.

Bake the cookies for 10 to 12 minutes, or until they are just slightly browned.  Place the baking sheets on wire racks to cool for 5 minutes.  use a spatula to transfer the cookies to the racks to cool completely.  While the cookies cool, prepare the filling.

Make the vanilla filling
In the bowl of a standing mixer fitted with the paddle attachment, beat the shortening and butter until lump free and smooth.  Add the sugar in three parts, mixing each part until just combined.  Add the salt, vanilla, and rum and beat again for 10 seconds.  The filling should be thick but spreadable (like the inside of an Oreo).  If it is too thick, add a drop or two of water as needed.  Keep adding water to reach desired consistency, but do not add too much or the filling will be too thin.

Alternatively, if the mixture is too thin, add a few tablespoons of confectioners sugar.

Assemble the Malted Milk Sandwich Cookies
Use a pastry bag or a small spoon to apply about 2 tablespoons of filling to the flat side of a cookie.  Place another cookie, flat side down, on top.  Press down slightly so that the filling spreads to the edges of the cookie.  Repeat until all the sandwich cookies are made.  Let them set up for about 15 minutes before serving.  Store the cookies at room temperature in an airtight container for up to 3 days.


Inspired by a Menu

March 10, 2011

There is a restaurant in Seattle called Sitka and Spruce and it is a pretty much uncontested local treasure.  It is always on “best of” lists and gets lots of awards.  They are passionate about local and have been for years – even before it was super cool to cook like a locavore.  The restaurant used to be in a tiny and unassuming space in an urban strip mall.  Randy and I had some amazing meals there.  The menu was always just written up on the blackboard according to the chef’s whims and the food was always super fresh, innovative, and very tasty.

One night, we went in for dinner and were told that it would be a 20 minute wait.  We went across the street for a beer only to come back and have them tell us that it would be another 20 minutes.  I’ll spare you the play by play but by the time we walked out, we had been waiting for an hour and a half with no apology, no offer for an appetizer on the house, no comped glass of wine.  Randy swore he would never eat there again.

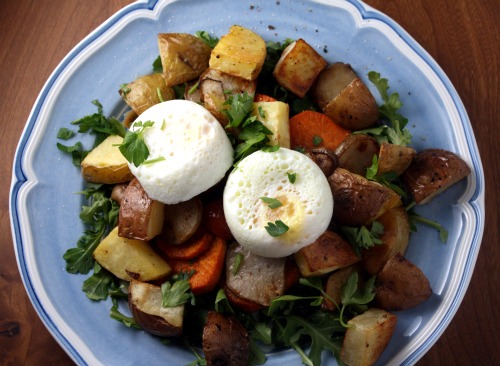
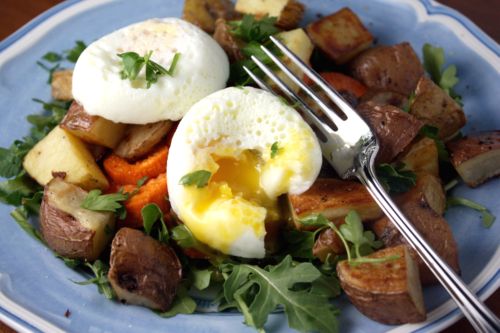
And, until recently, he didn’t.  When the restaurant moved into decidedly more swanky digs and I was dying to try it, I went for lunch with friends.  Twice.  The food is still super local, inspired, and very flavorful.  They also have an incredibly heavy hand with the olive oil which I don’t love.  Still, it is a very special place.  And they have a tiny grocery area where they sell amazing things that are hard to find elsewhere.  Last time I was in there, I picked up some Muscat vinegar.  As I was waiting to pay, I glanced at the menu.  All I saw was something like Potatoes, Jerusalem Artichokes, Arugula, and a Poached Egg.  If I hadn’t already eaten lunch, I would have ordered it right then and there.  So I did the next best thing.

I am often inspired by menus.  The dishes I make from those inspirations are usually things I have actually eaten in the restaurant.  But with those ingredients, all of which I was able to find in the Sunday farmers market, I knew I would have a home run.  Plus, roasted potatoes for dinner?  Hurray!

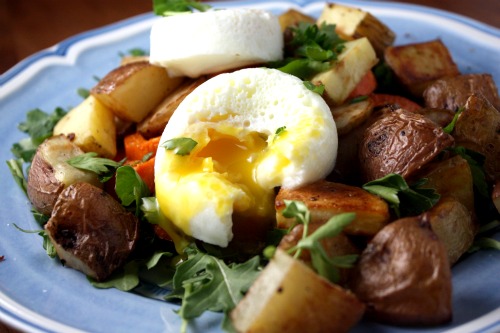
Potatoes, Jerusalem Artichokes, Arugula, and a Poached Egg
Dana Treat Original, Inspired by Sitka and Spruce
Serves 2

I confess to having an egg poacher (which is mine look like that) so I am not going to offer advice on how to do it the old fashioned way.  I am not very good at it.  You can check here for good instructions.  Jerusalem artichokes look like something you want to peel, but it is not necessary.  Just give them a good scrub.

1 tbsp. unsalted butter
3 medium Jerusalem artichokes, scrubbed and thinly sliced
Kosher salt and freshly ground black pepper
3 large Yukon gold potatoes, cut into large chunks
1 small sweet potato, peeled and cut into large chunks
Olive oil
8 cherry tomatoes
2 ounces arugula leaves
Good olive oil
Your favorite vinegar
4 eggs, poached
3 tbsp. chopped parsley

Preheat the oven to 400ºF.

Melt the butter in a medium skillet and then add the Jerusalem artichokes along with a pinch of salt.  Try to lay them in one layer if possible.  Cook, turning occasionally, until completely tender and browned in spots, about 10 minutes.  Turn out onto a paper towel lined plate.

Place the potatoes and sweet potatoes on a medium baking sheet.  Drizzle with about 2 tablespoons of olive oil and then sprinkle on a large pinch of salt and a few grinds of pepper.  Place the tomatoes on a small baking sheet and drizzle them with about 1 tablespoon of olive oil, salt, and pepper.  The sweet potatoes will roast faster than the Yukon golds so separate them on the baking sheet.

Bake the tomatoes for about 10 minutes, or until starting to brown.  Bake the sweet potatoes and Yukon golds until fork tender, about 16 minutes for the sweet and 25 minutes for the Yukons.  Resist the urge to toss them, allow them to develop a nice brown side.

Place about 1 ounce of arugula on each plate.  Drizzle with your best olive oil and then your favorite vinegar and sprinkle with salt.  Add pepper if you like it.  Top with half the vegetables and one or two poached eggs.  Sprinkle with parsley and repeat with the other plate.


« Older Posts Newer Posts »