Archive for September, 2010

Labor Day Cauliflower

September 6, 2010

It is Labor Day in the U.S. and for many that means barbecues.  It means sending summer off with a bang with things like burgers, potato salad, and large slices of watermelon.  There will be no barbecue here on this cold and rainy day.  I could link to barbecue friendly food from past posts but instead, I am going to talk about cauliflower.  (OK, here is one dish that I truly love that even involves a grill!  And while I am in parentheses, I should tell you that Seattle has a wonderful music festival every Labor Day weekend and it is called Bumbershoot because it always rains.)

Cauliflower.  I have a relatively new appreciation for cauliflower.  It started when I learned that roasting it at high heat produces something of utterly transcendent sweetness.  Nothing like the sad bowl of plain steamed stuff sitting on my childhood kitchen table, or the pile of raw browning florets untouched at nearly every salad bar and on every crudité platter.  Because of my new relationship with this member of the brassica family, I have been more open to recipes starring cauliflower.  That is a good thing because this beauty just got a permanent spot in my repertoire.

I recently read somewhere that there is a crisis in the saffron world.  Because it is so labor intensive to harvest and so expensive, much of the saffron we pay so dearly for is not actually saffron.  In other words, it is not the stamen of the crocus flower but the stamen of other flowers, most notably safflower.  Saffron’s  aroma is unmistakable (like pot’s aroma is unmistakable – sorry), so be sure to take a whiff of whatever you buy.  The high price is worth it for the scent, gorgeous color, and subtle pungent flavor.

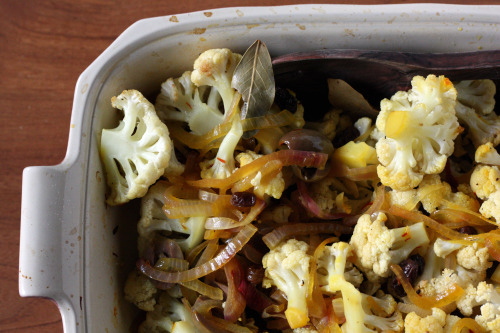
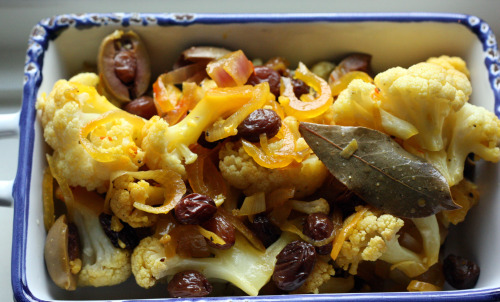
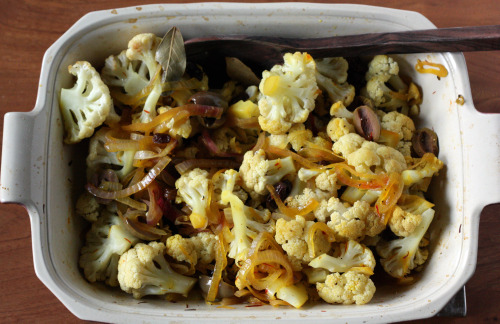
Just a pinch here flavors this whole dish.  Sure there are also olives, bay leaves and raisins, plus red onions that get cooked down so much and so nicely that even I, who am not usually a huge onion fan, didn’t pick them out.  But the saffron is what makes the dish.  Buy carefully.  I made this as a side dish served warm one night and served it cold as a salad the next.  Overnight in the refrigerator made the color of the cauliflower more golden and the flavor more intense, so don’t hesitate to make this ahead of time.

One Year Ago: Holly B’s French Bread
Two Years Ago: Chocolate Peanut Toffee

Saffron Cauliflower
Adapted from Plenty
Serves 4-6

Because this is an English cookbook, all the measurements are metric.  I chose to eyeball the ingredients rather than whip out my scale which you will see reflected below.

Large pinch saffron strands
¼ cup boiling water
1 large cauliflower, broken into medium florets
1 large red onion, cut in half and then thinly sliced
1 handful raisins
1 cup green olives, sliced in half
4 tbsp. olive oil
2 bay leaves
Salt and freshly ground black pepper

Preheat the oven to 400ºF.  Put the saffron strands in a small bowl and pour over the boiling water.  Leave to infuse for a minute, then pour the saffron and water into a large mixing bowl.  Add the remaining ingredients plus a large pinch of salt and a few grinds of pepper, and mix everything together with your hands.

Transfer the mix to a medium ovenproof dish, cover with foil, and place in the oven.  Cook for 40-45 minutes, or until the cauliflower is tender but not too soft.  Halfway through the cooking time, remove the dish from the oven and stir well, then cover again and return to bake.

Once the cauliflower is cooked, take it out of the oven and remove the foil.  Season to taste with salt and pepper and serve warm or room temperature.


Inspired by the Best

September 3, 2010

I think it was Lisa who said that her pizzas always come out shaped like Texas.  Lisa lives in Texas.  I can honestly say that mine come out shaped like all different states but this time I actually think it was Washington.  Coincidentally, I live in Washington.

Anyway, non-circular shapes aside, this pizza was inspired by a magical one I had at Delancey.  Last Friday I took nine out-of-town food bloggers to this hot spot in Ballard.  People have strong opinions about the best pizza in Seattle but for me there is no discussion.  At Delancey there were nine pizzas on the menu.  Of course it made sense to order one of each pizza, right?  We greedily dug into the first few and then they just kept coming and coming and coming and…  We were reluctant to leave any slices on the table because it was all so good.  My favorite part of a pizza is the crust and I want to really taste that crust.  Brandon’s has tremendous flavor and the perfect char.  It is thin and light but substantial enough to not be cracker-y.  He does not drown the pizza in toppings nor is he heavy-handed with the cheese.  He makes the perfect pie.

A favorite on our table featured padrón peppers which you can find at our farmers markets this time of year.  In fact, I had to fight someone for a slice of this pizza.  I played the vegetarian card (whiny voice:  “But half of these pizzas I can’t eat!  I need a slice of all the veg ones!)  As with all of the pizzas, this pie was a model of restraint.  A bit of sauce, a bit of cheese, and a couple of thinly sliced peppers strewn over the top.  I love heat and was lucky enough to find that my particular pepper was spicy (with padrón, some are spicy and most are not).  On a table full of great food, that pizza really stood out.

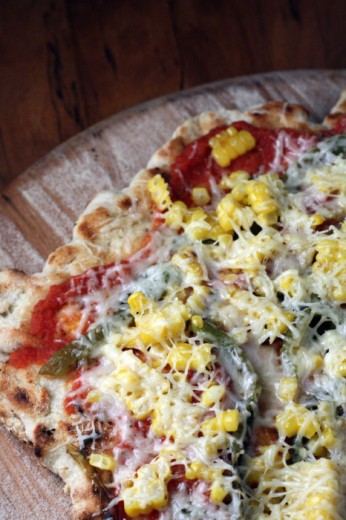
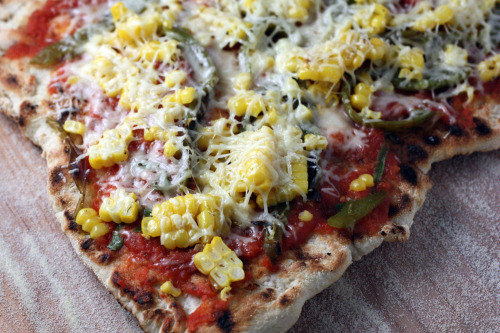
I have been meaning to grill more pizza this summer and now that the season is almost over, it’s time to get to it!  Knowing that my crust would not taste as good as Brandon’s and knowing that I would never get it as delicate as his, I decided to add a bit to his idea.  Gorgeous corn was for sale alongside the peppers at one of my favorite stalls so I picked up some of that.  I was in the midst of a time crunch so I decided that dinner had to come 100% from the market and my refrigerator.  I didn’t have any mozzarella on hand so I just used Parmesan.  I grilled the corn and the peppers, used a disk of homemade dough I had defrosted from my freezer, and successfully grilled a Washington state shaped pizza.

I had a small piece and Randy ate the entire rest of the pizza.  Seriously.  I thought I would have some left over for the babysitter tonight but apparently, if she wants to eat pizza, it’s going to be the Trader Joe’s special.  Randy loved it and I did too.  It’s not Delancey but it’s pretty good.

One last thing.  I should tell you that I don’t have a favorite pizza dough.  For this one, I used Jim Lahey’s version which I don’t love and am currently auditioning others.  Use the one you like best.  If you are crunched for time and live in the Seattle (or Burien) area, Grand Central Bakery makes one that is really good and fairly priced.

Other spicy pizza on Dana Treat: Mexican Pizza with Corn, Tomatillos, and Chipotle Peppers
One Year Ago:
Corn and Zucchini Timabale with Ancho Chile Sauce

Grilled Padrón Pepper Pizza
Inspired by Delancey
Makes enough for 2

1 recipe pizza dough
1 cup (approximately) pizza sauce
2 medium padrón peppers
1 large ear of corn, husks and silk removed
Olive oil
Kosher salt
2 handfuls of Parmesan cheese

Preheat your grill to medium-high.  Rub a bit of olive oil on the corn and peppers, then sprinkle with kosher salt.  Carefully place on the grill and cook, turning occasionally, until the peppers and the corn are blackened in spots.  You will want more color on the peppers than the corn and the peppers should be soft.  This process takes about 15 minutes.  Remove the vegetables and turn the heat on the grill up to high.

Once the vegetables are cool enough to handle, split open the peppers (don’t peel them!) and remove the seeds and membranes.  Thinly slice and set aside.  Cut the corn off the cob and set aside.

Dust a pizza peel with cornmeal or semolina flour.  Using your hands coax the dough into a nice thin circle (or the shape of your home state).  Working quickly and carefully, slide the dough on to the peel and then on to the grill.  Close the lid.  You want nice grill marks on the bottom but don’t allow it to overcook.  Depending on the heat of your grill, this can happen very quickly.  Using tongs, turn the dough over.  Spread the sauce all over the dough, scatter the peppers and corn over the surface and then sprinkle with the Parmesan.  Close the lid of the grill and cook for about 10 minutes, or until the edges of the dough are brown and the cheese is melted.  Remove and serve.

Tomato Sauce for One Pizza

1 15-ounce can diced tomatoes
½ tsp. kosker salt
Small pinch of sugar
½ tsp. dried oregano
8 basil leaves, sliced

Drain the tomatoes well.  Put all the ingredients in a blender and purée until smooth.


Savory Scones

September 1, 2010

Some people love breakfast.  Other people only eat breakfast because they know they are supposed to and they know that if they don’t, they will inhale an entire table’s worth of food for lunch.  I put myself in the second category.  I never feel hungry in the morning and, consequently, I eat one of the same three things every single day.  Having a rotation of three things is actually fairly recent.  Up until this year, I ate a Luna bar every day for nine years.  Nine years.  Now I alternate with thrilling things like yogurt and cereal.

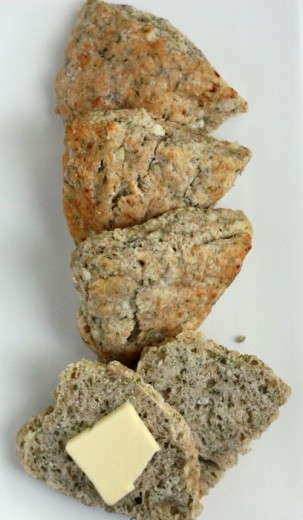
Sweet scones are all well and good but how about a savory scone?  I made these with a combination of dill and aged Cheddar but there are many other combos that would work.  Roasted red pepper and feta, scallion and chèvre, thyme and Gruyère all sound good to me.  I like the idea of serving these with some soup on a fall day in addition to offering them to friends for breakfast.

For this basic recipe, you use a (homemade) scone mix.  After I made the blueberry ones, I had just enough left over for another batch.  I kept the mix in the refrigerator and was so happy to have some on hand so I could make treats for my guests.


Scones previously on Dana Treat:
Almond Praline Scones, Classic Currant Scones|
One Year Ago:
Mint Filled Brownie Cupcakes
Two Years Ago:
Fresh Summer Rolls with Tofu

Savory Scones

Adapted from With Love & Butter
Makes 12 scones

For this recipe, you will need approximately half the Scone Mix.  Or if you want, you can double the Savory Scones and freeze half of them.  Lots of options.

4½ cups Scone Mix
½ cup coarsely grated Cheddar cheese
¼ cup chopped fresh dill
1 large shallot, chopped
½ tsp. freshly ground black pepper
1 cup buttermilk
½ cup cottage cheese

Preheat the oven to 375ºF with the rack in center position.  In a medium bowl, toss together the Scone Mix, cheese, dill, shallot, and pepper.  Drizzle the buttermilk over the surface and blob in the cottage cheese.  (DT: “Blob” is Holly’s word!)  Stir until mixed.  If the dough is too dry to stick together when pressed, add a bit more buttermilk.  You want to be able to make a nice firm shape.

Turn the dough onto a lightly floured surface and pat into two disks about 1½-inches thick.  Cut each disk into 6 wedges and arrange 1-inch apart on a cookie sheet.  Bake in two batches if they don’t fit on one sheet.  Bake 15 minutes, rotate the pan, and bake another 10 to 15 minutes, until the scones are light brown on top and darker on the bottom, and no longer soft and doughy in the center.  When judging doneness, don’t rely on the color of the tops alone.  The tops can look quite light and undone while the bottoms are getting quite brown.

Scone Mix
4½ cups all-purpose flour
1 cup plus 2 tbsp. whole wheat flour
2 tbsp. sugar
1½ tbsp. baking powder
1¼ tsp. baking soda
¾ tsp. salt
2¾ sticks cold butter, sliced

Place all the ingredients except the butter in a large bowl and mix.

Fit your food processor with the steel knife blade.  Put half the butter in the bowl and top with half the dry ingredients.  Pulse until the butter is reduced to pearl-sized bits.  Don’t over process or it will turn into a dough, you want a dry mix.  Pour the processed mixture into another large empty bowl.  Repeat this process with the remaining dry ingredients and butter.  Be sure to break up any large lumps of butter and, when through, toss thoroughly with your fingers.

Transfer the scone mix to an airtight container and store it in the refrigerator for up to 2 months, or in the freezer for up to 6 months.


Newer Posts »