Archive for January, 2010

Making Do with Soup

January 21, 2010

IMG_4516

I read a lot of food blogs.  There are about one bazillion of them out there and many of them are not all that good.  Many of them are good.  A few of them are great.  It’s the great ones where I get inspired.  When a dish leaps off the screen, that’s when I know it is time to make it.

When I saw this soup with the chickpea croutons, I immediately started my shopping list.  I love croutons in soup and had never thought to do anything like what Allison did with chickpea flour.  Brilliant, right?  Sadly, they did not work out for me.  I take total responsibility for the fail.  I’m not sure what I did wrong – did I stir enough?  too much? – but what I got was a slab of mush on my baking sheet.

Then, panic set in.  My brother Michael was coming to dinner.  Michael is a bike racer and has a large appetite.  I knew he was coming off a long ride and would be ravenous.  I wasn’t sure the soup as written was going to fill him up and so, I improvised.  I very loosely based this soup on a recipe in a Jeanne Lemlin book (Simple Vegetarian Pleasures) but really made it my own with what I had on hand.  I was really pleased with how the soup turned out.  If you read here often, you know anything with chickpeas is a favorite of mine.  The greens along with the couscous were a really nice combination.  I didn’t have any fresh herbs on hand (not even parsley!) but they would be most welcome here.  By the way, Michael left full.

IMG_4521

The two C’s together previously on Dana Treat: Chickpeas and Chard with Cilantro and Cumin
One Year Ago:
Sicilian Eggplant Spread with Crostini

Chickpea, Chard, and Couscous Soup
Dana Treat Original
4 Servings

Olive oil
1 onion, finely diced
2 garlic cloves, minced
½ – 1 tsp. crushed red pepper flakes
1 tsp. dried thyme
1 15-oz. can chickpeas, rinsed and drained
1/2 cup couscous
1 large bunch chard, leaves cut off the stems and cut or torn into bite size pieces
6 cups vegetable stock
Crumbles of ricotta salata or feta cheese (for garnish)
Cherry tomatoes (for garnish)

Heat a large pot over medium heat and add just enough olive oil to coat the bottom.  Add the onions and cook until they begin to soften, about 5 minutes.  Add the garlic, red pepper flakes, and thyme and stir for 2 minutes.  Add the chickpeas and the couscous and cook for 2-3 minutes, stirring often to keep the couscous from sticking to the bottom.

Add the chard, in batches if need be, and stir well to combine.  Pour in the vegetable stock and bring to a boil.  Reduce heat and allow the soup to simmer for about 30 minutes – enough time for the couscous to cook, the greens to soften, and the flavors to blend.  Serve in bowls topped with a crumble of cheese and a few cherry tomatoes.


Peanut Butter Cookies Done Right

January 19, 2010

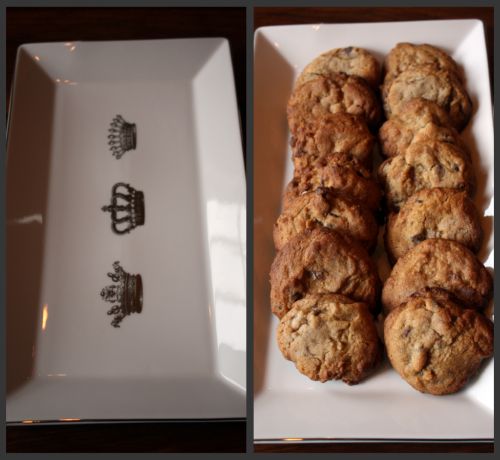
Cookie Collage

On a cookie plate, the first one I will go for is the chocolate chip and the last one is the peanut butter.  Why?  I don’t think I’ve ever had a good peanut butter cookie.  They tend to be dry and crumbly and the flavor is pretty one note.  I find at the end of eating one that my tongue kind of hurts.  Just not enough variety of flavor for me in that cookie.

IMG_4536

So why did I make these?  First of all, the milk chocolate chunk part of the recipe just screamed at me.  Then I noticed that they have a lot of peanut butter and not much flour which means that dry problem would most likely be taken care of.  Plus, in the header of the recipe, the authors say, “This is not your ordinary peanut butter cookie.  It is, in our humble opinion, the only peanut butter cookie.”  How could you not accept that challenge?  And so, I made them.  And so, now I have to deal with the temptation of having them in my house.  It’s not just the chocolate that makes these so much better than other peanut butter cookies I have had.  It is the cookie itself – moist but crisp in the right places and pure peanut butter flavor.

IMG_4532

Peanut Butter and Chocolate Together on Dana Treat: Holly B’s Peanut Butter Brownies, Peanut Butter Cup Brownies, Peanut Butter Candy Mini Brownie Cups

Peanut Butter Cookies with Milk Chocolate Chunks
Baked – New Frontiers in Baking
Makes about 24 cookies

Holy mistake Batman!  I just realized while typing in this recipe that I did not add the called for 1 cup of granulated sugar to the butter and brown sugar.  Yes, my cookies were missing a whole cup of sugar and are still delicious.  If you choose to leave out that cup of  granulated sugar, be sure to still use the cup of brown sugar.  Below is what you are supposed to do.

1¾ cups flour
2 tsp. baking soda
1 tsp. salt
1 cup (2 sticks) unsalted butter, softened, cut into 1-inch pieces
1 cup granulated sugar, plus more for sprinkling
1 cup firmly packed dark brown sugar
2 large eggs
1 tsp. pure vanilla extract
1 cup creamy peanut butter
6 ounces good milk chocolate, coarsely chopped

Sift the flour, baking soda, and salt into a medium bowl and set aside.

In the bowl of an electric mixer fitted with the paddle attachment, beat the butter and both sugars together until fluffy.  Scrape down the bowl and add the eggs, one at a time, beating until each is incorporated.  The mixture will look light and fluffy.  Add the vanilla and peanut butter and beat until just incorporated.

Add half the flour mixture and mix for 15 seconds.  Add the remaining flour mixture and mis until just incorporated.

Using a spatula or wooden spoon, fold in the chocolate.  Cover the bowl tightly and refrigerate for at least 3 hours.

Preheat the oven to 375°F.  Line two baking sheets with parchment paper.  (DT: I skipped this step and the cookies did not stick.)

Drop the dough by rounded tablespoons onto the prepared sheets, at least 2 inches apart.  With the palm of your hand, very gently press each cookie down so it forms a very tall disk shape.  Do not press too hard and do not press it flat.

Sprinkle the tops of the cookies with granulated sugar and bake for 10 to 12 minutes, rotating the pan halfway through the baking time, until the tops of the cookies just begin to brown.

Remove the pan from the oven and cool on a wire rack for 5 minutes.  Use a spatula to transfer the individual cookies to the rack to cool completely (although they are delicious warm).

The cookies can be stored, in an airtight container, for up to 3 days


Lasagne with Eggplant and Chard

January 18, 2010

IMG_4502

How do you feel about lasagne?  (And do you spell it lasagna?)  I ask because my husband said something surprising the other night when I told him I was making it for a dinner party.  First he made a face and then he said, “It’s kind of like making spaghetti.”  Coming from him, that is basically an insult.  For reasons that aren’t totally clear to me, Randy hates spaghetti.  Give him some kind of delicious sauce on spaghetti and he won’t like it.  Give him the same sauce on fettucine and he will love it.  I don’t understand but I accept and don’t make spaghetti.

When pressed, he explained that he is used to me making really interesting and unusual things for dinner parties and that lasagne seemed boring and maybe even easy.  I’m sure there are easy ways to make lasagne but for me, it has always been a fairly long and involved process.  Making sauce, making various fillings, roasting vegetables.  Lasagne is not a throw together meal in my world.

What’s more, we were having some friends over for dinner who I don’t know all that well.  Actually, I know the wives well, but I have only met the husbands a handful of times.  I didn’t want to make something really out there (aggressively vegetarian, as I like to call it) and have people not eat it.  I also wanted to make something satisfying so that, if they are used to eating a lot of meat, they didn’t feel like they needed to stop for a hamburger on the way home.  Everyone likes lasagne, right?
IMG_4512

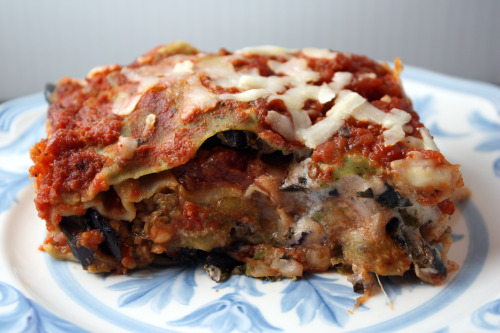
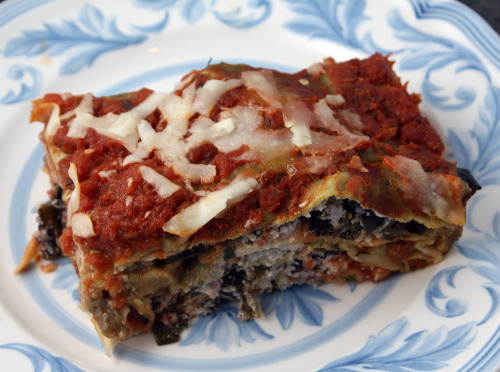
In my many cookbooks, I found a number of recipes that looked inticing.  But I decided against a béchamel sauce and that ruled out many of them.  I wanted something filling but I didn’t want a gut bomb and besides, Randy doesn’t do well with cream sauces.  I settled on this one from Deborah Madison’s Vegetarian Cooking for Everyone and I was very happy with how it turned out.  Hearty and flavorful but not too heavy or cheesy.  Eggplant and I are not the best of friends and I thought Madison’s idea to bake it and then chop it was genius.  Trying to saw through an eggplant round in a lasagne is difficult – pieces of eggplant are easy.  Finally, the greens in the ricotta filling are very welcome.  She calls for chard, I used red kale because I had some.  Their texture is welcome, the color makes it more interesting, and the “green” taste keeps it from being too rich.

Here is a silly little story.  I used to make a very good (but very time consuming) lasagne that featured two different vegetable fillings.  Whenever I made it, I would stress about the sauce.  The amount that the recipe yielded was on the skimpy side and I would fret about it all coming out right.  Not once did it occur to me to increase the amount of sauce I made.  I just stuck to the rules and stressed.  Now that I am older and wiser, I do things my way with lasagne.  I like mine saucy so I make extra sauce.  If the worst thing in the world is having too much homemade tomato sauce, then that is a pretty good world.  You can use it another night on another kind of pasta (not spaghetti!) or you can freeze it with beautiful results.  I give my recipe below, you will use ½ – ¾ of it for the recipe.  And if you would like to just use jarred sauce, I won’t tell anyone.

IMG_4505

One Year Ago: Pea Salad with Radishes and Feta Cheese

Lasagne with Eggplant and Chard
Adapted from Vegetarian Cooking for Everyone
Serves 6-8

1½ pounds fresh pasta sheets, or 1 box dried
Tomato sauce (about 2 cups, recipe follows)
1½ pounds eggplant, sliced crosswise ¼-inch thick
Olive oil
½ onion, finely diced
3 garlic cloves, minced
1 bunch green chard, leaves removed from the stems
Salt and freshly ground black pepper
1/2 dry white wine
1 cup ricotta cheese
1 egg
1 cup grated Pecorino Romano
8 ounces fresh mozzarella, thinly sliced

Prepare the sauce.  If you are using dried pasta, parboil it for a few minutes then drain it and lay out on a sheet pan so it doesn’t stick together.

Preheat the oven to 400°F.  Brush both sides of the eggplant lightly with oil.  Place the slices on a sheet pan and bake, turning once, until browned on both sides, about 30 minutes in all.  Chop coarsely and set aside.  (DT: This step can be done one day ahead.  Cool completely, then cover and refrigerate.)

Heat a large skillet over medium heat.  Add just enough olive oil to coat the bottom, then add the onion and garlic.  Stir frequently for 3 minutes.  Add the chard, sprinkle with a pinch of salt and a few grinds of pepper, and cook until wilted, about 5 minutes.  Add the wine, cover and cook until the chard is tender and the pan is dry, about 10 minutes.  Turn the mixture out onto a cutting board and finely chop.  In a bowl, mix together the ricotta and the egg, then stir in the chard mixture.  Season with salt and pepper.  (DT: This step can be done one day ahead.  Cover and refrigerate.)

Oil a 9- x 13-inch baking dish.  Coat the bottom lightly with sauce and then cover with a layer of pasta.  Scatter a quarter of the Pecorino over the top and add a quarter of the eggplant, ricotta mixture, and mozzarella.  Follow with another layer of pasta and repeat for three more layers.  End with a layer of pasta and top with sauce.  (Sprinkle with more Pecorino if you like.)  Cover with foil.  (DT: The whole lasagne can be made one day ahead.  Keep covered and refrigerate.  It will need another 10 minutes or so of baking time.)

Preheat the oven to 400°F.  Bake 20 to 30 minutes or until heated through.  Remove the foil and bake for another 5 to 10 minutes.  Let stand for 10 minutes before serving.

Dana’s Tomato Sauce
Makes a lot

Of course you can halve this recipe.

1 onion, finely diced
2 garlic cloves, minced
2 tsp. dried basil
1 tsp. dried oregano
1/2 cup good red wine
2- 28 ounce cans whole tomatoes
Salt and freshly ground pepper
Pinch of sugar (optional)

Heat a Dutch oven over medium heat.  Add just enough olive oil to coat the bottom, then add the onion along with a pinch of salt, and sauté until softened, stirring frequently, about 5 minutes.  Add the garlic, stir for another 2 minutes, then add the herbs.  Stir well to combine, then pour in the wine.

Cook, uncovered, until the wine is almost evaporated, then carefully add the two cans of tomatoes.  Bring to a boil, then reduce the heat to a simmer.  Cook until the sauce has thickened, periodically crushing the tomatoes against the side of the pot with a spoon, about 30 minutes.  Taste, adding salt and pepper as necessary and a pinch of sugar if the taste is metallic.  (In my experience, the better the tomatoes, the less of a need for sugar.)  If you prefer a smoother sauce, you can purée it with an immersion blender, or in a stand blender or food processor.  Let the sauce cool before you use a stand machine.


Poached Pear and Almond Tart

January 17, 2010

IMG_4493

Just let me warn you.  If you scroll to the end of this post, you will not find a recipe for this lovely pear tart.

Do you get Cook’s Illustrated or have any America’s Test Kitchen cookbooks?  If you do, then you know that the recipes are wordy.  Like, really wordy.  I think that is terrific and I always know, whenever I approach a new one, that the recipe will be clear and whatever I am making will turn out.  It does not, however, make for good blog content.  If I were to type out this recipe, it would take me a good long while.  Not because it’s so complicated (although there are several components to the tart), but because it is very well-explained and therefore long.

But I just had to write about this Poached Pear and Almond Tart.  This is my third time making it.  My first time I was very afraid.  I think there are looks bakers and there are taste bakers, and the very lucky ones are both.  I am a taste baker.  My goods taste delicious (most of the time) but they do not look like I bought them from a bakery.  In other words, they are far from perfect.  If you want a homemade looking desserts, I’m your girl.  Tarts with perfect crusts and oh-so-thinly sliced and fanned pears make me nervous.  But, trusting Cook’s Illustrated, I went for it and got a pretty great looks and tremendous taste pear tart.  If I hadn’t already known to trust those America’s Test Kitchen people, that would have been the moment to realize it.

There are so many wonderful things about this tart.  The pears are poached in wine and spices including the seeds from a whole vanilla bean (the recipe says half, I say a whole one).  The crust is probably the most delicious one I have ever tasted – so much so that I eat my piece from fat end to skinny so in case I decide not to finish it, I have gotten the best part.  Each component can me made separately and days ahead of serving time.  It’s pretty close to perfect-that-is-not-chocolate.

So, if you must make this tart, here are a few of things you can do.  You can go online to the Cook’s Illustrated web site and pay a small fee to register for their site.  Doing so allows you access to all of their recipe archives.  You could also treat yourself to their baking book which is titled Baking Illustrated.  That book is truly a treasure in and of itself plus the recipe is in there.  Or, if you are desperate for pear tart and short of funds, email me with your address and I will mail you a photocopy.

UPDATE:  The ever-lovely Cheryl from 5 Second Rule emailed me a link to a very similar tart.  She has made it with great success and it comes from Dorie Greenspan, a source I trust.  You can find it here.


Using Up Winter Vegetables

January 15, 2010

IMG_4438

Last weekend was the end of our CSA.  We joined in June and have gotten lovely produce almost every week since.  I chose this one because it went all the way through the fall and into winter.  Fall produce is my favorite (at least in terms of vegetables), so I didn’t want one that ended in September.

Now that it is over, I wonder if I will join again next year.  Or if I will choose another farm.  Or if I will just shop the farmer’s market, selecting what I want rather than resigning myself to what they give me.  I loved the quality – vegetables so fresh! – and the challenge of using what was completely seasonal.  I didn’t love week after week (after week) of carrots and greens.  So I don’t know.  Something to ponder in the dark days ahead before the days of kale end and the days of asparagus begin.

IMG_4442

I do love that of the many vegetables in this pot pie, half were from my CSA.  The parsnips, carrots, brussels sprouts, and beets were all in that last box.

If you take a look at the side bar to your right, you will notice a new category.  My friend Kelly suggested I create one for “quick and easy” recipes.  I went back through my archives and tagged the ones I would describe that way.  Everyone has a different idea of what is quick and easy so you may not always agree with me.  For instance, something that bakes in the oven for a while but only took you a few minutes of hands-on time would count in my book.  Or something that simmers on the stove with just a stir from you every ten minutes or so.  I know that getting dinner on the table can sometimes be a Herculean effort, so I hope you find this category helpful.

I would not qualify this pot pie as quick – easy yes, but not quick.  Look at this as a chance to practice your knife skills.  You will be richly rewarded by something extremely tasty and hearty without being heavy.  Feel free to play around with the vegetables and their amounts.  Everything gets roasted for the same amount of time with the exception of the zucchini, so if you have two beets and one parsnip – go for it.  Or if the idea of using half a butternut squash seems fussy to you, use the whole one and don’t use the beets.  You can see where I am going with this.  My final note is to not pile up the biscuit dough as high as I did because they didn’t cook all the way through by the time they were starting to brown.  Next time, I will dollop more delicately.

IMG_4449


Chunky Vegetable Pot Pie
Adapted from The Martha Stewart Living Cookbook – The Original Classics
Serves 6

1/2 medium (about 8 ounces) butternut squash, peeled and cut into ¾-inch cubes
1 small head celeriac, cut into ½-inch cubes
2 medium carrots, peeled and cut into thick 1-inch long matchsticks
1 cup cauliflower florets (from ½ of a cauliflower)
8 ounces brussels sprouts, cleaned and trimmed and sliced lengthwise
1 medium beet, trimmed and scrubbed, cut into ½-inch cubes
2 parsnips, peeled and cut into thick 1-inch long matchsticks
Olive oil
Kosher salt and freshly ground black pepper
3 garlic cloves, minced
2 medium shallots, minced
½ cup dry white wine
1½ cups vegetable stock
1 cup plus 2 tbsp. flour
2 tsp. baking powder
2 tbsp. plus 2 tsp. chopped fresh tarragon
3 tbsp. unsalted butter
1/2 cup milk
2 tbsp. freshly grated Parmesan cheese
1 medium zucchini, cut into 1-inch long matchsticks

1.  Preheat the oven to 425°F.  Place squash, celeriac, carrots, cauliflower, brussels sprouts, beet and parsnips in a roasting pan.  Toss with 2 tablespoons olive oil; season with salt and pepper.  Roast for 35 to 40 minutes, stirring twice during the cooking.  Remove; reduce oven to 375°F.

2.  Heat a medium skillet over medium heat.  Add just enough olive oil to coat the bottom, then add the garlic and shallots; cook until soft, about 5 minutes.  Raise the heat to high, and add the wine.  Let the wine reduce by half, about 2 minutes.  Add the vegetable stock and simmer over medium-high heat for 5 minutes.  Set aside.

3.  Combine 1 cup flour, the baking powder, 2 tsp. tarragon, and a sprinkling of salt in the bowl of a food processor.  Pulse in the butter until mixture resembles coarse meal.  Add the milk and Parmesan, process until combined, and set aside.

4.  Transfer vegetables to a large bowl.  Add zucchini and the remaining two tablespoons flour and two tablespoons tarragon; toss to combine.  Stir in the stock mixture; season with salt and pepper.  Transfer to a shallow ovenproof glass pie dish; bake for 15 minutes.  Remove from the oven and drop heaping tablespoons of the biscuit dough over the vegetables, leaving some of the vegetables exposed.  Place the pie dish in the oven and bake until the biscuits are golden, about 25 minutes.  Serve hot.


« Older Posts Newer Posts »