Archive for May, 2009

Individual Vegetable Tarts

May 21, 2009

img_2296

I have sung the praises of cookbook author Jeanne Lemlin here before.  Up until recently, I owned three of her cookbooks, all of which I love and could not do without.  For Mother’s Day, my sister-in-law bought me the one that was missing from my collection.  It is a fabulous addition.

I have a lot of cookbooks.  A lot.  Whenever I am tempted to buy a new one, I really look through the recipes.  About 90% of the time, I put the book in question back  because I find that the recipes are too similar to things I already have in other books.  What amazes me about Lemlin is this.  Here is an author whose books I use all the time.  You would think there would be no reason for me to have this fourth book.  And you would be wrong.  (This is starting to sound a lot like my justification arguments to my husband.)

Vegetarian Classics houses 300 more recipes, many of which jump off the page.  There are a few that bear a slight resemblance to earlier recipes, but most of them are quite different.  As I sat looking through the book, I knew that this entire week would be devoted to this book.  It has not disappointed so far.

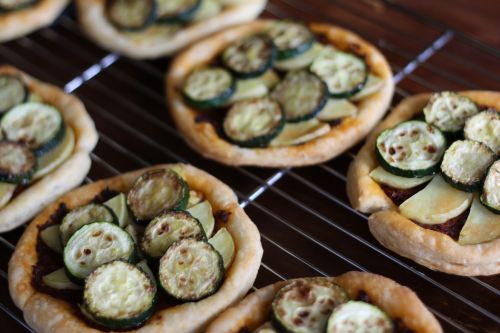
I made these lovely tartlets for my clients Tuesday night.  They were quite simple to make, looked pretty, and were delicious to eat.  I love when something looks like you spent a lot of time on it when in fact it was fairly quick.  These would also make a fabulous appetizer, cut in much smaller rounds and topped with a single slice of potato and a single slice of zucchini.  As an added bonus, the sun-dried tomato pesto that is slathered onto the puff pastry can be used on crostini or tossed with pasta.  I think making a double batch next time might be a good idea.
img_2305


Individual Vegetable Tarts
Adapted from Vegetarian Classics
Serves 4

1 sheet (half of a 17-ounce package) frozen puff pastry
Sun-Dried Tomato Pesto (recipe follows)
1 large Yukon Gold potato, halved, sliced 1/4 inch thick
2 tbsp. olive oil
1 large zucchini, sliced 1/4 inch thick

1.  Defrost the puff pastry in the refrigerator overnight.

2.  Fill a saucepan halfway with water and bring to a boil.  drop in the potato slices and cook until tneder but not mushy, about 5 minutes.  Drain and spread out on a plate to cool.

3.  Hea the oil in a large skillet until hot but not somiking.  Fry the zucchini slices until golden on each side.  Remove to a plate and let cool.

4.  On a lightly floured surface, roll the puff pastry into an 11×11 square.  Using a 5 inch cutter or inverted bowl, cut 4 disks from the pastry.  Place the disks on a baking sheet and pierce all over with a fork.  Keep refrigerated until you are ready to assemble the tarts.  Preheat the oven to 400 degrees.

5.  Spread 2 tbsp. pesto on each pastry disk, leaving a 1/2 inch border.  You will have some pesto left over; refrigerate for another use.  Ocver the pesto with some potato slices, then cover the potatoes with zucchini slices arranged in a circle.

6.  Bake 15-20 minutes, or until the pastry is golden brown.

Sun-Dried Tomato Pesto
Makes 1 cup

1/2 cup loose sun-dried tomatoes
2 garlic cloves, chopped
1/2 cup chopped fresh parlsey
1/4 cup chopped fresh basil
1/2 tsp. salt
Freshly ground pepper to taste
1/3 cup olive oil
2 tbsp. pine nuts
1/4 cup grated Parmesan cheese

1.  Place the tomatoes in a heat-proof bowl and pour boiling water over them.  Cover bowl with a plate and let sit 10 minutes.  Drain and cool the tomatoes.

2.  In a food processor, combine the tomatoes, garlic, parlsey, basil, salt, and pepper and process until finely ground.  Slowly pour in the oil and process until smooth.  Scrape the pesto into a bowl and stir in the pine nuts and cheese.  If you are using the pesto on pasta, stir in 1/2 cup boiling pasta water to thin it out.


Give Tofu a Chance

May 20, 2009

img_2288

I get a lot of questions about tofu.  These days I think it’s something that people feel they are “supposed” to like.  Or at least “supposed” to use.  There is so much information out there about the impact that a meat based diet has on the planet and I think people are really starting to read and listen.  People who are wanting to do something to minimize their impact often find eating less meat approachable.  But what do you do if you don’t like tofu?

First of all, let me say that you don’t have to like tofu.  Even if you are a vegetarian.  And there is no rule that says a vegetarian meal has to include tofu.  I have many many recipes posted here on this blog and there are only four that include our little soy friend.  There are tons of options if you don’t want to eat meat and are afraid of soy.  Take a peek through the main course section over on the right hand side bar and I think you’ll find some lovely things to eat.

That said, I do think tofu gets a bad rap.  It’s not a meat substitute – it is it’s own thing.  The most common complaints I hear is that tofu doesn’t taste like anything and that it is mushy.  Tofu doesn’t taste like much on it’s own but it absorbs other flavors beautifully.  If you make some kind of delicious marinade or sauce, it will taste like your delicious marinade or sauce.  And mushy?  It doesn’t have to be so!  If you buy extra firm (sometimes called super firm), the texture thing goes out the window.

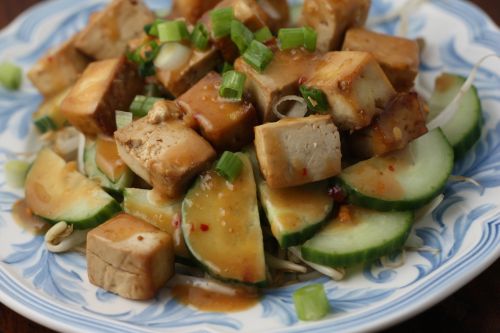
This salad is a new favorite of mine.  First you marinate some extra firm tofu and then roast it at relatively high heat which firms it up even more.  A bed of bean sprouts are laid on a plate, followed by thin slices of cucumber, the tofu, and an amazing peanut sauce is drizzled over the top.  It is a wonderful salad to serve with a light Asian inspired meal.  Of course, the salad is infinitely adaptable – cabbage, steamed broccoli, bok choy, even asparagus would be lovely here.  Next time I make it, I am going to double the tofu so I have some extra to snack on.  Yes, snacking on tofu.  Try it!

img_2293

One Year Ago:  Fear of Filo

Indonesian Tofu, Bean Sprout, and Cucumber Salad with Spicy Peanut Sauce
Adapted from Vegetarian Classics
Serves 4

1 recipe roasted tofu (recipe follows)

Peanut Sauce:
1/4 cup natural-style peanut butter
2 tbsp. tamari soy sauce
1 tbsp. lemon or lime juice
2 tbsp. firmly packed light brown sugar
1 garlic clove, minced
1/4 tsp. crushed red pepper flakes
3 tbsp. water

The Salad:
2 cups mung bean sprouts
1 small English cucumber, sliced 1/4 inch thick
1 scallion, very thinly sliced

1.  Chill the tofu thoroughly.

2.  To make the sauce: combine all the sauce ingredients in a small bowl and beat vigourously with a fork or small whisk until very smooth.

3.  To assemble the salad: spread 1/4 of the bean sprouts on each of 4 salald plates.  Layer on 1/4 of the cucumber, followed by 1/4 of the tofu.  Drizzle the sauce over each portion and garnish with the scallion.  (DT: I added another tablespoon or so of water to the dressing to thin it out a bit.)

Roasted Tofu

1 pound extra-firm tofu
1 1/2 tbsp. tamari soy sauce
1 tbsp. Asian sesame oil
1 tbsp. dry sherry

1.  Slice the tofu into 1/2-inch-thick slices.  Place them on a clean cotton towel or on paper towels.  use another towel or more paper towels to pat the tofu very dry.  Cut into 3/4 inch cubes.

2.  Combine the soy sauce, sesame oil, and sherry in a large bowl.  Add the tofu and use a rubber spatula to gently toss it with the marinade.  Let marinate at least 30 minutes, or cover and chill up to 24 hours.

3.  Preheat the oven to 450 degrees.

4.  Place the tofu and its marinade in a single layer in a large shallow baking dish.  Bake 30-35 minutes, or until golden all over and the marinade is absorbed.  Shake the dish after 15 minutes to prevent the tofu from sticking.  Can be served warm, room temperature, or cold.


Crystallized Ginger Ice Cream

May 19, 2009

img_2283

When Randy and I got married, I didn’t do much of a gift registry.  We were in our early 30’s and had both been married before.  We had all the sheets and towels and I had a KitchenAid mixer and a food processor.  We have plates we liked and more kitchen equipment than we had room for.  Of course, there were a few things we really wanted so those items went on our registry list.  One item was an ice cream maker.

My brother and his lovely wife bought us the ice cream maker, along with the cute bowls you see in the above picture.  Soon after we got married, we moved in to a new house.  The ice cream maker got put in a box that somehow got hidden in the basement.  Then it put in another box that got put in storage while we lived in London.  Then that same box came back to our basement and remained unopened until we moved to our current house, a little over 2 years ago.

This is the long way of telling you that, in spite of the fact that I make a lot of desserts, I have only made ice cream 3 times in my life.  I feel like there is dessert mentor somewhere to whom I owe an apology.  If you read food blogs, you have probably read in multiple places how easy and amazing it is to make your own.  Listen to those people and listen to me.  It’s easy and it’s amazing.  Ice cream makers are a relatively inexpensive piece of kitchen equipment, especially for the incredible results they give.

I made this ice cream somewhat on a whim.  For dessert last night, I planned on serving the Peanut Butter Cup Brownies that I had in the freezer, but had a hankering for something else too.  I decided to make ice cream, but didn’t want to spend any more time than necessary on it.  Caramel flavors were calling out to me, but I didn’t even want to make a caramel.  I settled on this incredible ginger flavor and am so glad I did.  Randy loves ginger and I thought it was time to reward him for all the chocolate that has been around here lately.  Poor guy.  He’s been a trooper.

Crystallized Ginger Ice Cream
Adapted from Ice Creams and Sorbets
Makes approximately 1 quart

2 cups half-and-half
1/4 cup minced peeled fresh ginger
4 large egg yolks
2/3 cup sugar
1 cup heavy (whipping) cream
1 tsp. vanilla
1/3 cup chopped crystallized ginger

Prepare a large bowl of ice water.

In the top of a double boiler (or in a heatproof bowl set over a pan of water), heat the half-and-half and fresh ginger over simmering water until steaming.  Remove from the heat and steep for 15 minutes.  In a bowl, whisk the egg yolks until blended, then whisk in the sugar.  Whisk in about half of the hot half-and-half and pour the yolk mixture into the pan of half-and-half.  Stir and cook over simmering water until the custard coats the back of a spoon ,about 10 minutes.  Immediately place the custard pan (or bowl) in the ice water bath and stir the custard occasionally until it cools to room temperature.  Strain the custard into a container and discard the ginger.  Stir in the cream and vanilla, cover and refrigerate until thoroughly chilled, about 3 hours.  (DT: Mine was chilled in one hour.)

Freeze in an ice cream maker according to manufacturer’s instructions.  When the ice cream is almost frozen, add the crystallized ginger and churn until blended in, about 15 seconds more.  Transfer to a container, cover, and freeze until firm, about 2 hours.


Poached Eggs in London

May 18, 2009

img_2272

The first time I ever had a poached egg was in London.  We lived there from July of ’03 to July of ’04 and before we moved over, his company sent us on a househunting trip.  (And in typical Randy fashion, he finagled a side trip to Dusseldorf.)  We went around London with three different real estate agents trying to figure out if there was a decent place to live in a decent neighborhood, that was even marginally in our budget.

Over the course of the frantic three days that we were being driven all over town, here is what we saw in a nutshell.

1)  Horrible places in good neighborhoods.
2)  Basement flats with almost no daylight whatsoever.
3)  Decent places with awful furniture.
4)  Kind of nice places that were way beyond our budget.

It was, to say the least, a little discouraging.  We had just bought a new-to-us house in Seattle which I loved.  Living somewhere awful, even if it was in London, seemed very depressing to me.

As we inched our budget upward, we started to see places that were slightly less awful.  A few I could even imagine myself living in.  And then we found our flat.  It was in Kensington on a dead end street (dead end street = less street traffic = quieter).  The lovely street housed the Estonian and Fijian embassies.  Up and across the street was the glorious Hyde Park.  We could walk in one direction to Notting Hill and in the other to the Victoria and Albert Museum.  The building was Virginia Woolf’s childhood home – our flat was the floor which had been her bedroom.  The flat was nicely furnished with charming toile wallpaper and it was filled with light.  It was expensive.  It was perfect.

After seeing it, Randy and I had lunch at a little place on the Kensington High Street.  We talked about whether we could afford it – whether it was worth it to spend so much on rent.  I had my heart totally set on it and he knew it.  We ordered our lunch and when my salad came, I was dismayed to see what I thought was a giant hunk of cheese among the arugula (or rocket as they say there) leaves.  But as I cut into it, I realized that it must be a poached egg – the likes of which I had never seen much less tasted.

When I was a kid, my mom used to make us fried eggs over easy.  I never liked them but, being the well-behaved child that I was, I ate them.  One day she made scrambled eggs instead and I liked those so much better that I never made or ordered eggs any other way.  I knew you could poach an egg – but why?  I never thought of eggs as anything other than breakfast food.  My poached egg revelation was not so very long ago and I was, at that time, a very good cook.  I just had narrow views about some things.  London helped with that.

img_2260

For breakfast, I still love my eggs scrambled (the exception would be a toasted English muffin, a few leaves of spinach, a thin slice of tomato, and a poached egg).  But you will often find me topping things with poached eggs for dinner.  So much so that a year and a half ago, I bought an egg poacher.  I find the put-them-in-simmering-water-with-a-bit-of-vinegar-and-swirl method a  bit stressful.  The egg poacher takes the stress out and gives you practically perfect looking eggs every time.

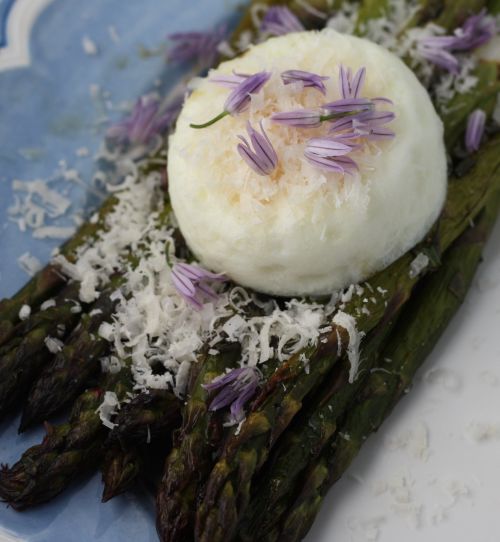
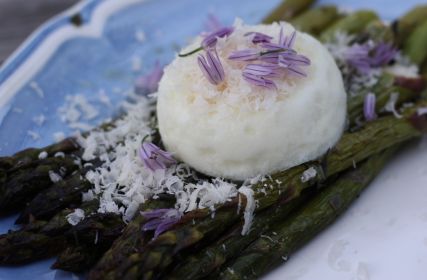
I made this dish for dinner last week with a bowl of tomato soup and a cheese panini.  I roasted the asparagus at high heat, drizzled it with tarragon and lemon juice right after taking it out of the oven, and topped it with the egg, followed by a bit of Parmesan cheese.  I’ve been craving it ever since.  Last night we had a friend of ours over for dinner.  Randy picked up some salmon for the two of them and I made that amazing flatbread.  I wanted a green salad but I also wanted this asparagus dish.  So I made both.

Of course, we took the flat in London.  Randy got his company to help us out a bit with the rent.  And then he got them to help out again when the dollar started to really tank against the pound.  We spent twice as much on rent on an 800 square foot flat as we did on our mortgage for our 2,000 square foot house.  But I loved living there.  It felt like home in a giant city where we knew virtually no one.  It was worth it.

One year ago:  Brown Rice Revisited

Roasted Asparagus with a Poached Egg

Dana Treat Original
Serves 2

When roasting asparagus, I always get the thicker spears.  If yours are thinner, they will not need as much time in the oven.  Below I link to egg poaching instructions from Gourmet which are the ones I used before the egg poacher entered my life.  If you want to make this dish more of a main course, serve two eggs per person and include some grilled crusty bread.

1 large bunch of asparagus
Olive oil
Kosher salt
Freshly ground pepper
Juice of 1/2 a lemon
1 tbsp. chopped fresh tarragon
1/4 cup freshly grated Parmesan cheese
2 poached eggs, see here for instructions, or check this out for an easy way to do it in plastic bag
Chive blossoms, for garnish (optional)

Preheat the oven to 425 degrees.  Meanwhile, snap the ends off the asparagus and give them a good wash.  Lay them out on a baking sheet and drizzle with olive oil.  Sprinkle with salt and pepper and mix to coat the asparagus evenly.  Roast in the oven until a fork comes out easily of the thickest spear and they are starting to brown, 15-20 minutes.  Shake once or twice during roasting process.  Remove from the oven and immediately toss with the lemon juice and the tarragon.  Allow to cool to room temperature.

Divide the asparagus between two plates.  Top with a poached egg and a shower of Parmesan cheese.  Garnish with chive blossoms, if desired.


Raspberry Almond Bars and Dave Matthews

May 15, 2009

img_21711

And now for a story that has nothing to do with these Raspberry Almond Bars.

My 4.5 year old is a very friendly and affectionate kid.  He almost always has a smile on his face and he just loves people.  He gives hugs to random people all over town but he is not always an equal opportunity hugger.  He especially loves women, the prettier the better.  He does hug men, just not as often.

Yesterday, we went to the park to meet up with my friend Brooke and her kids.  We were running a little late because the boys had extra long naps.  As I was herding them into the park (herding them is something I do often), I noticed she was talking to a guy.  As we got closer, I realized that the guy was Dave Matthews.

Now, Dave Matthews lives in our neighborhood.  My husband has seen him recently at our local vegan doughnut shop (don’t knock it ’til you’ve tried it) and at this same park.  I have seen him around and also met him on various occasions back when I worked in radio.  I used to be  a *big* fan and can now just call myself a fan.  I have met a lot of famous people, mostly musicians, and even so – I get totally star struck.  My heart started beating faster and before I could even think to myself just play it cool Dana, my son ran right up to him and did what every mom in the park at that moment wanted to do.  He threw his arms around Dave.

The best part about the whole thing is that Dave was lovely about it.  He hugged him back and said something along the lines of “thanks for a nice greeting”.  I said something along the lines of “the kid has good taste”.  I wanted to thrust my business card at him and tell him to call me if they wanted a personal chef, but I controlled myself.  We both went to watch our kids get dirty in the sandbox and I listened to his voice as he talked on his cell phone.  I love that voice.

And there you have it.  My story that has nothing whatsoever to do with raspberry bars.  Sometimes a mother just has to brag.

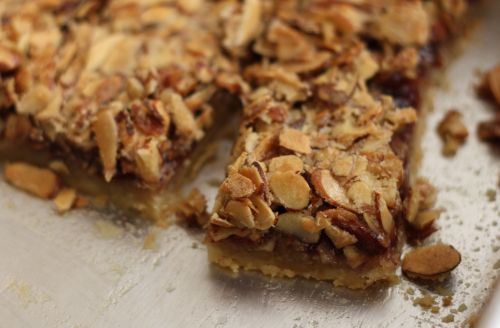
I made these bars last week for the Motherasana lunch I catered.  I wanted to have another dessert alternative to the chocolate chip cookies and these bars seemed to fit the bill.  They are really more an almond bar than a raspberry bar.  The raspberry comes from jam and there isn’t much of it spread over the shortbread base.  There are 3 cups of almonds in the topping, plus a whopping teaspoon of almond extract (that is a lot for almond extract), so if you don’t love almonds – don’t make these bars.  People seemed to like them, but not as much as the cookies.


Raspberry Almond Bars
Adapted from Food and Wine
Makes 2-3 dozen bars

The original recipe calls for one stick of butter and one stick of margarine.  I couldn’t justify buying margarine for the sole purpose of this recipe (I don’t use it for anything else), so I just used 2 sticks of butter.  The crust may have been less crisp, but it was delightfully tasty.

2 sticks (8 ounces)  unsalted butter, softened, plus 3 tbsp. melted
1 1/2 cups flour
1 cup confectioner’s sugar
3/4 cup seedless raspberry jam
3 cups sliced natural almonds (about 3/4 pound)
1/2 cup light brown sugar
1/2 cup granulated sugar
2 large eggs, lightly beaten
1 tsp. vanilla extract
1 tsp. almond extract

1.  Preheat the oven to 350 degrees.  Lightly butter a 9-by-13-inch baking pan.  In a standing mixer, beat the softened butter until smooth.  Add the flour and confectioner’s sugar and beat on low speed until combined.  Pat the dough evenly in the bottom of the pan and bake in the middle of the oven for about 30 minutes, or until golden.  Let cool slightly, the spread with the jam.  Leave the oven on.

2.  Toast the almonds for 7-8 minutes, or until golden and fragrant.  Let cool.

3.  In a medium bowl, whisk the brown and granulated sugars with the melted butter, eggs and vanilla and almond extracts until smooth;  fold in the almonds.  Spread the topping over the jam in an even layer.  Bake for about 25 minutes, or until set and golden.  Let cool completely in the pan.  Using a sharp knife, cut into 24 or 36 bars depending on your size preference.


« Older Posts Newer Posts »